
AI MCP server
Model Context Protocol (MCP) is an open-source standard that allows large language models (LLMs) to securely interact with external applications and access their data. In Odoo AI, users can connect an external AI agent directly to their Odoo database through an Odoo MCP server in order to read or modify the database using their own local AI workflows.
The following documentation provides an overview of Odoo MCP servers, how to connect AI agents to them, and how to read or write data through the server.
Note
This documentation uses the following terms with some flexibility and may differ from their proper technical usage, either in Odoo or externally:
Client: Refers broadly to the AI application with which the user interacts. For example, the LLM prompted by the user is also referred to as the client.
MCP workflow
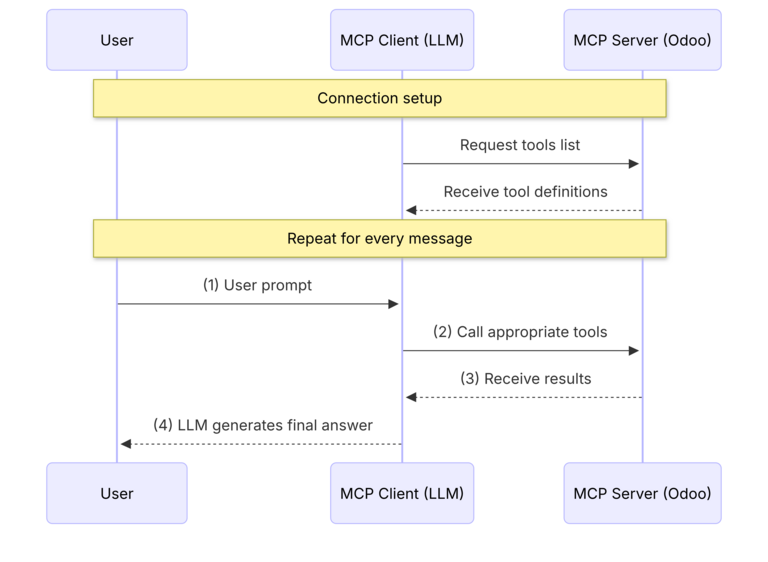
In the MCP workflow, an Odoo database acts as a remote MCP server that communicates with the MCP client (the user’s external AI agent) to execute tools such as reading data or editing records in the database. This process occurs internally and is invisible to the user, who interacts with the MCP client only by prompting it with specific tasks.
The following sequence outlines the MCP workflow in Odoo:
The user configures the client with server details and an authentication key. Once connected, the client automatically makes an initial request to the server for any available AI tools (or Server Actions) exposed to it in the database. If successful, the client caches the tools for the remainder of the session.
The user prompts the client in plain language. A list of example prompts is provided in this documentation.
The client requests that the server invoke the correct tools.
After executing the tool, the server returns the results to the client.
The client responds to the user’s prompt in plain language.
See also
See the AI server actions documentation for more information about tools in Odoo.
Configuration
The configuration process includes the following steps:
Set up authentication via API key.
Configure the MCP server details and connect via the client.
Expose server actions to the client from Odoo.
Important
Before configuring the AI client settings in step two, ensure that the following are installed:
An MCP-compatible AI agent (e.g., Claude Code, Antigravity, Codex)
Node.js (required to run the
npxcommand)
Set up authentication
To connect the MCP client to the server, users must first set up authentication to the server via a static API key. Every time the MCP client sends a request to the server, it uses the key to authenticate the user’s identity and permissions in the Odoo database.
To generate the API key, click the user icon in the upper corner, then select My Preferences.

On the Change my Preferences pop-up window, open the Security tab. Then, click Add API Key. On the Access Control pop-up window, confirm the database password.
After confirming the password, configure the API key in the New API Key pop-up window.
To start, for Key Name, enter a brief name or descriptor for the key.
Next, for Scope, select the MCP scope from the available options.
For Expires, select the period of time for which this key should be valid (e.g., 1 Month).
Finally, click Create key to generate the key.
Important
Be sure to save the key elsewhere. Once generated, the key is only shown to the user once and remains hidden thereafter.

Configure server settings
After generating an authentication key in Odoo, the user must properly configure their client with the following:
The API key generated in the previous section
The server URL, or endpoint, to which the client connects. This URL is formed by taking the user’s database URL and concatenating
/mcp(e.g.,https://example.odoo.com/mcp).
Important
Be sure to replace the following placeholders with the appropriate values:
server_name: Enter a custom name to identify the MCP server.database_url: Enter the URL of the Odoo database.API_KEY: Enter the API key generated in the previous section.
Connecting to Odoo MCP with Claude can be done either via Claude Desktop or Claude Code CLI.
Via Claude Desktop
Open Claude Desktop. Navigate to . The Local MCP Servers section lists all configured MCP servers along with their statuses.
To add a new server, click Edit Config. In the file explorer, open
claude_desktop_config.json and paste the following JSON snippet between the outermost
ellipses:
{
  ...
  "mcpServers": {
    "<server_name>": {
      "command": "npx",
      "args": [
        "-y",
        "mcp-remote",
        "<database_url>/mcp",
        "--header",
        "Authorization: Bearer <API_KEY>"
      ]
    }
  },
  ...
}
After saving the configuration file, the newly added server should appear in the Local MCP Servers section along with its connection status.
Via Claude Code CLI
In the terminal, paste the following command to add the MCP server:
claude mcp add --transport stdio <server_name> -- npx -y mcp-remote <database_url>/mcp --header "Authorization: Bearer <API_KEY>"
Note
To add the server to the system’s global (user-wide) configuration (i.e., the server is
accessible for all projects), include the --scope user flag in the command above.
Finally, run claude mcp list to check the connection status of the newly added server.
Connecting to Odoo MCP with Google Antigravity can be done through Antigravity 2.0 or Antigravity CLI.
Configure via Antigravity 2.0
Open Antigravity 2.0. Navigate to . The Installed MCP Servers section lists all configured MCP servers along with their statuses.
To add a new server, click Open MCP Config. In the file explorer, open
mcp_config.json and paste the following JSON snippet between the outermost ellipses:
{
  ...
  "mcpServers": {
    "<server_name>": {
      "command": "npx",
      "args": [
        "-y",
        "mcp-remote",
        "<database_url>/mcp",
        "--header",
        "Authorization: Bearer <API_KEY>"
      ]
    }
  },
  ...
}
After saving the configuration file, the newly added server should appear in the Installed MCP Servers section along with its connection status.
Connect via Antigravity CLI
Before connecting using Antigravity CLI, configure the server in Antigravity 2.0.
To check the connection status, run agy in the terminal to start Antigravity. Then, run
/mcp. The newly added server should appear along with its connection status.
Configuring an Odoo MCP server in Codex can be done either by directly editing the configuration file or via the Codex CLI.
Via config file
Open the config.toml file, located in the root directory (~/.codex/config.toml). Then,
paste the following into the configuration file:
[mcp_servers.<server_name>]
command = "npx"
args = ["-y", "mcp-remote", "<database_url>/mcp", "--header", "Authorization: Bearer <API_KEY>"]
Note
While the config.toml is located globally in the system’s root directory, it can also be
created for trusted, local projects by configuring a .codex/config.toml file in the
directory.
Via Codex CLI
In the terminal, paste the following command to add the MCP server:
codex mcp add <server_name> -- npx -y mcp-remote <database_url>/mcp --header "Authorization: Bearer <API_KEY>"
To check the connection status, run codex in the terminal to start Codex. Then, run
/mcp. The newly added server should appear.
See also
See the following documentation for more information about configuring clients:
Expose tools to client
After connecting to the server, the MCP client reads and writes data to the Odoo database by invoking the appropriate tool according to the user’s query.
These tools are accessed by turning on developer mode, then navigating to to open the dashboard of server actions, or tools.
By default, an Odoo database exposes the following tools to the client:
AI Tool: Get FieldsAI Tool: Get ModelsAI Tool: MCP Retrieve initial contextAI Tool: SearchAI Tool: Read group
The remaining tools are hidden from the client and must be manually exposed to be invoked.
To expose a tool, click on the tool entry. In the Usage tab of the server action form, select the checkbox next to Available in MCP. Optionally, select the checkbox next to Readonly Tool to mark that the tool does not write or modify existing data and can be automatically invoked without user approval.
Note
Enabling the Readonly Tool checkbox does not “hide” the tool from the AI client. It only advises the client that the tool is safe to invoke without explicit user approval.
See also
See the available tools page for a full list of available tools in the database.
Example use cases
An Odoo MCP server can be used to complete the following use cases, including example user prompts.
Data analysis and reporting
Use case |
Example prompt |
|---|---|
Sales pipeline review |
“Show me my open opportunities grouped by stage, then chart the pipeline value by salesperson.” |
Manufacturing/inventory planning |
“Which products on my Master Production Schedule have no forecast data, and what’s my total forecasted demand this month?” |
Historical reporting |
“How much did we invoice last quarter compared to this quarter?” |
Custom styling
Use case |
Example prompt |
|---|---|
Website content editing |
“Add a banner to my homepage announcing our summer sale, using a stock photo of a beach.” |
Custom site styling |
“Round the corners on all my product images site-wide.” |
AI image generation |
“Generate an image of a mountain at dusk and put it in the hero section.” |
See also