Live Chat
Odoo Live Chat allows users to communicate with website visitors in real-time. With Live Chat, leads can be qualified for their sales potential, support questions can be answered in real time, and issues can be directed to the appropriate team for further investigation or follow up. Live Chat also provides the opportunity for instant feedback from customers.
Enable Live Chat
The Live Chat application can be installed multiple ways:
Go to the , search
Live Chat, and click Install.Go to the list view, select a team, and on the team’s settings page, click the checkbox next to Live Chat, under the Channels section.
In the app, go to , scroll to the Email & Marketing section, check the box next to Livechat, and click Save.

Note
After the Live Chat application is installed, a live chat Channel is created, by default.
Create live chat channels
To create a new live chat Channel, go to the . Then, click New to open a blank channel detail form. Enter the name of the new channel in the Channel Name field.
To configure the remaining tabs on the channel detail form (Operators, Options, Channel Rules, and Widget), follow the steps below.

Tip
The channel detail form for any channel can be accessed by navigating back to the Website Live Chat Channels dashboard, via the breadcrumbs. Find the Kanban card for the appropriate live chat channel, hover over it, and then click on the (vertical ellipsis) icon to open the drop-down menu. Click Configure Channel to open the channel detail form.
Operators tab
Operators are the users who act as agents and respond to live chat requests from customers. When a user is added as an operator in a live chat channel, they can receive chats from website visitors wherever they are in the database. Chat windows open in the bottom-right corner of the screen.

On the channel detail form, click the Operators tab. The user who originally created the live chat channel has been added as an operator by default.
Note
Current operators can be edited, or removed, by clicking on their respective boxes in the Operators tab, which reveals a separate Open: Operators pop-up. In that pop-up, adjust any information, as needed. Then, click Save, or click Remove to remove that operator from the channel.
Click Add to reveal an Add: Operators pop-up window.
In the pop-up window, scroll to find the desired users, or enter their name in the search bar. Then, tick the checkbox next to the users to be added, and click Select.
New operators can be created and added to the list directly from this pop-up window, as well, by clicking New, and filling out the Create Operators form. When the form is complete, click Save & Close, or Save & New for multiple record creations.
Danger
Creating a new user can impact the status of an Odoo subscription, as the total number of users in a database counts towards the billing rate. Proceed with caution before creating a new user. If a user already exists, adding them as an operator will not alter the subscription or billing rate for a database.
Options tab
The Options tab on the live chat channel detail form contains the visual and text settings for the live chat window.
Livechat button
The Livechat Button is the icon that appears in the bottom-right corner of the website.
Change the text in the Notification text field to update the greeting displayed in the text bubble when the live chat button appears on the website.
The Livechat Button Color alters the color of the live chat button as it appears on the website. To change the color, click on a color bubble to open the color selection window, then click and drag the circle along the color gradient. Click out of the selection window once complete. Click the (refresh) icon to the right of the color bubbles to reset the colors to the default selection.
Tip
Color selection, for the button or header, can be made manually using a slider or through RGB, HSL, or HEX color code entries from the pop-up color selection window that appears when either of the color bubbles are clicked. Different options are available, depending on the operating system.
Example
With the following settings, the live chat button appears on the website as shown:
Notification text: “Have a Question? Chat with us.”
Livechat Button Color: set to purple

Livechat window
The Livechat Window is the space where the live chat conversation with website visitors takes place.
Edit the Welcome Message to change the message a visitor sees when they open a new chat session. This message appears as though it is sent by a live chat operator, and acts as both a greeting and an invitation to continue the conversation.
Edit the Chat Input Placeholder to alter the text that appears in the box where visitors type their replies. This message prompts the visitor to initiate the chat.
The Channel Header is the colored bar at the top of the chat window. The Channel Header Color can be changed following the same steps as the Livechat button.

The live chat window with a purple channel header and placeholder text that reads, “Say Something…”
Channel Rules tab
To configure which website user actions open the live chat window, go to the Channel Rules tab on the live chat channel detail form.
To create a new channel rule, click Add a line. This opens the Create Rules pop-up window.

Create new rules
Fill out the fields on the Create Rules pop-up window as instructed below, then click Save & Close.
The Livechat Button is the icon that appears in the bottom-right corner of the website. Select from one of the following display options:
Show: displays the chat button on the page.
Show with notification: displays the chat button, as well as a floating text bubble next to the button.
Open automatically: displays the button, and automatically opens the chat window after a specified amount of time (designated in the Open automatically timer field, that appears when this option is selected).
Hide: hides the chat button on the page.
To include a Chatbot on this channel, select it from the drop-down menu. If the chatbot should only be active when no operators are active, check the box labeled Enabled only if no operator.
The Enabled only if no operator field is only visible if a chatbot is selected in the Chatbot field.
The URL Regex specifies the web pages where this rule should be applied. In the URL Regex field, input the relative URL of the page where the chat button should appear.
For example, to apply the rule to the URL, https://mydatabse.odoo.com/shop, enter /shop to
the URL Regex field.
To apply the rule to all pages on the database, enter / in the URL Regex
field.
This field designates the amount of time (in seconds) a page should be open before the chat window opens. This field only appears if the Live Chat Button for this rule is set to Open automatically.
If this channel should only be available to site visitors in specific countries, add them to the Country field. If this field is left blank, the channel is available to all site visitors, regardless of location.
Note
In order to track the geographical location of visitors, GeoIP must be installed on the database. While this feature is installed by default on Odoo Online databases, On-Premise databases require additional setup steps.
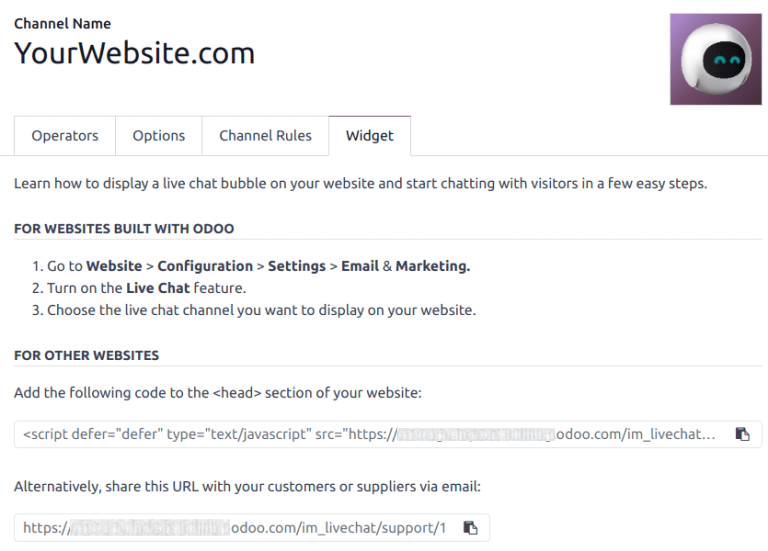
Widget tab
The Widget tab on the live chat channel detail form provides an embeddable code snippet for external, non-Odoo websites. This code can be added to a website to provide access to a live chat window.
Tip
The live chat widget can be added to websites created through Odoo by navigating to . Then, scroll to the section. In the Channel field, select the channel to add to the site. Click Save to apply.
To add the widget to a website created on a third-party platform, click the first
(copy) icon on the Widget tab, and paste the code into
the <head> tag on the site.
Likewise, to send a live chat session to a customer, click the second (copy) icon on the Widget tab. This link can be sent directly to a customer. When they click the link, they are redirected to a new chat window.