
Salaries
In Odoo, salaries are calculated and determined by six factors: salary structure types, salary structures, rules, rule parameters, rule categories, and salary input types. Together, these determine how each employee’s pay is calculated.
Each structure type contains one or more structures within it. Each structure contains a set of rules, and every rule uses parameters and categories to define how specific amounts are calculated. Additional salary inputs, such as bonuses or deductions, can also be included to adjust the final salary.
When payslips are calculated, Odoo calculates the employee’s worked time from their work entries, then applies the relevant structure, rules, and parameters from the employee’s assigned structure type to determine their total pay.
Structure types
In Odoo, a structure type groups related salary structures. When a contract specifies a structure type, only the structures within that type are used to calculate the employee’s pay. Each structure type houses individual structures within them, each containing a set of rules for processing a timesheet entry.
Structure types define key aspects of payroll configuration, including how often employees are paid, their working hours, the default salary structure, and whether wages are fixed (salary-based) or variable (hourly-based).
Example
A structure type called Employee contains two different structures within it: a Regular Pay
structure which includes all the separate rules for processing regular pay, and an End of Year
Bonus structure, which includes the rules only for the end of year bonus. Both belong to the
same Employee structure type.
View existing structure types by navigating to .
Two default structure types are preconfigured in Odoo: Employee and Worker.
Typically, Employee is used for salaried employees, which is why the Wage Type is set to Fixed Wage. Worker is typically used for employees paid by the hour, so the wage type is set to Hourly Wage.
Note
If using a country-specific payroll localization, it is recommended to use the structure in the corresponding country localization document.

New structure type
If the default structure types do not meet the company’s needs, go to and click New to create a custom structure type.
Warning
When creating a new salary structure type, ensure all local and national laws are accounted for. Confirm with the accounting department when configuring payroll structures, to ensure all requirements are met.
Proceed to enter the following information in the fields:
Structure Type: Enter the name for the new structure type, such as
EmployeeorWorker.Country: Select the country that the new structure type applies to from the drop-down menu.
Wage Type: Select the wage type for the structure:
Fixed Wage: For salaried employees who receive the same wage every pay period.
Hourly Wage: For employees paid based on hours worked during a pay period.
Scheduled Pay: Select the typical pay schedule for the new structure type using the drop-down menu. This indicates how often this specific type of structure is paid out.
Working Hours: Select the working hours for the new structure type using the drop-down menu. All available working hours for the currently selected company appear in the drop-down menu. The default working hours are the Standard 40 hours/week option. If the needed working hours do not appear in the list, a new set of working hours can be created.
Pay Structure: Select the pay structure that falls within the new structure type using the drop-down menu. This is used as the default option when generating payslips.
Work Entry Type: Select the work entry type used to create all work entries for the employee.

New working hours
To make new working hours, type the name for the new working hours in the Working Hours field on the new structure type form, then click Create and edit. A Create Working Hours pop-up window loads. The form has two sections: a general information section, and a Working Hours tab listing all the individual working hours by day and time. When the form is completed, click Save.
Name: Type in the name for the new working hours. This should be descriptive and clear to understand, such as
Standard 20 Hours/Week.Schedule Type: Select whether the hours are Flexible or Fully Fixed by clicking the corresponding radio button. Selecting Flexible hides the Working Hours tab and some other fields in the general information section.
Define Amount of Hours per day: Enable this option to base the schedule on a set amount of expected hours by day, instead of set start and end times for each day. When this option is modified, a Confirmation pop-up window appears. Click Confirm on the pop-up to make the change.
Full Time Equivalent: The number of hours per week an employee needs to work to be considered a full-time employee. Typically, this is approximately 40 hours, and this number affects what types of benefits an employee can receive, based on their employment status (full-time vs. part-time). This field is not able to be modified.
Work Time Rate: This percentage is auto-generated based on the configured times in the Working Hours tab, compared to the Full Time Equivalent. This number should be between
0.00%and100%, so if the percentage is above100%, it is an indication that the working times may need adjustment.Company: Select the company that can use the new default working hours using the drop-down menu. Leave this field blank if the hours are available for all companies.
Timezone: Select the time zone to be used for the new working hours using the drop-down menu.
2 Week’s Calendar: Enable this checkbox to switch from a one-week calendar to a two-week calendar. When this option is modified, a Confirmation pop-up window appears. Click Switch on the pop-up to make the change. When enabled, the presented tabs change from a single Working Hours tab to two tabs: Week 1 Working Hours and Week 2 Working Hours.
Important
Switching the calendar between either method removes all current work entries.
Working Hours tab: This tab is where each day’s specific working hours are listed, including breaks. When a new working schedule is created, the Working Hours tab is pre-populated with a default 40-hour week, with each day divided into three timed sections.
Each day includes a morning shift (8:00-12:00), a lunch break (12:00-13:00), and an afternoon shift (13:00-17:00), configured using a 24-hour time format.
The average daily working hours are automatically calculated based on the schedule and appear in the Avg field, along with the Total hours for the week.
To adjust any of these entries, click the desired field and modify the information using the drop-down menus or type the information in directly.
Ensure the Work Entry Type field is configured for each line. This ensures the Payroll app properly calculates all work entries.
Note
Working hours are company-specific, and cannot be shared between companies.
Tip
If the 2 Week’s Calendar option is enabled, ensure the various working hours for both tabs (Week 1 Working Hours and Week 2 Working Hours) are correctly configured.

Structures
Salary structures are the different situations in which an employee could be paid within a specific structure, and are specifically defined by various rules.
The number of structures a company needs for each structure type depends on how many different ways
employees are paid, and how their pay is calculated. A common example of an additional structure is
a Bonus.
To view all the various structures for each structure type, go to .
Each structure type lists the various structures associated with it. Each structure contains a set of rules that define it.
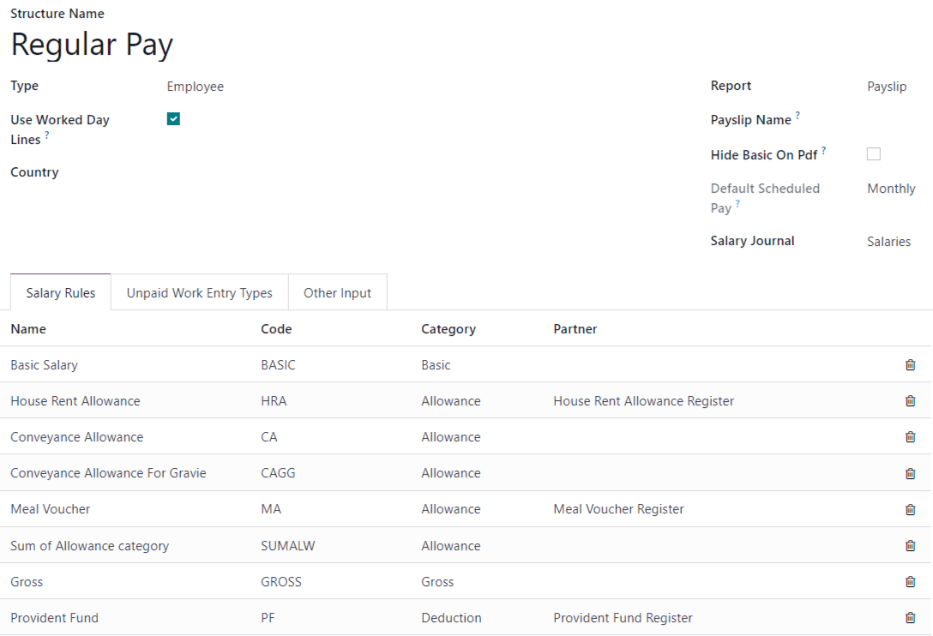
Odoo comes with two salary structures preconfigured: Regular Pay, housed within the Employee structure type, and Worker Pay, housed within the Worker salary structure type.
Click on a structure to view its Salary Rules. These rules define how the payslip will be computed for the employee.
Note
After installing a payroll localization, relevant structures are installed and appear in this list.
Salary input types
When creating payslips, it is sometimes necessary to add other entries for specific circumstances, like tips, commissions, expenses, or deductions. These other inputs can be found by navigating to . All universal and localization-specific salary input types appear in the list.
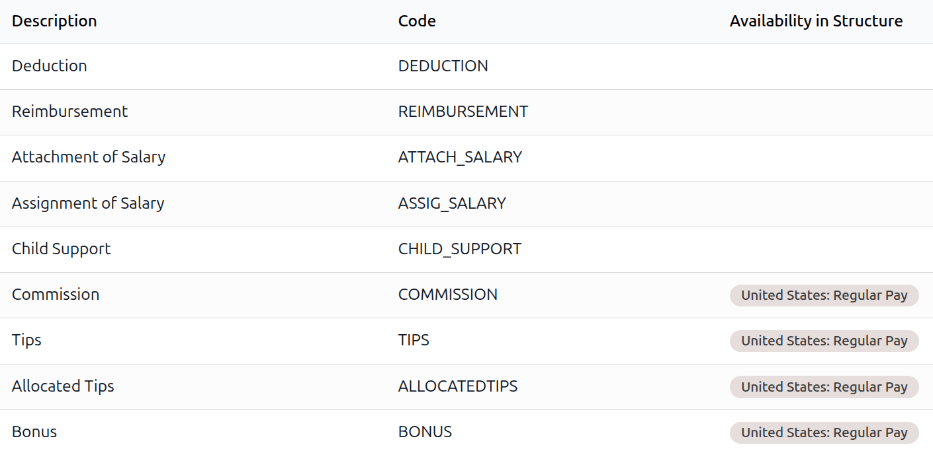
If a new input type is needed that does not appear on the list, click the New button to create a new salary input type. Enter the Description, the Code, and select which structure it applies to in the Availability in Structure field.
Enable the Available in adjustments checkbox if the input should be a salary adjustment.
Important
The Code is used in the salary rules to compute payslips. If the Availability in Structure field is left blank, it indicates that the new input type is available for all payslips and is not exclusive to a specific structure.