
Add applicants
Once an applicant submits an application, either using the online application, or emailing a job position alias, an applicant card is automatically created in the Recruitment app.
However, in some instances, applicants may need to be created manually in the database. This could be necessary if, for example, a company accepts paper applications in the mail, or is meeting prospective applicants at an in-person job fair.
To view current applicants, navigate to the app, then click the desired job position card. Doing so reveals the Applications page, which displays all applicants for that specific role, in a default Kanban view, organized by stage.
Add applicants from a job position’s Applications page by using either the (quick add) button, or the New button.
Quick add
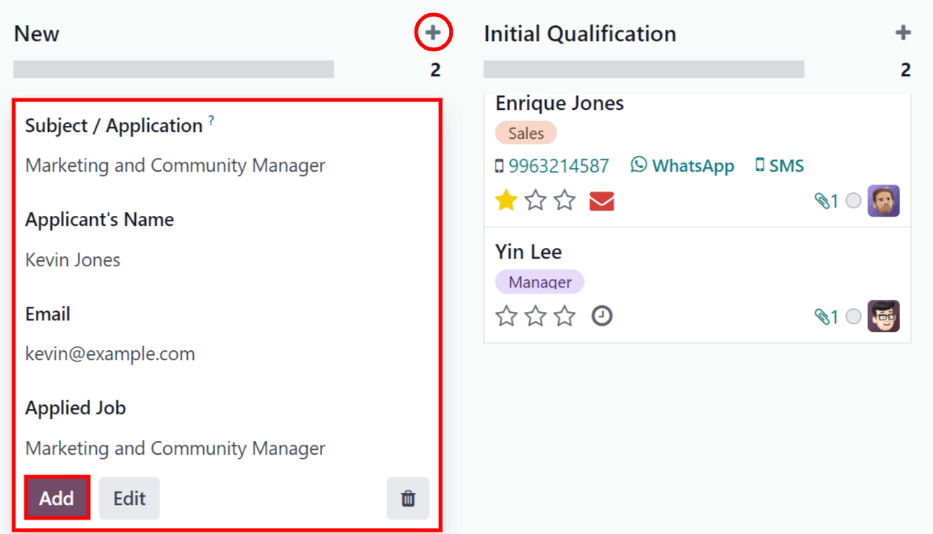
On the job position’s Applications page, click the (Quick add) button in the corner of the desired stage, and a new applicant card loads.
Enter the following information on the card:
Applicant’s Name: Enter the applicant’s name in this field. This is displayed as the card title in the Kanban view of the Applications page.
Job Position: The current job position populates this field. To change it, select a different job position from the drop-down menu. The newly-created card then appears on the Applications page for that selected job position.
After the information is entered, click Add. This adds the applicant card to the stage, and a new blank applicant card appears.
If preferred, after entering the Applicant’s Name in the Kanban card, click Edit, and a detailed applicant form loads. Enter the information on the new applicant form.
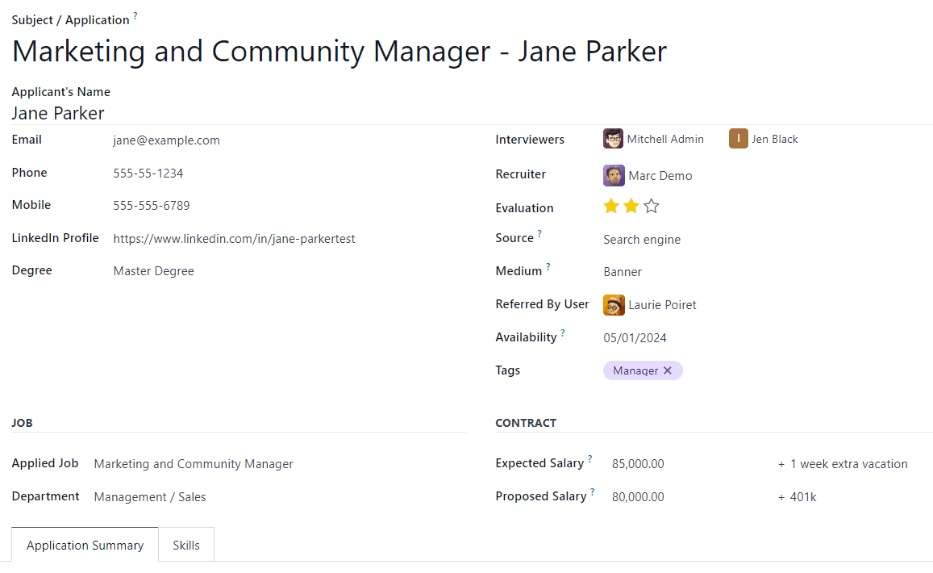
New applicant form
On the Applications page, click the New button in the corner, and a blank Applications form loads.
By default, the Job Position and Recruiter fields are populated according to the job position configurations. Additionally, the Department and Company fields in the Details tab may also be populated, if those details are configured on the job position.
Complete the fields in the following sections on the new applicant form.
Note
Depending on installed applications and configurations, some fields may not be displayed.
Applicant section
Applicant: Enter the applicant’s name. This field is displayed as the card title in the Kanban view of the Applications page. This is the only required field on the form.
Email: Enter the applicant’s email address.
Phone: Enter the applicant’s phone number.
LinkedIn Profile: Enter the web address for the applicant’s personal profile on LinkedIn.
Evaluation: Represents a rating for the applicant: one star ( ) is Good, two stars ( ) is Very Good, and three stars ( ) is Excellent.
Job Position: Select the job position the applicant is applying for. This field is populated by default but can be changed if necessary.
Recruiter: Select the user responsible for the entire recruitment process for the job position. This field is populated by default but can be changed if desired.
Interviewers: Using the drop-down menu, select the people to conduct the interviews. The selected people must have either recruiter or officer access rights configured for the Recruitment app to appear in the drop-down list.
Tags: Select as many tags as desired from the drop-down menu. To add a tag that does not exist, type in the tag name, then click Create “new tag” from the resulting drop-down menu.
Note tab
Enter any notes regarding the applicant in this tab. These notes are only visible internally to users who have the proper access rights.
Example
A recruiter met an applicant at a job fair and had a discussion regarding the job position as well as the applicant’s prior history. They also had a furniture assembly display, with different pieces to be assembled. This allowed the recruiters to view the applicant’s skills in real time. The recruiter uses the Note tab to enter the following information:
Met the applicant at a job fair. They have previously worked in furniture assembly for Furniture
R Us. They demonstrated their skills at our assembly display, and finished assembling a chair in
under 3 minutes - which was the fastest among all participants today.
Details tab
The Details tab houses various information regarding the applicant and the job position.
Applicant section
Enter the following information in the respective fields:
Degree: Select the applicant’s highest level of education from the drop-down menu. Options are: Graduate, Bachelor Degree, Master Degree, or Doctoral Degree.
Note
The Graduate option indicates the applicant graduated at the highest level of school before a Bachelor’s degree, such as a high school or secondary school diploma, depending on the country.
Availability: Select the available start date for the applicant. To select a date, click on the field to reveal a calendar. Navigate to the date the applicant can start, and click to select it. Leaving this field blank indicates the applicant can start immediately.
Job section
The following fields are preconfigured when creating a new applicant, as long as these fields are specified on the job position form. Editing the fields is possible, if desired.
Department: Select the job position’s department using the drop-down menu.
Company: Select the job position’s company using the drop-down menu. This field only appears in a multi-company database.
Salary package section
Configure both the expected and proposed salary and benefits in this section. Fill out the following fields:
Expected: Enter the applicant’s requested salary amount in this field. The number should be in a
XX,XXX.XXformat. The currency is determined by the localization setting for the company. If any benefits are requested by the applicant, enter them in the blank Other Benefits text field next to the Expected salary field. The benefits should be short and descriptive, such as4 Weeks VacationorDental Plan.Proposed: Enter the salary amount offered to the applicant in this field. The number should be in a
XX,XXX.XXformat. If any benefits are offered to the applicant, enter them in the Other Benefits text field next to the Proposed field. The benefits should be short and descriptive, such asUnlimited Sick TimeorHealth Insurance.
Sourcing section
This section houses the details regarding the way the applicant applied for the job position. This information is necessary for employee referrals, and allows for reporting on the channels with the highest applicant generation.
Referred By User: If referral points are to be earned for this job position in the Referrals application, select the user who referred the applicant from the drop-down menu. The Referrals application must be installed for this field to appear.
Source: Using the drop-down menu, select where the applicant learned about the job position. The following options come preconfigured in Odoo: Search engine, Lead Recall, Newsletter, Facebook, X, LinkedIn, Monster, Glassdoor, Craigslist, and Referral. To add a new Source, type in the source, then click Create “(new source)”.
Medium: Using the drop-down menu, specify how the job listing was found. The preconfigured options are: Banner, Direct, Email, Facebook, Google Adwords, LinkedIn, Phone, SMS, Television, Website, X, or [Push Notifications] (website name). To add a new Medium, type in the medium, then click Create “(new medium)”.
Campaign: Using the drop-down menu, select the campaign used for the job position.

Skills tab
The Skills tab houses all the applicant’s skills. As skills are added, Odoo compares the expected skills configured for the job position with the applicant’s skills.
Additionally, the Job Position Matching scale updates in real time, showing the percentage of the job skills the applicant has. This aids recruiters when assessing an applicant.
Note
The Job Position Matching scale displays the graphic in purple. If the applicant matches 100% of the required skills, the graphic appears green.
