
Avalara integration
Avalara’s AvaTax is a cloud-based tax software. Integrating AvaTax with Odoo provides real-time and region-specific sales tax calculations when users sell and invoice items in Odoo. AvaTax tax calculation is supported for customers in every United Nations chartered country, including for inter-border transactions.
Important
While the AvaTax calculation is supported for customers around the world, AvaTax is only available for integration with databases/companies whose fiscal country is set to the United States, Canada, or Brazil.
Whereas this page explains the process for companies in the United States and Canada, the process differs for companies in Brazil and is documented on the Brazilian localization page.
AvaTax takes into account location-based tax rates for each state, county, and city. It improves remittance accuracy by paying close attention to laws, rules, jurisdiction boundaries, and special circumstances (like tax holidays and product exemptions).
Important
AvaTax uses the company address by default. To use the warehouse address, enable Allow Ship Later in the POS app settings.
Excise tax is not supported. This includes tobacco/vape taxes, fuel taxes, and other specific industries.
See also
Module installation
Using AvaTax requires installing the AvaTax module(s). To do so, open
the Apps app, remove the Apps filter in the Search bar, type in
AvaTax, and press Enter to display the available modules related to AvaTax:
Avatax (
account_avatax): Default AvaTax module that adds the base AvaTax features for tax calculation.Avatax for SO (
account_avatax_sale): Includes the information needed for tax calculation on sales orders in Odoo.Avatax for Inventory (
account_avatax_stock): Includes tax calculation in Odoo Inventory.
Should AvaTax be needed for geo-localization or with the Amazon Connector, install those modules individually:
Avatax for geo localization (
account_avatax_geolocalize): Includes the features required for integration of AvaTax into geo-localization in Odoo.Amazon/Avatax Bridge (
sale_amazon_avatax): tax calculation features between the Amazon Connector and Odoo.
Additional modules related to the Brazilian fiscal localization are also available.
See also
For additional information on the fiscal localizations themselves, view the following fiscal localization documentation:
Available integrations
For users in the United States and Canada, there are two options for AvaTax integration:
Avalara Included: An affordable In-App purchase service designed for SMBs with essential tax calculation needs.
Avalara Direct: A robust solution for high-volume or complex businesses, with tailored support provided directly by Avalara.
Avalara Included |
Avalara Direct |
|
|---|---|---|
Best fit |
SMBs / Lower Volume |
Mid-Market/ Enterprise |
AvaTax Engine |
✅ |
✅ |
Cost per Transaction |
$ Credit-based |
$$ Contract-based |
Account Managed by |
Odoo IAP |
Avalara Direct |
Odoo Technical Support |
✅ |
✅ |
Annual Transaction Limit |
5,000 |
Unlimited Custom |
1st tier Support by |
Odoo |
Avalara |
Avalara Direct Support |
Limited |
✅ |
Return Prep & Filing |
⚠️ Add-on only |
⚠️ Add-on only |
Tax Remittance |
⚠️ Add-on only |
⚠️ Add-on only |
Avalara Included
Avalara Included is an affordable in-app tax calculation service designed for small and medium-sized businesses with essential tax compliance needs. Built on Avalara’s AvaTax platform, it integrates with Odoo to provide real-time, region-specific tax calculations for sales, purchases, and invoices.
Avalara Included is available for databases/companies with locations in the United States and Canada.
See also
Important
Businesses that exceed 5,000 transactions annually must instead use an Avalara Direct plan to ensure uninterrupted service at higher transaction volumes. To migrate from Avalara Included to Avalara Direct, speak with your account manager.
In multicompany environments, Avalara Included credentials cannot be shared between companies. Instead, create a unique Avalara Included account with a unique email address for each individual company in the database.
In-App purchase credits
Avalara Included requires users to purchase credits on the Odoo IAP page.
One credit is consumed every time an invoice or credit note is posted with an Avatax fiscal position. Select the package that best fits the demand, based on the estimated number of transactions.
Configuration
Avalara Included is available both for Odoo users who do not yet have an Avalara account and need to create one and for Odoo users with an existing Avalara account that they would like to migrate to the Avalara Included plan.
Create an Avalara Included account
Important
The Avalara account activation must be done on the production database. If the account is created from a test database that does not have an associated valid enterprise account, an error message may appear indicating that no valid enterprise contract was found.
To activate and use the Avalara Included feature, follow these steps:
Navigate to .
In the Taxes section, enable AvaTax.

Select Avalara Included as the account type and enter a valid email address. This email address is used to link the company’s information to the Avalara Included account.
Click Connect to Avalara Included to establish the connection between the Odoo database and the new Avalara account.
Accept Avalara’s terms and conditions.
At this point, the Avalara account is created and an email is automatically sent to the associated email address. Follow the instructions in the email to activate the account by creating a password and registering in the Avalara Portal.
Test connection
After creating an Avalara Included account, click Test connection. This ensures the email added in the AvaTax Portal Email field is correct and a connection is made between Odoo and the AvaTax API.
Sync parameters
Upon finishing the configuration and settings of the AvaTax section, click the Sync Parameters button to synchronize the exemption codes from AvaTax.
Create a basic company profile
To complete the Avalara account setup, create a basic company profile.
Collect essential business details for the next step: locations where tax is collected, products/services sold (and their sales locations), and customer tax exemptions, if applicable. Follow the Avalara documentation for creating a basic company profile:
Note
After finishing these configurations that are specific to Avalara Included, be sure to complete the configurations that are common to both Avalara Included and Avalara Direct.
Migrate to Avalara Included
Companies currently using Avalara Direct in production that have fewer than 5,000 annual transactions, including invoices and credit notes, are eligible to migrate their account plan to Avalara Included.
Important
Migrating from Avalara Direct to Avalara Included changes the Avalara account from a monthly contract model to an in-app purchase model, where transaction credits can be purchased based on volume. First-level support is also transferred to Odoo.
To migrate to Avalara Included, follow these steps:
Navigate to .
In the Taxes section, under AvaTax, verify that the Integration Method is set to Avalara Direct.
In the Environment field, select Production. Confirm that the API ID and API KEY are correctly configured.
Click Migrate to Avalara Included. A confirmation message appears outlining the changes to Avalara services and pricing before proceeding with the migration.
Review the differences between each integration carefully before confirming the migration.
Once the migration is complete, a confirmation message appears indicating that the account was successfully migrated to Avalara Included.
Note
Because the migration process uses the same email address associated with the Avalara Direct account, access to the Avalara portal remains available with the existing email address. No additional email configuration is required in Odoo.
Important
Once the migration is complete, IAP credits must be purchased to continue using the AvaTax engine.
Avalara Direct
Avalara Direct is an in-app tax calculation service designed for mid-market and enterprise businesses with a high volume of transactions (5000+ per year) and more complex needs. Built on Avalara’s AvaTax engine, Avalara Direct integrates with Odoo to provide real-time, region-specific tax calculations for sales, purchases, and invoices.
Avalara Direct is available for databases/companies with locations in the United States and Canada.
See also
Note
Most small and medium-sized businesses should instead use Avalara Included. Existing Avalara Direct users with fewer than 5,000 annual transactions can migrate to Avalara Included.
Configuration
Create an account
To use AvaTax, an account with Avalara is required for the setup. If one has not been set up yet, connect with Avalara to purchase a license.
Tip
Upon account setup, take note of the AvaTax Account ID. This will be needed in the Odoo setup. In Odoo, this number is the API ID.
Create a basic company profile
Collect essential business details for the next step: locations where tax is collected, products/services sold (and their sales locations), and customer tax exemptions, if applicable. Follow the Avalara documentation for creating a basic company profile:
Connect to Avalara
After creating the basic company profile in Avalara, connect Avalara and Odoo.
Navigate to either Avalara’s sandbox or production environment, depending on which type of Avalara account you wish to integrate.
Log in to create the License Key. Go to . In the License key and client secrets tab, click Generate License Key.
Important
Generating a new license key breaks the connection with existing business apps using the AvaTax integration. Make sure to update these apps with the new license key.
If this is the first API integration being made with AvaTax and Odoo, click Generate license key.
If this is an additional license key, ensure the previous connection can be broken. There is only one license key associated with each of the Avalara sandbox and production accounts.
Warning
Copy this key to a safe place. It is strongly encouraged to back up the license key for future reference. This key cannot be retrieved after leaving this screen.
Odoo AvaTax settings
To integrate AvaTax with Odoo, follow these steps:
Go to .
Scroll to the Taxes section and enable AvaTax.
In the Integration Method field, select Avalara Direct.
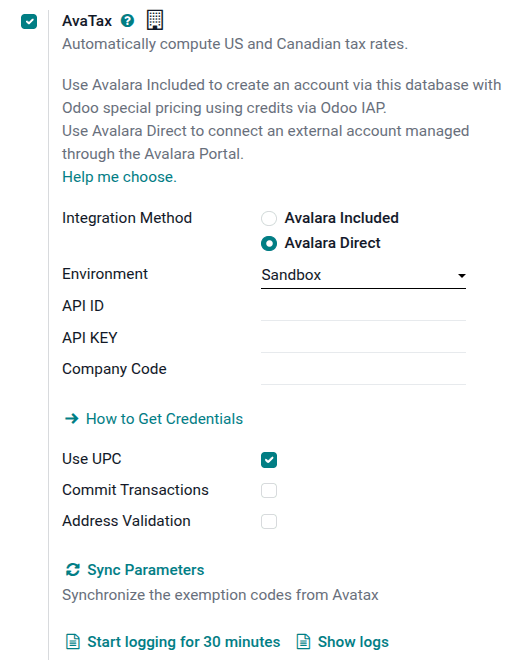
Select the Environment in which the company wishes to use AvaTax. It can either be Sandbox or Production.
Enter the AvaTax Account ID in the API ID field, and the License Key in the API Key field.
Tip
The Account ID can be found by logging into the AvaTax (sandbox or production) portal:
In the upper-right corner, click on Account.
The Account ID is displayed at the top of the menu.
Learn more about how to access the License Key.
Enter the Avalara company code for the company being configured in the Company Code field. Avalara interprets this as DEFAULT if it is not set.
Note
The Company Code can be accessed by logging into the Avalara portal (sandbox or production) and navigating to . The code is displayed in the Company Code column.
Test connection
After entering the API ID and API KEY, click Test connection. This ensures the API ID and API KEY are correct, and a connection is made between Odoo and AvaTax.
Sync parameters
Upon finishing the configuration and settings of the AvaTax section, click the Sync Parameters button to synchronize the exemption codes from AvaTax.
Note
After finishing these configurations that are specific to Avalara Direct, be sure to complete the configurations that are common to both Avalara Included and Avalara Direct.
Odoo configuration
Regardless of which Avalara integration a company uses, there are some additional configurations in Odoo that are required before using AvaTax to ensure tax calculations are made accurately.
Fiscal country
To set the Fiscal Country, navigate to .
Under the Taxes section, set the Fiscal Country feature to United States or Canada. Then, click Save.
See also
Company settings
All companies operating in the Odoo database should have a full and complete address listed in the settings. Open the Settings app, and scroll to the Companies section. If the database has only a single company, click Update Info to update the company details.
If there are multiple companies operating in the database, click Manage Companies, then click on each company in the list to update its information.
The Street, Street2, City, State, ZIP, and Country must all be up to date for each company to ensure accurate tax calculations and smooth end-of-year accounting operations.
See also
Transaction options
To configure AvaTax-related transactional settings, go to and enable the relevant options in the AvaTax section:
Use UPC: to use Universal Product Code (UPC) for transactions instead of custom-defined codes in Avalara. Consult a certified public accountant (CPA) for specific guidance.
Commit Transactions: to add the Odoo database’s transactions to AvaTax reports.
Address validation
The Address Validation feature ensures that the most up-to-date address by postal standards is set on a contact in Odoo. This is important to provide accurate tax calculations for customers.
Important
The Address Validation feature only works with partners/customers in North America.
To enable address validation, go to , scroll to the Taxes section, and under AvaTax, tick the checkbox next to Address Validation.
Save the settings to display the Validate link on North American contact records. Each contact’s address must be validated individually:
To Validate an address, open the Contacts app and select a contact. With the Address Validation feature enabled, the Validate link appears beside the Address.
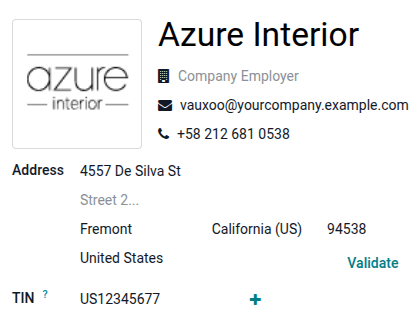
Click Validate to open a pop-up window with a Validated Address and Original Address listed. If the Validated Address is the correct mailing address for tax purposes, click Save Validated.
Warning
All previously-entered addresses for contacts in the Odoo database need to be validated using the validation process outlined above.
Important
For accurate tax calculations, it is best practice to enter a complete address for the contacts saved in the database. However, AvaTax can still function by implementing a best effort attempt using only the Country, State, and ZIP. These are the three minimum required fields.
Fiscal positions
Fiscal positions (tax and account mapping) are used to determine which tax rates should apply based on the customer. They are also used for account mapping.
To configure a fiscal position for AvaTax:
Navigate to .
Click the default Automatic Tax Mapping (AvaTax) in the list or create a new fiscal position.
Ensure that Use AvaTax API is enabled on the fiscal position form view.
Optionally, enable Detect Automatically to automatically apply the fiscal position to transaction records in Odoo that match the fiscal position’s set conditions.
Important
If the Detect Automatically feature is disabled, a fiscal position must be set for each customer.
AvaTax accounts
Once Use AvaTax API has been enabled for a fiscal position, set the relevant accounts in the AvaTax Invoice Account and AvaTax Refund Account fields in the AvaTax tab to ensure smooth end-of-year record keeping. Consult a certified public accountant (CPA) for specific guidance on setting both accounts.
AvaTax product category codes
AvaTax categorizes products using product category codes to ensure that the correct taxes are applied to each product. Before using the integration, specify an AvaTax product category code on each product category or individual product.
To set an AvaTax product category code for a product category, navigate to and select the relevant product category. Then, select the AvaTax product category from the AvaTax Category drop-down menu, or click Search More to open the complete list of options.
To set an AvaTax product category code for an individual product, navigate to and remove the default Sales filter. Select the relevant product, then select the AvaTax product category from the AvaTax Category drop-down menu, or click Search More to open the complete list of options.
Important
Every product must have an AvaTax category, whether defined directly on the product form or on the product category the product belongs to.
Note
If both the product and its category have an AvaTax Category set, the product’s AvaTax Category takes precedence.
See also