Transactions
Importing transactions from your bank statements allows keeping track of bank account transactions and reconciling them with the ones recorded in your accounting.
Bank synchronization automates the process. However, if you do not want to use it or if your bank is not yet supported, other options exist:
Import bank transactions delivered by your bank;
Register bank transactions manually.
Note
Grouping transactions by statement is optional.
Transaction view
The list of transactions for the bank journal is displayed in the Bank Matching view. To access it, go to the Accounting Dashboard, then either:
click the journal name (e.g., Bank) or its Transactions button to display all transactions, including those previously reconciled, or
click the x to reconcile button to display only unreconciled transactions. To include previously reconciled transactions, remove the Not Matched filter from the search bar.
Unreconciled transactions display the following information while collapsed:
The date of the transaction
A button linked to the chatter. The icon of this button can vary:
The (comments) icon displays only on hover and indicates that there are no attachments or activities for the transaction.
The (attachments) icon indicates that there is an attachment on the journal entry.
The (activities) icon indicates that there is an activity scheduled on the journal entry.
The label of the transaction
The partner of the transaction (if one is set)
Up to two action buttons, depending on the details of the transaction
The balance of the transaction
Note
When the chatter of a transaction is open, a blue tag highlights the related transaction.
The chatter can be opened and closed by clicking the (comments) icon and the (close) icon in the top right of the view.
Once a transaction is reconciled, its action buttons are replaced with the labels of the item(s) it was reconciled with or the account if it was reconciled with the Set Account action button.
Duplicate transactions
Duplicate transactions occur when either by human error or bank sync error, the same transaction is created multiple times. The duplicate transaction view identifies potential duplicate transactions so they can be selected and deleted. To access the duplicate transaction view, first access the Bank Matching view by going to the Accounting Dashboard and clicking the bank journal’s name, then open the Actions menu and click Find Duplicate Transactions.
Potential duplicate transactions are identified based on their amount, date, and account number, or (if the transaction is created via bank sync) the transaction ID.
Select a Starting Date to view the corresponding potential duplicate transactions, then select the transactions to delete and click Delete Selected.
Note
Any transactions created by bank sync that the bank sync provider determines to be potential duplicates are displayed in the Provider Duplicates tab. This tab is only visible if there are any potential duplicates according to the provider.
Import transactions
Odoo supports multiple file formats to import transactions:
SEPA recommended Cash Management format (CAMT.053)
Comma-separated values (CSV)
Excel (XLSX)
Open Financial Exchange (OFX)
Quicken Interchange Format (QIF)
Belgium: Coded Statement of Account (CODA)
To import a file, go to the Accounting Dashboard, click the (ellipsis) icon on the Bank journal, and select Import file. Next, select the file and upload it.
Tip
- Alternatively, access the transaction list by:
clicking on the Bank journal’s name, then clicking Upload
dragging and dropping a file on the bank journal on the Accounting Dashboard
dragging and dropping a file on the Bank Matching view
Certain file types such as CSV and XLSX, then require setting the necessary formatting options and mapping the file columns with their related Odoo fields, after which you can run a Test and Import your bank transactions. Other file types are mapped automatically.
See also
Register bank transactions manually
You can also record your bank transactions manually. To do so, go to the Accounting Dashboard, click the Bank journal’s name, and then on New. The Partner field is optional to ease the reconciliation process, but the Label and Date fields are mandatory.
Statements
A bank statement is a document provided by a bank or financial institution that lists the transactions that have occurred in a particular bank account over a specified period of time.
In Odoo Accounting, it is optional to group transactions by their related statement, but depending on your business flow, you may want to record them for record-keeping and organizational purposes.
To access a list of existing statements, go to the Accounting Dashboard, click the (dropdown menu) icon next to the bank or cash journal you want to check, then click Statements.
Important
To ensure the ending balances of your bank statements in Odoo align with the ending balances of the statements that are provided by your bank, create an opening transaction to record the bank account balance as of the date you begin synchronizing or importing transactions. This is necessary to ensure the accuracy of your accounting.
Tip
To access a statement’s transactions, click Transactions directly from the Bank Statements list view or open a statement and click the Statement lines smart button.
Statement creation
The Bank Matching view displays transactions from most recent to oldest and groups them by statement, with any recent transactions that do not belong to a statement at the top. To add transactions to a statement, hover on the most recent transaction that should be included in the statement, and click the Statement button that appears on the upper separator line. Doing so creates a statement from that transaction down to the oldest transaction that is not yet part of a statement.
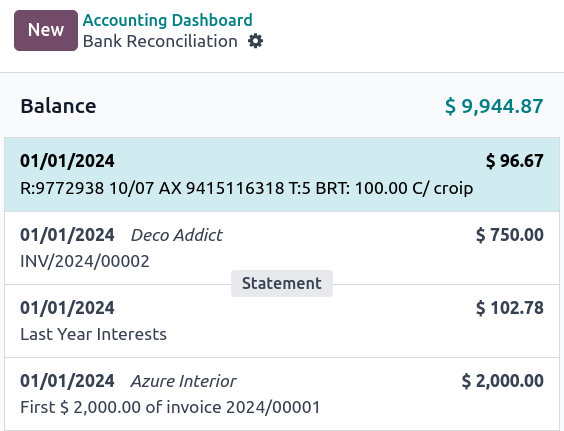
In the Create Statement window, fill out the statement’s Reference, verify its Starting Balance and Ending Balance, add an attachment such as a PDF of the statement if desired, and click Save.
Tip
Transactions can also be added to statements from the list view. Select all the transactions corresponding to the bank statement, and, in the Statement column, select an existing statement or create a new one by typing its reference, clicking on Create and edit…, filling out the statement’s details, and saving.
Statement viewing, editing, and printing
To view an existing statement, click the statement amount in the Bank Matching view or click the statement name and then the (Internal link) icon in the Bank Matching list view. From here, you can edit the Reference, Starting Balance, Ending Balance, and Attachments.
Note
Manually updating the Starting Balance automatically updates the Ending Balance based on the new value of the Starting Balance and the value of the statement’s transactions.
If the Starting Balance doesn’t equal the previous statement’s Ending Balance, or if the Ending Balance doesn’t equal the running balance (Starting Balance plus the statement’s transactions), a warning appears explaining the issue. To maintain flexibility, it is still possible to save without first resolving the issue.
To generate and print a PDF of the bank statement, click the (gear) icon and click Statement.
Note
When a bank statement is generated to be printed, it is automatically added to the Attachments if no file was attached when creating the statement.