India
Installation
Install the following modules to get all the features of the Indian localization:
Name |
Technical name |
Description |
|---|---|---|
Indian - Accounting |
|
Default fiscal localization package |
Indian E-invoicing |
|
|
Indian E-waybill |
|
|
Indian E-waybill Stock |
|
|
Indian - Accounting Reports |
|
Adds the Indian GST Return filing and the Indian Tax reports. |
Company
To configure your company information, open the Settings app, scroll down to the Companies section, click Update Info, and configure the following:
Company Name
Address, including the Street, City, State, ZIP, and Country
PAN: essential for determining the type of taxpayer.
GSTIN: necessary for generating e-Invoices, E-waybills and filing GST returns.
GSP configuration
To use the e-Invoicing, E-Way bill, and GST return filing services in Odoo, configure BVM IT Consulting Services India Private Limited as the GSP. To do so, follow these steps :
If needed Upgrade the Indian - Accounting (
l10n_in) module.Go to .
Scroll down to the Select GSP Provider section, and set the GSP field to BVM IT Consulting.
Log into the NIC e-invoice portal and NIC E-Way bill portal and create a new API user for each.
Go to , scroll down to the Indian Integration section, and enter the new Username and Password for the e-Invoicing and E-Way bill features.
Indian Configuration
The Indian Integration section provides essential taxation and compliance features to simplify financial operations. To enable these features, navigate to and scroll down to the Indian Integration section.

TDS/TCS: Activate this to enable TDS/TCS functionality along with account-based TDS/TCS section suggestions.
Registered Under GST: Select this if your business is registered under GST to access GST-related features, including e-invoice, e-waybill, GST e-filing, fetch vendor e-invoiced document and check GST number status.
E-Invoicing: Connects to the e-invoice NIC portal to submit invoices.
E-Way bill: Connects to the e-waybill NIC portal to generate e-waybills.
GST E-Filing & Matching: Enable the feature to facilitate GST return filing and connect with the GST portal to submit GSTR-1 and retrieve GSTR-2B.
Check GST Number Status: Enable to verify GSTIN Status.
Fetch Vendor E-Invoiced Document: Helps in creating draft vendor bills using e-invoice data submitted by vendors on GST portal.
Important
Check the Production Environment checkbox to start using Indian services in the production environment. If you want to use the testing environment then keep the checkbox unchecked.
e-Invoice system
Odoo is compliant with the Indian Goods and Services Tax (GST) e-Invoice system requirements.
Setup
NIC e-Invoice registration
You must register on the NIC e-Invoice portal to get your API credentials. You need these credentials to configure your Odoo Accounting app.
Log in to the NIC e-Invoice portal by clicking Login and entering your Username and Password;
Note
If you are already registered on the NIC portal, you can use the same login credentials.

From the dashboard, go to ;
After that, you should receive an OTP code on your registered mobile number. Enter the OTP code and click Verify OTP;
Select Through GSP for the API interface, set BVM IT Consulting Services India Private Limited as GSP, and type in a Username and Password for your API. Once it is done, click Submit.

Configuration in Odoo
To enable the e-Invoice service in Odoo, activate the E-Invoicing feature and enter the Username and Password previously set for the API.
Additionally, make sure the GSP field is configured in the Accounting settings.
Workflow
Generate e-Invoice
Once an invoice is confirmed, click the Send button to open the wizard. Select E-Invoicing, then click the Generate button. Odoo will upload the JSON-signed file of the invoice to the NIC e-Invoice portal.

Note
You can find the JSON-signed file and check the e-Invoicing status in the chatter.
Invoice PDF report
Once an invoice is validated and submitted, the invoice PDF report can be printed. The report includes the IRN, Acknowledgement (number and date) and QR code. These certify that the invoice is a valid fiscal document.

e-Invoice cancellation
To cancel an e-Invoice, click the Request Cancel button on the related invoice. In the Cancel E-Invoice window, fill out the Cancel Reason and Cancel Remarks.
Note
You can find the e-Invoicing status in the chatter.
Management of negative lines in e-Invoices
Negative lines are typically used to represent discounts or adjustments associated with specific products or global discounts. The government portal prohibits the submission of data with negative lines, which means they need to be converted based on the HSN code and GST rate. This is done automatically by Odoo.
Example
Consider the following example:
Product Details |
|||||
|---|---|---|---|---|---|
Product Name |
HSN Code |
Tax Excluded |
Quantity |
GST Rate |
Total |
Product A |
123456 |
1,000 |
1 |
18% |
1,180 |
Product B |
239345 |
1,500 |
2 |
5% |
3,150 |
Discount on Product A |
123456 |
-100 |
1 |
18% |
-118 |
Here’s the transformed representation:
Product Details |
||||||
|---|---|---|---|---|---|---|
Product Name |
HSN Code |
Tax Excluded |
Quantity |
Discount |
GST Rate |
Total |
Product A |
123456 |
1,000 |
1 |
100 |
18% |
1,062 |
Product B |
239345 |
1,500 |
2 |
0 |
5% |
3,150 |
In this conversion, negative lines have been transformed into positive discounts, maintaining accurate calculations based on the HSN Code and GST rate. This ensures a more straightforward and standardized representation in the E-invoice records.
GST e-Invoice verification
After submitting an e-Invoice, you can verify if the invoice is signed from the GST e-Invoice system website itself.
Download the JSON file from the attached files. It can be found in the chatter of the related invoice;
Open the NIC e-Invoice portal and go to ;
Select the JSON file and submit it;
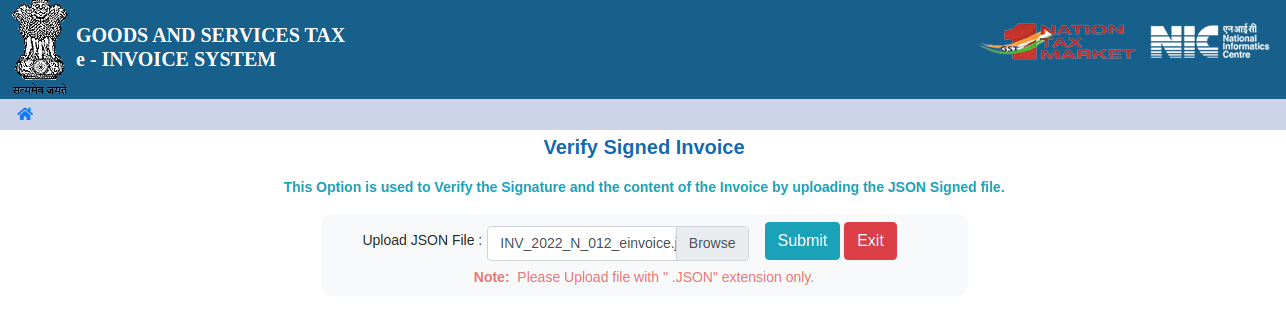
If the file is signed, a confirmation message is displayed.

E-Way bill
Setup
Odoo is compliant with the Indian Goods and Services Tax (GST) E-waybill system requirements.
API registration on NIC E-Way bill
You must register on the NIC E-Way bill portal to create your API credentials. You need these credentials to configure your Odoo Accounting app.
Log in to the NIC E-Way bill portal by clicking Login and entering your Username and Password;
From your dashboard, go to ;
Click Send OTP. Once you have received the code on your registered mobile number, enter it and click Verify OTP;
Check if BVM IT Consulting Services India Private Limited is already on the registered GSP/ERP list. If so, use the username and password used to log in to the NIC portal. Otherwise, follow the next step.

Select Add/New, select BVM IT Consulting Services India Private Limited as your GSP Name, create a Username and a Password for your API, and click Add.

Configuration in Odoo
To enable the E-Way bill service in Odoo, activate the E-Way bill feature and enter the Username and Password.
Additionally, make sure the GSP field is configured in the Accounting settings.
Workflow
Generate E-Way bill
To generate an E-Way bill, confirm the customer invoice/vendor bill and click Create e-Waybill. Enter the necessary details and click Generate e-Waybill to proceed.
Note
You can find the JSON-signed file in the attached files in the chatter.
Invoice PDF report
You can print the invoice PDF report once you have submitted the E-Way bill. The report includes the E-Way bill number and the E-Way bill validity date.

E-Way bill cancellation
To cancel an E-Way bill, click e-Waybill on the related invoice/bill, then Cancel e-Waybill. In the Cancel Ewaybill window, fill out the Cancel Reason and Cancel Remarks.

Note
Once you request to cancel the E-Way bill, Odoo automatically submits the JSON-signed file to the government portal. You can check the JSON file in the chatter.
E-waybill creation from receipts and delivery orders
Note
Make sure the E-Way bill Stock module is installed and the E-Way bill setup is complete.
To create E-Way bills from receipts and deliveries in the Inventory app, follow these steps:
Go to or and select an existing delivery order/receipt or create a new one.
Click Create E-waybill/Challan.
Note
To create an E-way bill:
A delivery order must be in the Done state (i.e., validated)
A receipt must have the Ready or Done state.
Click Generate e-Waybill to validate the E-Way bill and send it to the NIC E-Way bill portal.
Tip
To use the E-Way bill as a challan for goods deliveries without sending it to the NIC E-Waybill portal, click Use as Challan.
To print the E-waybill or the challan, click the (gear) icon and select Ewaybill / Delivery Challan.
Indian Check GSTIN Status
The Indian - Check GST Number Status allows you to verify the status of a GSTIN directly from Odoo.
To verify the status of a contact’s GST number, access the customer’s/vendor’s form and click Check GSTIN Status next to the GSTIN field.
To verify the status of a GST number entered on an invoice/bill, access the invoice/bill and click the (refresh) button next to the GST Status field.

A notification is displayed to confirm the status update and the GSTIN status and verification date are logged in the contact’s chatter.
Indian GST Return filing
Enable API access
To file GST Returns in Odoo, you must first enable API access on the GST portal.
Log into the GST portal by entering your Username and Password, and go to My Profile on your profile menu;

Select Manage API Access, and click Yes to enable API access;

Note
It is recommended to set the Duration to 30 days to avoid the need for frequent token reauthentication.
Doing so enables a Duration drop-down menu. Select the Duration of your preference, and click Confirm.
Indian GST Service In Odoo
Once you have enabled the API access on the GST portal, activate the GST E-Filing & Matching Feature to start using GST Service. Then, in the Registered Under GST section, fill in the required GST Username.

Additionally, make sure the GSP field is configured in the Accounting settings.
File-in GST Return
To file a GST return, make sure the GST E-Filing & Matching Feature is enabled. Then, go to the Accounting dashboard and click Tax Returns on the Tax Returns journal. In the Accounting Periods window, fill in the following fields.
Opening Date: Starting date from which tax return periods are created.
Fiscal Year End: End date of the fiscal year (e.g., 31 March).
GSTIN Periodicity: Frequency of return filing (e.g., Monthly).
Tip
Alternatively, go to , click Report: and select GSTR-1 (IN). Then, click Returns to file the return.
Note
To reconcile vendor bills with GST portal data, go to , click Report: and select GSTR-2B, and click Reconcile.
Filing GSTR-1 tax return
To file a GSTR-1 tax return, follow these steps:
Click the suitable GSTR-1 report for the desired period to open the filing view.

Note
It is recommended to file the return five days before the filing date to avoid any penalties.
Odoo automatically performs validation checks before submission to ensure compliance with GST portal requirements that must be addressed before filing.
Note
The following types of validation issues can be raised:
Apply Appropriate Tax: IGST is not applicable for intra-state transactions.
Wrong CGST/SGST on Inter-State Transactions: CGST/SGST cannot be applied on inter-state transactions.
Fiscal Year Reversed Move: Credit Notes for invoices issued in a given financial year should not be included in GSTR-1 after November 30th; remove tax from these lines.
Invalid HSN Codes: - For products (non-services), HSN codes must not begin with
99. - For services, HSN codes must begin with99.Missing HSN Codes: Some product lines do not have HSN codes for journal items.
Invalid UQC Codes: The Unit Quantity Code (UQC) must comply with Indian GST standards.
Missing Document Summary: Document summary lines are mandatory for GSTR-1. This check is always marked as Anomaly initially. After reviewing the summary by clicking the relevant check, it changes to Reviewed.
Missing E-Invoice: Some invoices are not linked to an e-invoice.
Unlinked Unregistered Credit Notes: Credit Notes have been issued without referencing an invoice.
Validation checks have four stages:
To Review: Check requires review.
Reviewed: Check has been reviewed.
Supervised: Check is supervised, and a supervisor is assigned.
Anomaly: Check has failed.
Click on any individual check to view and resolve the corresponding issue.
Tip
A tax return can only be validated when all checks are in the Reviewed or Supervised stage.
After reviewing the checks, click Validate. The Review stage appears in green then.
Click GSTR-1 (IN) to review the report.
Click Submit, and click Push Data in the Submission Instructions window to send the report to the GST portal.
During this step, GST portal credentials must be verified. As the data is being sent, the Send stage in the progress bar appears orange. Once the GST portal confirms receipt, the stage turns green. If an error occurs, the Send stage changes to red.
Note
Click the (ellipsis) icon on the relevant GSTR-1 line to display additional options:
Generate XLSX: Download the GSTR-1 report as an XLSX file.
Reset: Clear the current state and revert the return to the initial stage.
Click Check Status to retrieve the current status from the GST portal. Once the confirmation is received, the Review stage in the progress bar turns green. Then, click Mark as Filed to finalize and submit the return as filed.
Important
Once a return is marked as Filed, it cannot be reset or filed again.
Receive GSTR-2B tax reconciliation
Select the relevant GSTR-2B report for the desired period that needs to be reconciled.
In the validation checks view, click Fetch E-Invoice to retrieve vendor e-invoice data for the reconciliation period. The check is initially marked as Anomaly and changes to Reviewed after fetching. Then, click Validate to confirm and mark the Review stage as green.
Important
The Fetch E-Invoice check only turns green if the e-invoice data is fetched two days after the end of the last month’s reconciliation period.
Click Fetch GSTR-2B to retrieve all invoices from the GST portal. Once the data is fetched, the Fetch stage in the progress bar turns green. To view the raw report data, click GSTR-2B (IN).
The fetched invoices are automatically matched with the E-invoices. Click View Bills to see detailed matching results.
Note
The Match stage indicates the reconciliation status:
Orange: Partially matched (some bills require correction).
Green: Fully matched (all bills reconciled).
In case of mismatches, correct the affected bills, then click the (ellipsis) icon to access additional options:
Re-Match: Re-run the matching process after making corrections.
Reset: Reset the reconciliation to the Match stage.
After all bills are fully matched, click the (ellipsis) icon and select Mark as Complete. The Complete stage in the progress bar turns green, finalizing the bill reconciliation.
Tax reports
GSTR-1 report
The GSTR-1 report is divided into sections. It displays the Base amount, CGST, SGST, IGST, and CESS for each section.

GSTR-2B report
The GSTR-2 report is divided into sections. It displays the Base amount, CGST, SGST, IGST, and CESS for each section.

GSTR-3B report
The GSTR-3B report contains different sections:
Details of inward and outward supply subject to a reverse charge;
Eligible ITC;
Values of exempt, Nil-rated, and non-GST inward supply;
Details of inter-state supplies made to unregistered persons.

Profit and Loss (IN) report
This is a Profit and Loss report that displays the balances for Opening Stock and Closing Stock. It helps users using Continental accounting to accurately determine the cost of goods (i.e Opening Stock + purchases during the period - Closing Stock).

TDS/TCS threshold alert
TDS and TCS are tax provisions under Indian law, triggered when transaction amounts exceed specified thresholds. This alert notifies users when the value of invoices or bills surpasses these limits, prompting the application of the appropriate TDS/TCS.
To configure Odoo to advise you on when to apply TDS/TCS, set the TDS/TCS section field on the corresponding account in the chart of accounts. Odoo will display a banner suggesting the TDS/TCS section under which tax might be applicable when recording an invoice or bill.
Configuration
Navigate to
In the Indian Integration section, enable the TDS or TCS feature as required.
Navigate to .
Click View on the desired account, and set the TDS/TCS Section field.
Note
The TDS/TCS sections are pre-configured with threshold limits. If you need to modify these limits, go to . In the Advanced Options tab, click on the (internal link) icon of the Section field.

Applying TCS/TDS on invoices and bills
Based on the account used on the customer invoice or vendor bill, Odoo checks the TCS/TDS threshold limit. If the limit specified in the TCS/TDS Section of the account is exceeded, Odoo displays an alert that suggests applying the appropriate TCS/TDS. The alert will disappear once the TCS/TDS is applied.

TCS is directly applicable in the tax on the invoice lines. To apply TDS, click the TDS Entry smart button on the vendor bill/payment. The popup window allows specifying the TDS details. Confirm the entry to apply the TDS.

In Odoo, the aggregate total is calculated for partners sharing the same PAN number, across all company branches.
Example
Branch |
Customer |
Invoice |
Transaction Amount (₹) |
PAN Number |
|---|---|---|---|---|
IN - MH |
XYZ Enterprise - GJ |
Invoice 1 |
₹50,000 |
ABCPX1234E |
IN - MH |
XYZ Enterprise - GJ |
Invoice 2 |
₹30,000 |
ABCPX1234E |
IN - MH |
XYZ Enterprise - MH |
Invoice 3 |
₹40,000 |
ABCPX1234E |
IN - DL |
XYZ Enterprise - GJ |
Invoice 4 |
₹20,000 |
ABCPX1234E |
IN - GJ |
XYZ Enterprise - MH |
Invoice 5 |
₹60,000 |
ABCPX1234E |
Aggregate total = 50,000 + 30,000 + 40,000 + 20,000 + 60,000 = ₹200,000
The aggregate total for all customers (XYZ Enterprise - GJ, MH, DL) sharing the PAN number ABCPX1234E across all branches is ₹200,000.