Security and authentication
Various security features are integrated into Odoo Sign by default, such as:
email verification, whereby the signer receives a unique link to the document or envelope of multiple documents via an email sent directly to their email address
a signatory hash that links the signer’s identity to the exact content of the document at the moment of signing
a certificate of completion that provides details of the signing process
Additional security can be ensured by:
requiring other methods of secured identification, such as SMS, Aadhaar eSign (India) or itsme® (European Union, United Kingdom, Norway and Iceland)
using a cryptographic signature by means of a digital certificate issued by a Certificate Authority (CA) or generated yourself
Signatory hash
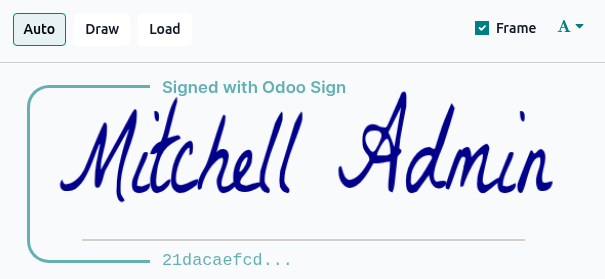
When someone signs a document, a hash, i.e., a unique digital signature of the operation, is generated to link the signer’s identity to the exact content of the document at the moment of signing. This process guarantees that any changes made after a signature has been added can be easily detected, maintaining the document’s authenticity and integrity throughout its lifecycle.
A visual security frame displaying the beginning of the hash is added to signatures and initials.
Tip
Internal users can hide or show it by turning the Frame option on or off when adding their signature or initials to the document.
The signatory hash of each signer is provided on the certificate of completion that is generated when a document is fully signed.
Certificate of completion
Each time a document or document envelope is fully signed, i.e., completed and signed by all signers, a certificate of completion is generated and sent to all signers via email, along with the fully signed document(s).
Note
When documents are signed via an Odoo record’s chatter, or when a signature request initiated from an Odoo record is fully completed (whether a one-off document or using a template), the certificate of completion is also added to the chatter, along with the fully signed document(s).
This certificate contains details of the signing process that support the validity of the signatures and provide proof that the document has not been altered after signing.

The following information is provided:
Document Details, which include when the signature request was created and by who, the file name of the
.pdfdocument or documents that were signed, the number of signers, and a unique reference hash that can optionally be added to each page of a signed document.A list of Participants who have signed the document, including the verification method and a unique signatory hash that ensures traceability and integrity.
Timestamped, IP, and geographically traceable records of Signing Events and Access Logs.
As well as being sent via email, a signed document’s certificate of completion can be downloaded at any time via the Sign app:
Go to and switch to the Kanban view.
Click the (vertical ellipsis) icon in the top-right of the card of a document, then click Details.
Click Download then Certificate.
Secured identification
When a signature request is sent via email, the signer accesses the document by clicking on a unique link contained in the email. This default verification step serves as confirmation that the signer controls the email address associated with the signature request.
It is also possible to require additional authentication for one or more signers via one of the following methods:
Via Aadhar eSign (available in India)
Via itsme® (available in the European Union, the United Kingdom, Norway and Iceland)
Important
These authentication methods require buying credits. If you do not have any credits left, authentication is skipped.
See also
Unique code via SMS
With authentication via SMS, signers receives a one-time code by SMS, which they enter when prompted during the signing process to identify themselves.
This feature is enabled by default in Sign’s general settings.
Note
Before being able to send SMS messages, you need to register your mobile phone number. To do so, go to and, under Authenticate by SMS, click Manage Service & Buy Credits. On the next screen, click Register then proceed to register your phone number.
To require signer authentication via SMS:
With the document or document envelope open, in the left panel, click the (vertical ellipsis) icon next to the relevant signer, then click Edit.
In the pop-up, select Unique Code via SMS as Authentication.
Click Save.
Upon signing the document, an extra Final Validation window is displayed where the signer enters first their phone number, then the one-time code received.

Aadhaar eSign
Aadhaar eSign allows signers in India to digitally sign documents using their Aadhaar number and OTP (One Time Password) verification. This provides a secure and legally valid way to complete signatures directly within Odoo Sign.
Important
In Odoo Sign, Aadhaar eSign can only be used for signature requests containing a single document. Additionally, only one signer per document can be required to authenticate via Aadhaar eSign, and this party must be the last party to sign the document.
This method is therefore most suitable for a single document with a single signer, or where the first signer is the party sending the signature request.
To enable authentication with Aadhaar eSign, go to , then enable Sign with Aadhar eSign.
To require signer authentication via Aadhaar eSign:
With the document or document envelope open, in the left panel, click the (vertical ellipsis) icon next to the relevant signer.
In the pop-up, select Via Aadhaar eSign under Authentication.
Click Save.
Upon signing the document, an extra Final verification page is displayed where authentication via Aadhaar is required.
Note
The digital certification from eMudhra is available in the downloaded document.
Itsme®
Itsme® authentication allows signers in the European Union, the United Kingdom, Iceland and Norway to prove their identity.
To enable authentication with itsme®, go to , then enable Identify with itsme®.
To require signer authentication via itsme®:
With the document or document envelope open, in the left panel, click the (vertical ellipsis) icon next to the relevant signer.
In the pop-up, select Via itsme® under Authentication.
Click Save.
Upon signing the document, an extra Final verification page is displayed where authentication via itsme® is required.
Cryptographic signature
Odoo Sign allows you to use your own digital certificate to sign documents. A digital certificate uses cryptography, which relies on secure mathematical algorithms, to ensure a signed document’s authenticity and integrity.
Authenticity is ensured as your verified identity is linked to the signature, while integrity is ensured as the document cannot be altered without invalidating, or ‘breaking’, the cryptographic signature.
A digital certificate is stored in a file such a .p12 or .pfx file. This is a secure container
that contains:
a private key that applies a unique cryptographic signature to a document; and
identifying information about the signer and a public key that is shared with the recipient for signature validation
The file is always protected by a password, which is never stored in plain text. Odoo uses this password to decrypt the private key at the moment a document is signed.
Obtain or create a digital certificate
Most businesses obtain their digital certificate from a trusted Certificate Authority (CA). In many
cases, the CA provides the .p12 or .pfx file directly, along
with its password.
It is also possible to generate a certificate yourself. Adobe Acrobat and Microsoft, for example, allow the creation of digital certificates.
Note
Self-generated digital certificates do not provide the same level of trust as a certificate obtained from a trusted CA. However, they can be useful if you need to provide a digital signature urgently or for less official situations.
Once you have obtained or created a digital certificate, you can then upload it to your Odoo database.
Upload a digital certificate in Odoo
To upload a digital certificate in Odoo:
Go to .
Under Cryptographic signature, click the Signing certificate dropdown and click Create.
In the pop-up, complete the relevant fields:
Name: Enter a name for the certificate.
Certificate: Click Upload your file, then select the relevant certificate file in
.p12or.pfxformat.Certificate Password: Enter the certificate password for the uploaded file; it must be minimum six characters. This password is used to decrypt the private key during the signing process.
Click Save.
Note
After the certificate has been uploaded, two read-only fields are auto-completed: the Validity date, i.e., the date on which it starts to be valid, and the Serial number that will be added to signed documents.
In a multi-company environment, one certificate can be uploaded per company.