Domain names
Domain names serve as easily recognizable labels for online locations such as websites, translating difficult-to-remember numerical IP addresses into readable, memorable web addresses.
Odoo Online and Odoo.sh databases use a subdomain of the odoo.com domain by default
(e.g., mycompany.odoo.com).
However, you can register a free domain name on Odoo Online or use a domain name you own.
Register a free domain name
To register a one-year free domain name for an Odoo Online database:
Open the database manager.
Click the database name and select Domain Names.
Search for the desired domain name and check its availability.
Select the desired domain name, fill in the Domain Owner form, and click Register. The domain name is directly linked to the database.
Important
A verification email from
noreply@domainnameverification.netwill be sent to the email address provided. Verifying the email address is necessary to keep the domain active and receive the renewal quote before expiration.Finally, map the domain name to your Odoo website.
Terms and conditions
The domain name registration is free for the first year. After this period, Odoo will continue to manage the domain in partnership with Gandi.net, the domain name registrar, and you will be charged Gandi.net’s renewal rate. Odoo sends a renewal quotation every year to the email address specified in the Domain Owner form several weeks before the domain’s expiration date. The domain is renewed automatically when the quotation is confirmed.
The offer is only available for Odoo Online databases.
The offer is limited to one domain name per client.
The offer is limited to the registration of a new domain name.
The offer is available to One App Free plans. Ensure your website contains sufficient original content for Odoo to verify that your request is legitimate and in compliance with Odoo’s Acceptable Use Policy. Given the high number of requests, it can take Odoo several days to review them.
DNS records
To manage a free domain name’s DNS records:
Open the database manager.
Click the database name and select Domain Names.
Click DNS.
Tip
A: the A record holds the IP address of the domain. It is automatically created and cannot be edited or deleted.
CNAME: CNAME records forward one domain or subdomain to another domain. One is automatically created to map the
wwwsubdomain to the database. If the database is renamed, the CNAME record must be updated accordingly.MX: MX records instruct servers on where to deliver emails.
TXT: TXT records can be used for various purposes (e.g., verifying domain name ownership).
Any modification to the DNS records can take up to 72 hours to propagate worldwide on all servers.
Subdomains
Adding a subdomain label to a free domain name (e.g., subdomain.yourdomain.com) allows
creating multiple websites or creating database records from emails
received on an alias (e.g.,
email@subdomain.yourdomain.com).
To create a subdomain, add a CNAME record:
Open the database manager.
Click the database name and select Domain Names.
Click DNS.
Click Add DNS record and select CNAME.
Name: enter the desired subdomain label (e.g.,
subdomain).Content: enter original database domain with a period at the end (e.g.,
mycompany.odoo.com.).
Click Add record.
Note
To use a subdomain’s address for your Odoo website, it is necessary to:
Mailbox
The free domain name does not include a mailbox. However, there are two options for linking it to a mailbox.
Use a subdomain
After creating a subdomain, go to the database and open
the Settings app. Under the Alias Domain field, enter the subdomain (e.g.,
subdomain.yourdomain.com), click Create, and then Save.
Use an external email provider
To use an external email provider, it is necessary to add an MX record:
Open the database manager.
Click the database name and select Domain Names.
Click DNS.
Click Add DNS record and select MX.
Fill in the Name, Content, and Priority fields according to the external email provider.
Google Workspace
To use a free domain name with Gmail, register for Google Workspace.
During the registration process, select Set up using your existing domain when asked to
Choose a way to set up your account, and enter your domain (e.g., yourdomain.com) when
asked What’s your business’s domain name?.
Domain ownership verification
Sign in to Google Workspace. When asked to verify you own your domain, click Switch to manual verification.

Select
gandi.netas the Domain host and click Continue.
Copy the content of the Value field under TXT record. Leave the window open.

Add a TXT record.
Open the database manager.
Click the database name and select Domain Names.
Click DNS.
Click Add DNS record and select TXT.
Enter
@in the Name field, paste the Value provided by Google in the Content field, and click Add record.

Go back to Google Workspace, tick the box at the bottom, and click Confirm.
Redirect emails to Gmail
Open the database manager.
Click the database name and select Domain Names.
Click DNS.
Click Add DNS record and select MX.
Enter
@in the Name field,1in the Priority field,smtp.google.com.in the Content field, and click Add record.
Open the Google Workspace Admin console, click Activate Gmail for your domain, and follow the steps.
Configure an existing domain name
If you already own a domain name, you can use it for your Odoo website.
Warning
To avoid potential SSL certificate validation issues, it is strongly recommended to follow these steps in the specified order:
If you are transferring your website, set up URL redirections before transferring the domain name to preserve the website’s SEO.
Redirect your naked domain name (this step is optional but recommended).
Note
If you are using Cloudflare, follow these instructions to add a CNAME record and secure and redirect a naked domain.
Add a CNAME record
Adding a CNAME record to forward your domain name to the address of your Odoo database is required.
The CNAME record’s target address should be your database’s address as defined at its creation
(e.g., mycompany.odoo.com).
The CNAME record’s target address should be the project’s main address, which can be found on Odoo.sh by going to , or a specific branch (production, staging or development) by going to , and clicking How to set up my domain?. A message indicates which address your CNAME record should target.
The specific instructions depend on your DNS hosting service.
Redirect a naked domain
Note
Although optional, completing this step is advised.
To let visitors use your naked domain name (a domain name without any subdomains or prefixes)
(yourdomain.com), creating a 301 redirect (a permanent redirect from one URL to another)
to www.yourdomain.com is required:
from
http://yourdomain.comtohttps://www.yourdomain.com, andfrom
https://yourdomain.comtohttps://www.yourdomain.com.
The specific instructions depend on your DNS hosting service. However, not all of them offer to redirect a naked domain to HTTPS. If you encounter any issues, we recommend using Cloudflare.
Using Cloudflare to secure and redirect a naked domain
Enter your domain name on Cloudflare’s dashboard and select Quick scan for DNS records.
Choose a plan (the free plan is sufficient).
Follow Cloudflare’s instructions and recommendations to complete the activation.
Add a CNAME record to redirect your naked domain (
yourdomain.com) to thewwwsubdomain (e.g.,www.yourdomain.com) by clicking DNS in the navigation menu, then clicking the Add record button, and using the following configuration:Type: select
CNAME.Name: enter
@(oryourdomain.com).Target: enter
www.+yourdomain.com, e.g.,www.yourdomain.com.Proxy status: toggle the option on (Proxied).
Click Save.

Add another second CNAME record to redirect the
wwwsubdomain (e.g.,www.yourdomain.com) to your database address (e.g.,mycompany.odoo.com) using the following configuration:Type: select
CNAME.Name: enter
www.followed by your domain name, e.g.,www.yourdomain.com.Target: enter your database’s address as defined at its creation e.g.,
mycompany.odoo.comProxy status: toggle the option off (DNS only).
Click Save.

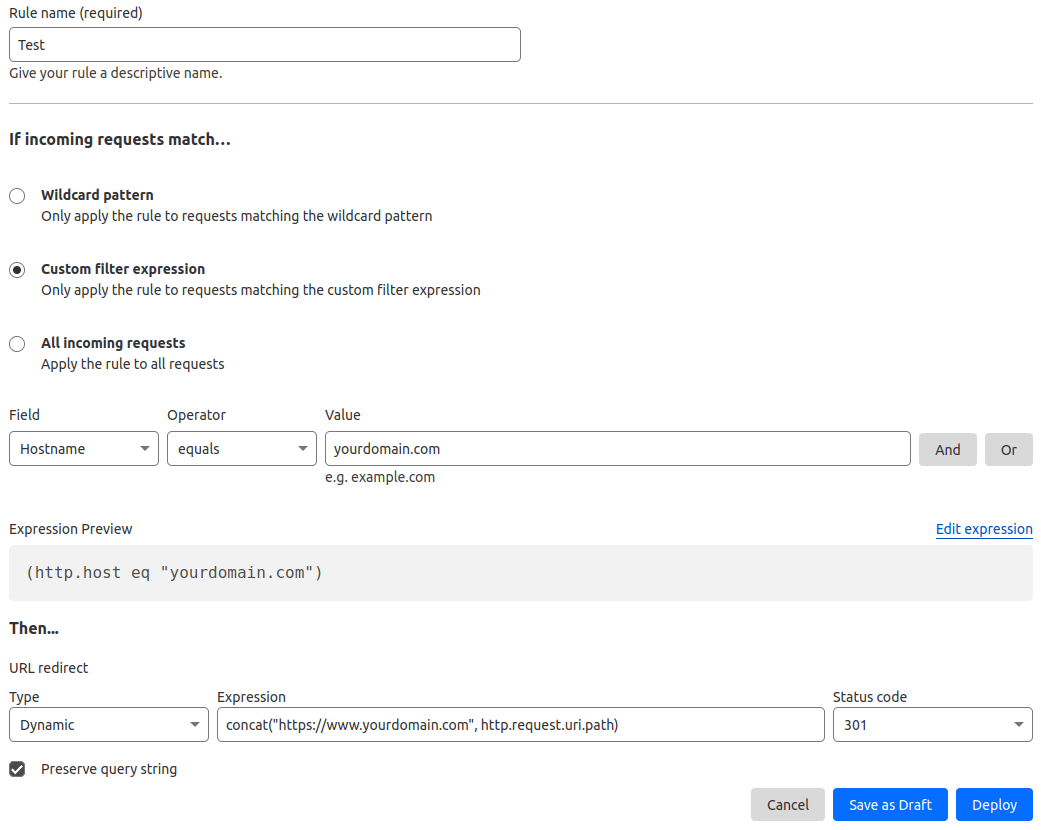
Define a redirect rule to permanently redirect (301) your naked domain (e.g.,
yourdomain.com) to bothhttp://andhttps://by going to . On that page:Enter any Rule name.
Under the If incoming requests match… section, select Custom filter expression and use the following configuration:
Field: select
Hostname.Operator: select
equals.Value: enter your domain name, e.g.,
yourdomain.com.
Under the Then… section, use the following configuration:
Type: select
Dynamic.Expression: enter the following expression
concat("https://www.yourdomain.com",
http.request.uri.path)
, replacingyourdomain.comwith your domain name.Status code: select
301.Preserve query string: enable the option by ticking the box.
Click Deploy.
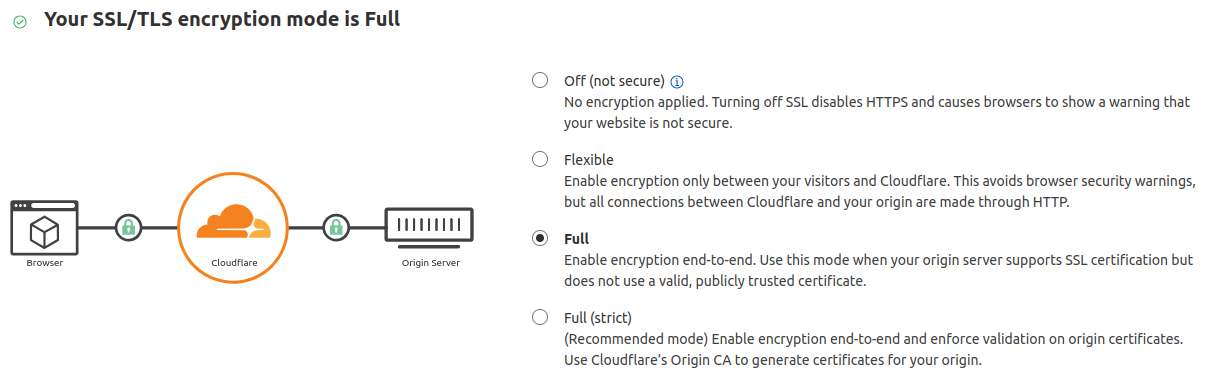
Go to and ensure the encryption mode is set to Full.
Map a domain name to an Odoo database
Warning
Ensure you have added a CNAME record to your domain name’s DNS before mapping your domain name to your Odoo database.
Failing to do so may prevent the SSL certificate from being validated and could result in a certificate name mismatch error. Web browsers often display this as a warning, such as “Your connection is not private”.
If you encounter this error after mapping the domain name to your database, wait up to five days, as the validation may still be in progress. If not, you can submit a support ticket, including screenshots of your CNAME records.
Open the database manager.
Click the database name and select Domain Names.
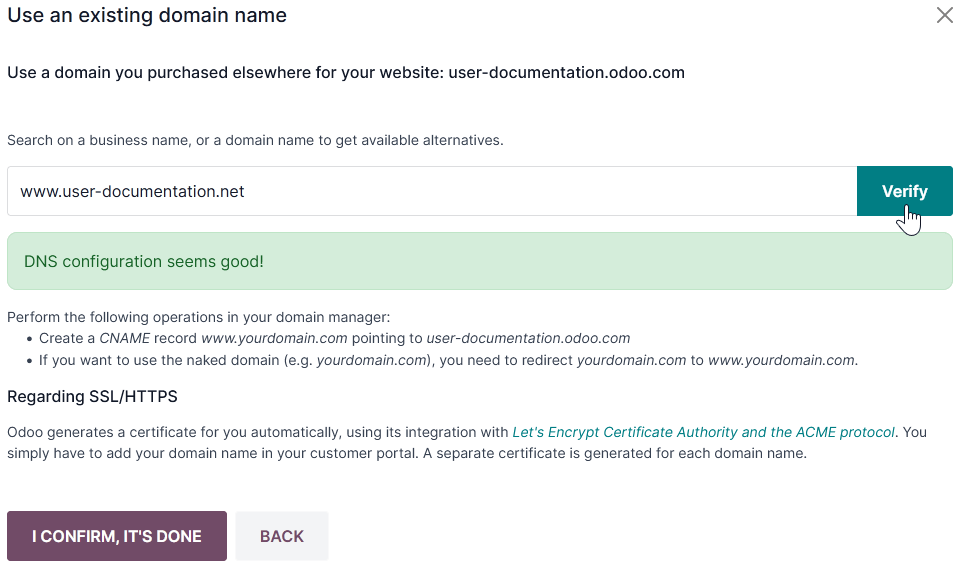
Click Use my own domain.
Enter the domain name (e.g.,
www.yourdomain.com), click Verify, then I confirm, it’s done.
On Odoo.sh, go to , type the domain name to add, then click Add domain.

See also
SSL encryption (HTTPS protocol)
SSL encryption allows visitors to navigate a website over a secure connection, indicated by the https:// protocol at the beginning of a web address rather than the non-secure http:// protocol.
Odoo generates a separate SSL certificate for each domain mapped to a database using Let’s Encrypt’s certificate authority and ACME protocol.
Note
Certificate generation may take up to 24 hours.
Several attempts to validate your certificate are made over the next five days after you map your domain name to your database.
If you use another service, you can keep using it or change to Odoo’s.
Important
No SSL certificate is generated for naked domains (domain names without any subdomains or prefixes).
Web base URL of a database
Note
If the Website app is installed on your database, skip this section and continue from the Map a domain name to an Odoo website section.
The web base URL or root URL of a database affects your main website address and all the links sent to your customers (e.g., quotations, portal links, etc.).
To make your custom domain name the web base URL of your database, access your database using your custom domain name and log in as an administrator (a user part of the Settings access right group under Administration).
Important
If you access your database using the original Odoo address (e.g., mycompany.odoo.com), the
database’s web base URL will be updated accordingly. To prevent the automatic update of the
web base URL when an administrator logs in to the database, activate the developer mode, go to ,
and enter web.base.url.freeze as the Key and True as the Value.
Note
You can also set the web base URL manually. To do so, activate the developer mode, go to , and
search for the web.base.url key (create it if necessary) and enter the full address of your
website as the value (e.g., https://www.yourdomain.com). The URL must include the protocol
https:// (or http://) and not end with a slash (/).
Map a domain name to an Odoo website
Note
Mapping your domain name to your website is different than mapping it to your database:
It defines your domain name as the main one for your website, helping search engines index it correctly.
It defines your domain name as the base URL for your database, including portal links sent to your customers via email.
If you have multiple websites, it maps your domain name to the appropriate website.
Go to . If you have multiple websites, select
the one you want to configure. In the Domain field, enter the URL of your website (e.g.,
https://www.yourdomain.com) and Save.
Warning
Mapping your domain name to your Odoo website prevents Google Search from indexing your original
database address (e.g., mycompany.odoo.com).
If both addresses are already indexed, it may take some time for the indexation of the second address to be removed from Google Search. You can use the Google Search Console to fix the issue.
Subdomains
Adding a subdomain label to a domain name (e.g., subdomain.yourdomain.com) allows creating
multiple websites with a single domain name. To do so:
Add a CNAME record to forward your subdomain (e.g.,
subdomain.yourdomain.com) to the address of your Odoo database (e.g.,mycompany.odoo.com).