Bill of materials
A bill of materials, or BoM for short, documents specific components and their respective quantities that are needed to produce or repair a product. In Odoo, BoMs serve as blueprints for manufactured goods and kits and often include production operations and step-by-step guidelines.
BoM setup
To create a BoM, go to and click New.
First, select a Product using the drop-down menu. Optionally specify a Product Variant that this BoM applies to.
Specify the Quantity of units that are produced with a single BoM.
Optionally specify a Reference that can be used to differentiate similar BoMs for the same product from one another. This reference is visible when selecting the BoM to use on the manufacturing order (MO) form.
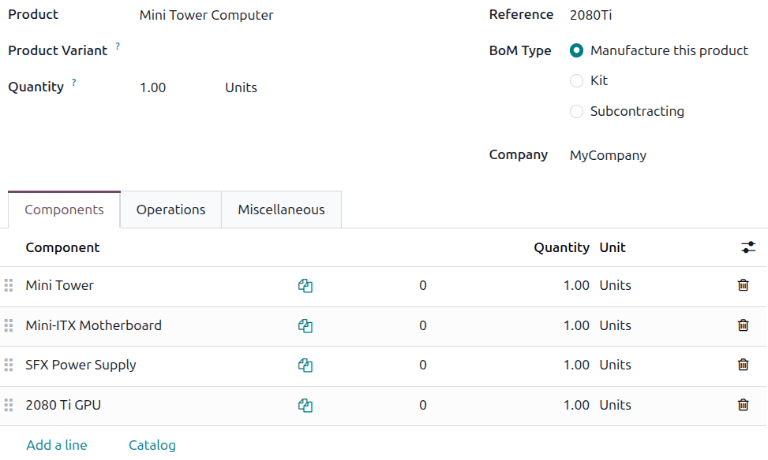
Example
A computer manufacturer specializes in Mini Tower Computers. A graphical processing unit (GPU)
shortage requires the manufacturer to use a different GPU to continue to produce mini tower PCs.
They create a new BoM with the Reference 2080Ti to differentiate it from their
standard build.
Next, set the BoM Type to Manufacture this product.
Then, specify required components and, if necessary, define any manufacturing operations.
Tip
Individual BoMs can also be quickly accessed or created by clicking the Bill of Materials smart button on any product form available in the Sales, Inventory, and Manufacturing apps, as well as through any internal links that reference a product (such as in a field or a line item).
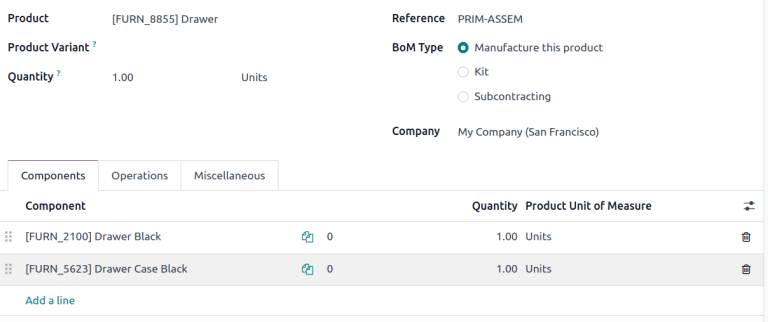
BoM for the Drawer product, displaying the Components tab.
See also
Components
In the Components tab of a BoM, specify components used to manufacture the product by clicking Add a line. From the Component drop-down menu, select from existing products or create a new product by typing the name and selecting either the Create “(component)” option to quickly add the line item, or the Create and edit option to add the component and continue to its configuration form.
Optionally, access additional fields by clicking the (settings adjust) icon at the end of the Components tab. Select the checkboxes for the following features to enable these columns:
Apply on Variants: Specify which product variant each component is used in. When the field is left blank, the component is used in all product variants.
Consumed in Operation: Specify the operation using the component. Useful for determining manufacturing readiness.
Operations
Add an operation to a BoM to specify production instructions and register time spent on an operation. To use this feature, first enable the Work Orders feature by going to . In the Operations section, select the Work Orders checkbox to enable the feature.
See also
Next, navigate to the BoM by going to and selecting the desired BoM. To add a new operation, go to the Operations tab and click Add Operation (if no operations exist) or Add a line (if operations already exist).
Doing so opens the Open: Operations pop-up window, where the various fields of the operation are configured:
Operation: Enter the name of the operation.
Work Center: Select an existing location to perform the operation, or create a new work center by typing the name and selecting the Create “(work center)” option.
Cost based on: Specify whether the cost for the operation is based on Actual time (tracked time and real employee costs) or Theoretical time (estimated time and costs).
Apply on Variants: Specify if this operation is only available for certain product variants. If the operation applies to all product variants, leave this field blank.
Duration Computation: Choose how time spent on the operation is tracked. Opt for Fixed if operators can record and modify time themselves, which allows a Default Duration to be specified. Alternatively, choose Computed to use the operation’s time tracker, which enables the last (#) work orders field. This ensures the time to complete will be estimated based on a specified number of the previous operations.
Company: Specify the company for which the BoM is available.
Include operation details in the Instructions tab.
Instructions
In the Instructions tab, click the Add a line link to open the Create Quality Point window. Individual steps in the instructions are saved as quality control points (QCPs).
In the Create Quality Point window, specify a Title and the Company for which the instruction is valid.
In the Type field, specify the type of step that should be performed. The following types of steps are available:
Instructions: This check provides specific instructions for how to complete the quality check.
Take a Picture: This check requires a picture of the product to be uploaded for later review by the assigned quality team.
Register Consumed Materials: This check prompts operators to confirm the quantity of materials that were consumed during the manufacturing operation.
Register Production: This check prompts manufacturing employees to confirm the quantity of the product that was produced during the manufacturing operation.
Print label: This check prompts operators to download and print a label to attach to the product or its packaging.
Pass - Fail: This check specifies a criterion that products must meet for the check to pass.
Measure: This check prompts employees to record a measurement of the product that must be within a tolerance of a norm value for the check to pass.
Worksheet: This check requires the employee processing the check to fill out an interactive worksheet.
Spreadsheet: This check requires the employee processing the check to fill out an interactive spreadsheet.
Important
When a step is added to a BoM operation, Odoo stores it in the Quality app as a QCP. It is possible to manually create a QCP with the Instructions check type and even assign it to an operation other than manufacturing, like receipts.
In the Team field, specify the team that is responsible for the step.
Use the Instructions tab to specify the step’s instructions.
Tip
Type / for a list of formatting options and features, including Odoo AI. In the following
example, Odoo AI is asked to generate a detailed instruction list to measure and cut wood.

Use the Worksheet tab to upload a supplementary PDF that will display when the operator completes that step.
If the Type is set to Pass - Fail, Measure, Register Production, Worksheet, or Spreadsheet, the Message if Failure tab appears. Use this tab to include instructions for what to do if the quality check fails. For example, instruct the employee processing the step to create a quality alert.
Click Save to save the step.

After all instructions are added, click Save & Close to close the pop-up window. To add more steps, click Save & New, then repeat the same steps above to configure another operation.
Finally, in the Open: Operations window, click Save to save the operation.
Note
Each operation is unique, as it is always exclusively linked to one BoM.
Tip
After creating an operation, click the Copy Existing Operations button to choose an operation to duplicate into the BoM. It is possible to choose operations from other BoMs. This creates an independent copy of the selected operation and adds it to the BoM.

Miscellaneous
The Miscellaneous tab contains more BoM configurations to customize the following fields:
Manufacturing Lead Time: The number of days required to manufacture the product
Days to prepare: The number of days in advance that MO should be created to allow time to replenish components or manufacture sub-assemblies
Batch Size Value: If selected, the number of units to add to a MO can be specified. When the demand exceeds the batch size, the MO is split into multiple MO.
Project: the project to which the BoM applies. The Project app must be installed for this field to display.
Manufacturing Readiness: Choosing When all components are available displays a red Not Available component status unless all components are available. Choosing When components for the 1st operation are available shows the Component Status as a green Not Available when only the components consumed in the first operation are in stock. This indicates that although not all components are available, operators can at least begin with the first operation.
Tip
Add a Register Consumed Materials step to the BoM instructions to indicate when a component is consumed.

Version: Displays the current BoM version, visible with the Odoo PLM app installed for managing BoM changes.
Additional Notes: Additional notes that are added to an MO. These notes are also visible in the Shop Floor module.
See also

Replace components across multiple BoMs
Periodically, the design of a product may change to use different components. Use the Bill of Materials page or the component’s product form to update the component across multiple products at the same time.
Bill of Materials page
To begin, navigate to . All BoMs are listed on this page.
To locate all BoMs that use the affected component, click into the search bar and filter using a Custom Filter. Select . Set is equal to, and select the component that you want to filter by. Click Search. BoMs with the matching component display.

Then, select the BoMs to update and click . The component lines display on the BoM Lines page.
To update the component across multiple BoMs, first filter by the component again by clicking into the search bar and selecting Custom Filter. Filter by Component, set is equal to, and select the component, then click Search. The BoM lines (component and associated BoMs) display.

Select the lines to update, then update the Component field for one of the lines. When clicking away from the Component field, a Confirmation window opens to verify that multiple components will be updated. Click Update to verify the changes.
Component product form
To begin, navigate to . Click in the search bar and search for the component product, then open its product form.
Click the Used In smart button. All BoM lines that contain this component are displayed. To update the component across multiple products, select the checkbox next to the affected BoMs, then click in the Component field of one of the selected BoMs. Update the Component to the new component, then click away. A Confirmation pop-up window opens. Verify that the selected records should be updated by clicking Update.
Add by-products to BoMs
A by-product is a residual product that is created during production in addition to the main product of a BoM. Unlike the primary product, there can be more than one by-product on a BoM.
To add by-products to a BoM, first enable the By-Products feature in . In the Operations section, select the checkbox for By-Products to enable the feature.
Once the feature is enabled, add by-products to a BoM by clicking the By-products tab. Once the feature is enabled, add by-products to a BoM by clicking the By-products tab. Click Add a line, and fill in the By-product, Quantity, and Unit. Optionally, specify a Produced in Operation for the by-product.
Optionally, the Cost Share percentage of a by-product can also be specified at this
stage. The cost share is the percentage of the final production cost for the by-product, divided by
the quantity produced. The total of all by-products’ cost share must be less than or equal to 100.
Example
The by-product, Mush, is created in the Grind grapes operation when producing Red Wine.

BOM Overview
Each BoM form includes a BOM Overview that serves as a roadmap for all the BoMs and operations involved in manufacturing a Quantity of a product, including routes, times, and costs.
To open it, navigate to , then select a BoM from the list. In the BoM form, click the BoM Overview smart button.
Example
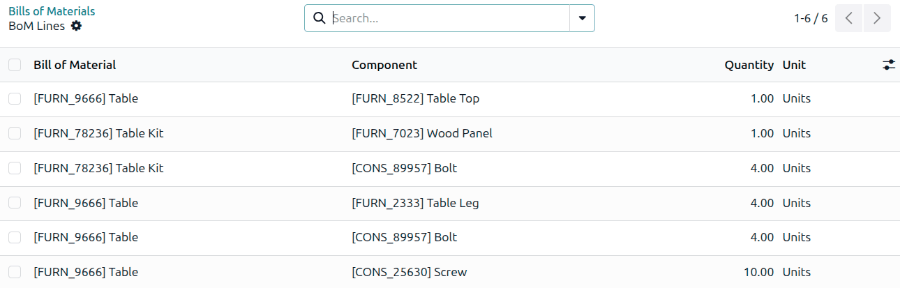
Consider a Table product manufactured using the following components:
1
Table Top4
Table Legs4
Bolts10
Screws
In this multi-level hierarchy, the Table Top is a sub-assembly consisting of 2 Wood Panels,
following the Manual Assembly operation. Furthermore, each Wood Panel is produced from 6 Ply
Layers and 2 Wear Layers.
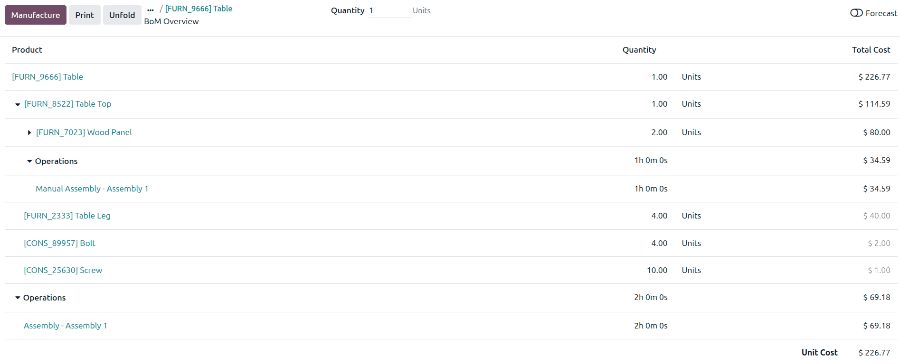
By default, the following columns are listed in the BOM Overview:
Product: The product being manufactured is listed in the top row. In subsequent rows, the components required to manufacture the product are listed. If sub-assemblies are required for a component, expand the row using the (Fold) icon. If an operation is required to manufacture the component or product, it is listed under the Operations section.
Quantity: The number of units required to manufacture the product is listed.
Total Cost: This is the total cost of the unit, including price, labor, and other factors. Costs displayed in grey are read directly from the component’s product record (the Cost field), while costs in regular text are computed by the report. The BOM Overview only calculates a cost when it has a sub-BoM to expand (using manufactured components) or when it can derive it from a work center rate (via operations). For purchased components, consumables, or any product without a BoM, the report shows the standard cost defined on the product and greys it out to make the distinction visible.
Toggle the Forecast button to display more columns in the BOM Overview report. These fields help forecast future product manufacturing, taking into account existing component inventory.
The following columns are available in the BOM Overview when Forecast is enabled:
Free to Use/On Hand: This shows how many units can be reserved for an order out of the total number of units available to the company.
Status: This column specifies whether a component is Available or Not Available, or if it needs to be purchased (# To Buy). If the product or component needs to be manufactured, the Estimated date of completion is listed, taking into account the Lead Time listed in the next column.
Lead Time: The number of days required to manufacture or purchase a component or product is listed.
Route: If a product or component is replenished via a specific route, it is listed in this column.
Click the Manufacture button to create a new manufacturing order for the selected product.
Click the Print button to generate a PDF of the report. To include all lines in the PDF, expand them using the (Fold) icon.
To expand all lines in the report at once, click the Unfold button. To collapse the lines again, click the Fold button.