Documents
Odoo Documents allows you to store, view, and manage files within Odoo.
Folders and documents are organized into sections accessible from the tree on the left. The following sections are available:
All: displays all folders and files the user has access to.
Company: contains folders and files shared across the company. Access is determined by the access rights defined for the folder and file.
My Drive: the user’s personal workspace for organizing and accessing files and folders they own or have uploaded.
Shared with me: includes files that have been shared with the user but are not part of any parent folder they have access to.
Recent: shows recently modified files the user has permission to view or edit.
Trash: stores deleted files and folders.
Click a section in the tree to view its contents. Select a folder to open it, manage it, and access its files.
Click a file to open it and take available actions. To close the file, press Esc or click the (close) icon. You can also drag and drop a file or folder to move it to another folder or section.
Tip
Use the search bar to quickly find specific items.
The chatter tracks changes to folders and files and allows communication with internal users and external contacts. Open the Details panel to access it.
See also
Configuration
Deletion delay
By default, items moved to the trash remain there for 30 days before being permanently deleted. To adjust this delay, go to and edit the Deletion delay (days) field.
File centralization
File centralization allows for automatically organizing all files associated with a specific app into dedicated folders. It is enabled by default for each app upon installation. To disable file centralization, modify the default folder, or configure the tags to be added to the app-specific files, go to , and edit the relevant setting under the File Centralization section.
Tip
File centralization cannot be disabled for Accounting documents. A sub-folder is automatically created for each journal type (e.g., Sales, Purchase, Bank, etc.), and the journal name is added as a tag on each document. Click Journals to edit the list of journals to synchronize and define their corresponding folders and tags.
For Human Resources files, a sub-folder is automatically created for each employee, and specific tags are added to the files based on the document type (e.g., Contracts, Payslips, etc.). You can also create additional Employee Subfolders automatically by entering the desired folder names, separated by commas.
Note
Changing the folder or tags only affects new files; existing files remain unchanged.
When file centralization is enabled for an app, deleting a record in that app moves its attachments to the trash in the Documents app.
Folders
You can organize files in folders available in the Company or My Drive sections.
To create a folder, select the desired section in the tree, click New, and select Folder. In the pop-up, enter the folder’s Name and click Save. To create a sub-folder, select the parent folder first, then follow the same steps.
Note
Some folders and sub-folders are created automatically based on the file centralization settings.
To manage a folder or sub-folder, select it and click the (Actions) icon above the tree. The following options are available in the menu:
Download: Download the folder as a .zip file, including its files and sub-folders.
Rename: Modify the folder’s name.
Add star: Mark a folder as a favorite for quicker access. This setting is user-specific and does not affect other users’ workspaces. You can then use the Starred filter to navigate to your favorite folders quickly.
Info & Tags: View the folder’s details and chatter.
Move to trash: Move the folder and its content to the trash.
Actions on Select: Define the server actions that are available (as buttons) for the files in the folder. Click an action to add or remove it. Click Add Custom Action to create a new one.
Automations: Create automation rules.
Important
Setting up automation rules requires activating Studio, which may impact your pricing plan.
AI Auto-sort: Use Odoo AI to automatically organize the files in the folder and trigger actions based on the provided AI prompt. Add the corresponding actions for your prompt in the lower section of the popup. This option requires the Odoo AI app to be installed.
Tip
Switch to the list view to:
manage multiple folders at once.
Export or Insert in spreadsheet one or multiple folders.
quickly execute actions such as Share, Download, Rename, etc. Hover over a folder line and click the corresponding icon at the end of the line to perform the desired action.
Files
To upload a file, select the desired folder in the tree, click New, and select Upload.
Tip
On Odoo Online databases, each uploaded file must not exceed 64MB.
You can also drag and drop a file from your computer to the desired folder within the Documents app.
URL links
To add a link to a URL (e.g., a video) and make it accessible from a folder, click New and select Link. Enter the URL, add a Name, and select the appropriate Folder.
Spreadsheets
To create a spreadsheet, click New and select Spreadsheet.
See also
Managing files
Several buttons are available in the top bar when opening a file:
the Actions menu, which includes the options described below
Download
The following options are available in the Actions menu:
Duplicate: Create a copy of the file. In the popup, select or create the destination folder, then click Duplicate in destination folder’s name.
Move to Trash: Move the file to the trash.
Rename
Info & tags: View the file’s details and chatter.
Move: Move the file to another folder. In the popup, select or create the destination folder, then click Move to destination folder’s name.
Create shortcut: A shortcut is a pointer to a file, allowing access from multiple folders without duplicating the file. In the popup, select or create the destination folder, then click Create a shortcut in destination folder’s name.
Manage versions: View all versions of the file in upload order, download a specific version, or upload a new one as needed.
Lock: Protect the file from any modifications.
Copy Links: Copy the file’s URL for sharing. Access is controlled based on the file’s access rights.
Split PDF: Split a PDF file.
Tip
You can use folder-specific email aliases to automatically save files sent to the alias into the corresponding folder.
Switch to the list view to:
manage multiple files at once.
Export or Insert in spreadsheet one or multiple files.
quickly perform actions such as Share, Download, Rename, etc. Hover over a file line and click the corresponding icon at the end of the line to perform the desired action.
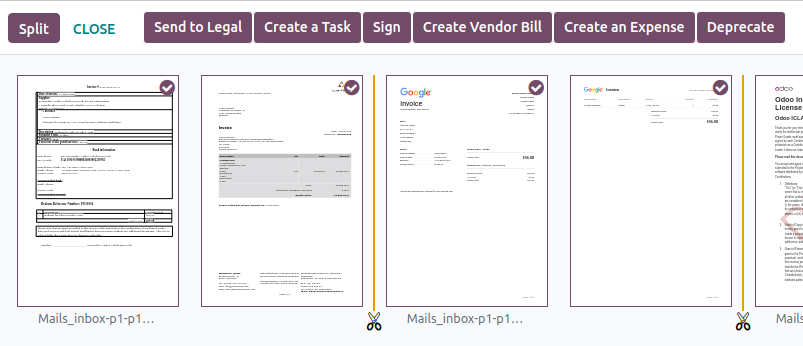
Splitting and merging PDFs
To divide a PDF into individual or groups of pages, open the PDF, click the Actions button, and select Split PDF. Click the (scissors) icon between pages to remove a split if needed, then click Split to confirm.
To merge PDF files, follow these steps:
Navigate to the folder containing the files you want to merge.
Hold down Ctrl and click the relevant files.
Click the Actions button and select Merge PDFs.
If needed, click Add file to browse and select a PDF file from your computer.
Click the (scissors) icon between the files.
Click Split to merge them.
Note
The original PDFs are replaced by the merged version.
Tip
Press Shift + S to add or remove all splits between pages.
To delete a specific page, select the page, then click Delete.
Requesting files
Request files from users as a reminder for them to upload specific files. To do so, follow these steps:
Click New and select Request.
Enter a Document Name and select the person you’re requesting it from in the Request To field.
If needed, set a Due Date In, edit the Folder where the file should be added, add Tags, and write a Message.
Click Request.
A placeholder for the missing file is created in the selected folder. Once the file is available, click the placeholder to upload it.
Tip
You can also request a document from the list of scheduled activities.
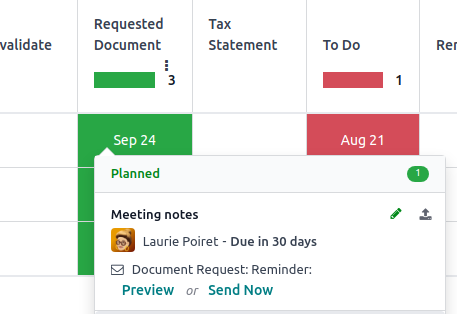
To see the list of all requested files, switch to the Activity view of the Documents app and go to the Requested Document column. Click a requested file’s date to view its details. You can then:
Upload a file using the (upload) button;
Edit the activity using the (edit) button;
Cancel the activity using the (cancel) button;
Send a reminder email. Click Preview to preview the content of the reminder email if needed, then Send Now.
To send a reminder email for all requested files, click the (ellipsis) icon in the Requested Document column and select Document Request: Reminder.
Details panel
To view a folder’s or file’s information and tags, select the folder or file, then click the icon (for folders) or Actions button (for files) and select Info & Tags.
Tip
Alternatively, for folders, you can also click the (Info & Tags) button in the upper-right corner next to the view icons.
The details panel allows the following:
Change the file’s folder or the folder’s name.
View the file’s or folder’s size and the folder’s item count.
Change the file’s or folder’s owner and contact. By default, the person who creates a file or folder is set as its owner and granted full access rights to it. To change it, select the required user from the dropdown list. The contact is a person who only has Viewer access rights to the file or folder, e.g., an existing supplier in the database.
Access the chatter.
To close the details panel, click the (remove) button in the upper-right corner.
Note
To view a file from their user profile, a user must be set as the contact and have at least Viewer access.
Email aliases
You can use an email alias to automatically save files sent to the email alias into a specific folder. To set up an email alias for a folder, follow these steps:
Make sure a custom alias domain is configured in the General Settings.
Select the folder where files should be saved.
Click the (Info & Tags) in the upper-right corner next to the view icons.
In the details panel, enter the desired email alias.
Optionally, specify an Activity type and assignee to create an activity when a file is received via the alias.
Optionally, select the Tags to automatically apply to the files created through the alias.
Note
Emails sent to the alias without attachments are converted into files, using the email subject as the file name.
See also
Linked records
To link the file to a specific record, select the appropriate model from the Linked to dropdown menu (identifiable by its placeholder No linked model), then select the desired record.
Note
If file centralization is enabled for a specific app, adding a file to the Documents app by uploading an attachment automatically adds the corresponding record in the Linked to field of the file.
Sharing and access rights
Note
You can only share folders and files and edit their access rights if you have editing rights.
Access rights can be set on:
folders: Select the folder, click the (gear) icon, and select Share.
files: Open the file and click Share in the top bar.
Tip
Switch to the list view to share or manage the access rights of multiple filers or folders at once.
To grant access to specific users or contacts, follow these steps:
In the (Invite people) field, select the users or contacts you want to grant access to from the dropdown menu or enter their email address.
Note
Access through link must be enabled first before granting access to external contacts.
Set the Role field to Viewer or Editor.
If desired, toggle the Notify switch off to avoid sending a notification email.
Click Share to grant access (with or without a notification) or Copy Links to copy the sharing link to the clipboard.
Tip
To remove a permission or set an expiration date for it, hover the mouse over the relevant contact and click the (remove) or (calendar) button, respectively.

To configure General access for Internal users or Access through link, select Viewer, Editor, or None (to completely restrict access). For Access through link, you can also specify whether the folder or file should be Discoverable (i.e., accessible through browsing). Click Save to apply the changes, then Copy Links to copy the sharing link to the clipboard.
Note
Each folder and file URL includes the access rights assigned to it. When you share a link to a folder, recipients are directed to a dedicated portal where they can view the files in that folder, excluding any with restricted access.
Portal users can access folders and files they have permission to view or edit through the customer portal by clicking the Documents card.
Managing files across apps
You can save files to or attach existing files in the Documents app from any record.
To save an attachment to the Documents app, hover over an attachment in the record’s chatter and click the (Add to Documents) icon.
To attach a file to a record from the record’s chatter, click the Add from Documents icon, select the desired file, and click Add from Documents to add the raw file, or Paste Link(s) to insert a link to the file (and preserve the document’s access rights).
To insert a file from Documents into the Odoo rich-text editor, type
/file, then select the desired file, and click Add from Documents to add the raw file, or Paste Link(s) to insert a link to the file (and preserve the document’s access rights).
File digitization with AI
Files available in the Finance folder can be digitized. Select the file, click Create Vendor Bill, Create Customer Invoice, or Create Customer Credit Note, then click Send for Digitization.
See also