
Schedule interviews
Once an applicant has reached the First Interview stage, it is time to schedule an in-person, virtual, or phone interview. This can be done in one of two ways through the Recruitment app, either by the recruitment team, or by the applicant.
With a single drag and drop action, Odoo sends the applicant an email with a self-service scheduling link. The applicant selects an available time slot, and the meeting is automatically added to the calendars of all participants. This eliminates the need for back-and-forth emails or phone calls.
Recruitment team scheduled interviews
When an applicant reaches an interview stage, the recruitment team schedules the interview by first coordinating a suitable date and time with the applicant and interviewers.
To schedule an interview, navigate to the applicant’s card by going to the app and clicking the relevant job card. Click the desired applicant’s card on the Applications page.
To schedule a phone, virtual, or in-person interview, click the No Meeting smart button at the top of the applicant’s record.
Note
The Meetings smart button displays No Meeting if no meetings are currently scheduled. For applicants who are new to the First Interview stage, this is the default.
If there is one meeting already scheduled, the smart button displays 1 Meeting, with the date of the upcoming meeting beneath it. If more than one meeting is scheduled, the button displays Next Meeting, with the date of the first upcoming meeting beneath it.
Clicking the Meetings smart button loads a calendar, showing the scheduled meetings and events for the currently signed-in user, as well as the user’s favorites configured in the Calendar app. To hide any user’s schedules from the calendar, uncheck the box next to their name.
To view only the schedules of the user and the interviewers, click + Add Attendees at the bottom of the Attendees list and add each desired interviewer from the resulting drop-down menu.
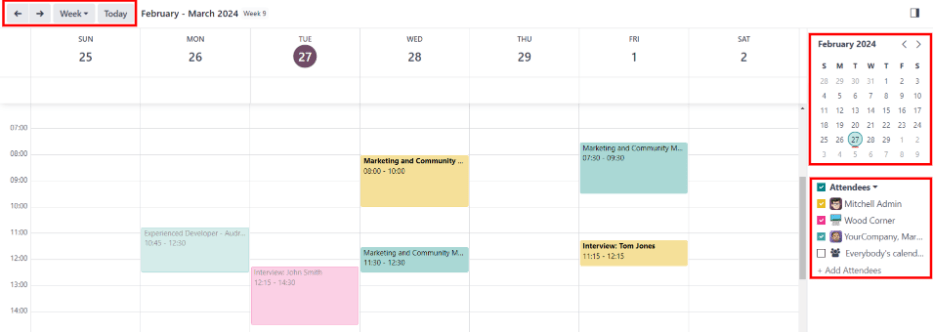
To add a meeting to the calendar when in the Day or Week view, click on the start time of the meeting and drag down to the end time. Doing so selects the date, time, and length of the meeting. A meeting can also be added by clicking the New button.
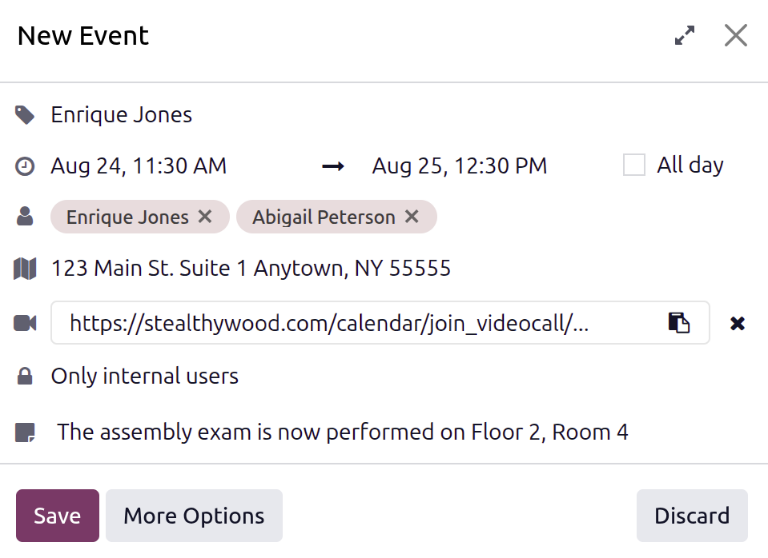
Both methods cause a New Event pop-up window to appear.
New event pop-up window
Configure the information for the interview on the New Event pop-up window. The only required information is the meeting title, date, and time.
(Booking Name): Enter the title for the meeting. The default subject is the applicant’s name.
(Dates): Configure the start and end date and times for the meeting. Clicking either of these fields opens a calendar pop-up window. Click on the desired date to select it, enter the times in the corresponding fields, then click Apply.
All Day: Click the box to schedule an all-day interview. If this box is ticked, the (Dates) fields change to display the date only.
(Participants): Select the people attending the meeting. The default attendees are the prospective candidate and the assigned recruiters for the job position. Add as many other people as desired.
(Location): Enter the address for the interview.
(Videocall URL): If the meeting is virtual, or if a virtual option is available, click Video, and a URL is automatically created and populates this field.
(Visibility): Determine who can see the meeting using the drop-down menu. The default options are Public, Private, and Only internal users.
Notes: Enter any relevant notes in this field. There is an option to enter formatted text, such as numbered lists, headings, tables, links, photos, and more. Use the powerbox feature by typing a
/to reveal a list of options. Scroll through the options and click on the desired item. The item appears in the field and can be modified. Each command presents a different pop-up window. Follow the instructions for each command to complete the entry.
Once the card details are entered, click Save to save the changes and schedule the interview.
More options
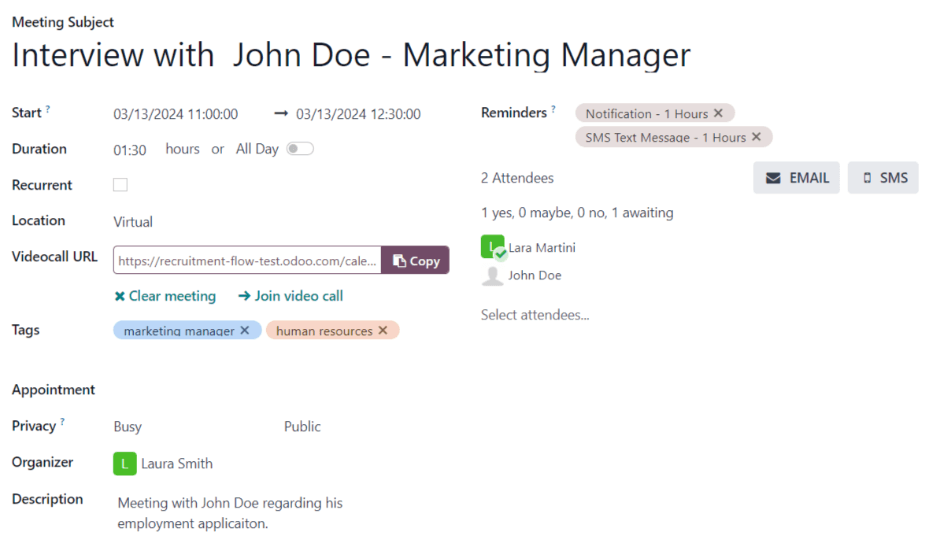
To add additional information to the meeting, click the More Options button of the New Event pop-up window. Enter any of the following additional fields:
Duration: This field auto-populates based on the Start (and end) date and time. If the meeting time is adjusted, this field automatically adjusts to the correct duration. The default length of a meeting is one hour.
Linked to: The applicant being interviewed. This field cannot be modified. Click the applicant’s name to view the applicant’s card.
Status: Select if the interviewers are marked as Busy or Available during the interview. This field is set to Busy by default.
# guests: This field displays the number of people invited to the meeting.
# Awaiting: The number of guests that have not responded to the meeting invitation.
Email: Click this to email the meeting guests with any updates.
SMS: Click this to send an SMS message to the meeting guests.
Send meeting to attendees
Once the meeting details are correct, the meeting can be sent to the attendees via email or SMS. This is done from the expanded event form.
Via email
To send the meeting via email, click the Email button next to the Attendees field on the expanded meeting form.
A Contact Attendees email configurator pop-up window appears. A pre-formatted email using the default Calendar: Event Update email template populates the email body field.
All meeting guests are added to the To field by default. Make any desired changes to the email, then click Send to send the email.
Via SMS
To send the meeting via SMS, click the SMS button next to the Attendees field on the expanded meeting form. A Send SMS pop-up window appears.
At the top, a blue banner appears if any attendees do not have valid phone numbers, and lists how many records are invalid. If a contact does not have a valid mobile number listed, click Discard, edit the attendee’s record, then redo these steps.
When no warning message appears, type in the message to be sent to the attendees in the main text field. To add any emojis to the message, click the (smile add) icon on the side of the pop-up window.
The number of characters and amount of text messages required to send the message (according to GSM-7 criteria) appears beneath the text field. Click Put in queue to have the text sent later, after any other messages are scheduled, or click Send now to send the message immediately.
Note
Sending text messages is not a default capability with Odoo. To send text messages, credits are required, which need to be purchased. For more information on IAP credits and plans, refer to the In-app purchases (IAP) documentation.
Applicant scheduled interviews
Coordinating interview times typically requires several email exchanges or phone calls, and can slow the recruitment process. Enabling Odoo’s self-service scheduling removes that bottleneck. When an applicant is moved to an interview stage, the system automatically sends a scheduling link, records the selected slot, and updates all relevant calendars.
This automation is turned off by default. To activate this, modify the First Interview and Second Interview stages and assign the Recruitment: Schedule Interview email template to them.
Modify stage
Modify the First Interview or Second Interview stage so the stage’s Email Template field is set to Recruitment: Schedule Interview.

Send email
After configuring the First Interview or Second Interview stages to send emails, drag and drop the applicant card into one of these stages to send the email.
Self-scheduled interview
When the applicant receives the email, they click the Schedule my interview button at the bottom of the email. This navigates the applicant to a private online scheduling page, which is only accessible through the emailed link.
This page displays the Meeting Details on the side of the screen which includes the format and length of the meeting. In this example, the interview is virtual ( Online) and the duration is one hour ( 1 hour).
The applicant clicks on an available day on the calendar, signified by purple text. Once a day is selected, they click one of the available times to select that date and time.

Tip
Be sure to check the Timezone field beneath the calendar to ensure it is set to the correct time zone. Changing the time zone may alter the available times presented.
Once the date and time are selected, the applicant is navigated to an Add more details about you page. This page prompts the applicant to enter their Full name, Email, and Phone number, all of which are required. The contact information entered on this form is used to remind the applicant about the scheduled interview.
When everything is entered, the applicant clicks the Confirm Appointment button, and the interview is scheduled.
After confirming the interview, the applicant is taken to a confirmation page, where all the details of the interview are displayed. The option to add the meeting to the applicant’s personal calendars is available, through the Add to iCal/Outlook and Add to Google Agenda buttons, beneath the interview details.
The applicant is also able to cancel the interview if necessary, with the Cancel your appointment button at the bottom of the confirmation.
