WhatsApp
WhatsApp is an instant messaging and voice-over-IP app that allows users to send messages, make calls, and share content. Businesses can use WhatsApp Business to communicate with their customers by text, send documents, and provide support. This documentation covers the integration of a WhatsApp Business Account (WABA) with Odoo using the WhatsApp Business API.
Note
WhatsApp is an Odoo Enterprise-only application that does not work in Odoo Community edition. To use the Odoo WhatsApp app, switch from Community to Enterprise.
Connecting a WhatsApp Business Account to an Odoo database enables the following in Odoo’s WhatsApp app:
Send and receive WhatsApp messages directly from an Odoo database.
Create and send pre-approved templates with dynamic placeholders/variables, such as:
Quotations from the Sales app.
Receipts and invoices from the Point of Sale app.
Tickets from the Events app.
Important
The WhatsApp integration is only compatible with WhatsApp Business Platform Accounts. Personal WhatsApp accounts and WhatsApp Business App accounts are not compatible with the Odoo WhatsApp integration. See Meta’s documentation to learn more:
The WhatsApp integration supports two flows: company-initiated and customer-initiated. A company can start a discussion by sending a template to one or more customers. If the customer answers within 15 days, a Discuss chat window pops up to begin the conversation.
If a customer initiates by sending a message to the company’s public WhatsApp number, Odoo opens a group chat with all operators responsible for the WhatsApp channel.
Tip
Consider setting up separate WhatsApp accounts for each department, to better manage communications.
WhatsApp configuration in Meta
WhatsApp is operated by Meta, the parent company of Facebook. Odoo’s WhatsApp integration uses a standard API connection configured in Meta:
Create a Meta business account.
Create a Meta developer account.
Set up an app and WhatsApp product in Meta’s developer console.
Test the API connection.
Once the WhatsApp API is connected, Odoo users can send and receive messages through Odoo’s Discuss application.
Create a Meta business account
Important
In order to create a Meta business account, the user must have a personal Facebook account that has existed for a minimum of one hour prior to setting up the Facebook Business account. Trying to create the business account prior to this time results in an error.
To create a business account with Meta, navigate to Meta Business Suite. Click Create account and then enter the business name, the administrator’s name, and a work email address. Click Next, and confirm the email address in the pop-up window that appears. After confirming, click Done to close the window.
Next, follow the instructions in the email sent by Facebook to confirm the creation of the business account and to complete the setup process.
See also
Important
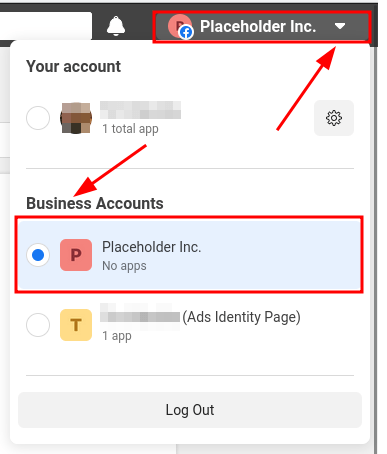
If the business account is linked to a personal Facebook account, the administrator must switch between their personal account and the business account for the remainder of the configuration.
To switch to the business account, navigate to the Meta Developer Dashboard and click the account name in the top-right corner. Under Business Accounts, select the business to be configured.
Create a Meta developer app for Odoo
On the Meta Developer Dashboard dashboard, sign in with the Meta developer account. If no account is configured yet, link a Facebook account to create a Meta developer account.
Note
A Facebook developer account is different than a Facebook business account. While developer accounts are tied to personal Facebook accounts, business accounts are not as they represent a business and manage all of the business’s assets in Meta, such as apps.
After signing in to the Meta developer account, click My Apps in the top-right corner. This redirects the administrator to all the apps the developer has configured in the specific developer account. Click Create App to configure a new Meta application.
Add app details
The first step of the Create an app process is to fill out the App details
section. Enter Odoo in the App name field.
Note
The app name can be changed in the settings afterward.
Warning
Trademarks and branded elements may not be used in this text section. This includes the Meta
group of companies. Do not include the word WhatsApp or the system flags this as an error.
Next, enter the developer email address in the App contact email field, then click Next.
Select the app type
The next step in app creation is the :Use cases section. Under , select Others, select Others, then click Next. The page redirects to Select an app type.
Select Business. This selection allows for the creation and management of the WhatsApp API. Click Next to configure the app as desired.
Select the business portfolio
The last step of the app creation process is to connect a business portfolio.
Under Business portfolio - Optional, click the drop-down menu and select the Meta business account profile. Review the Meta Platform Terms and Developer Policies agreements, then click Create app to accept and create the app.
To accept the agreements and create the app, enter the Facebook account password and click Submit. The browser then redirects to the Meta for Developers dashboard.
Warning
If the Meta business account is prohibited from advertising, the app cannot be claimed. To resolve this issue, navigate to Meta Business Suite for assistance.
For more information, see Meta’s documentation on advertising restrictions.
Add a WhatsApp product to the app
Now that the basic structure of the app has been created, a product needs to be added to the app. Navigate to the Meta Developer Dashboard, and click on the app that is being configured. The page redirects to the app’s dashboard.
Under Add products to your app, go to WhatsApp near the bottom of the page and click Set up.
The browser then redirects to the configuration page for the WhatsApp Business Platform API.
Under Select a Meta Business Account option, select the Meta business to be configured, then click Continue to confirm the selection and agree to Meta’s terms and conditions as linked on the Meta App Dashboard.
Once the WhatsApp product is added to the app, Meta provides a WhatsApp test phone number. This test phone number can send unlimited messages to a maximum of five recipients.
Under Send and receive messages, select the To field and choose Manage phone number list. Add up to five valid WhatsApp number as recipients, then enter the confirmation codes sent to those phone numbers in WhatsApp to verify.
See also
WhatsApp API quickstart
Once the Meta accounts and app have been configured, click Continue to proceed to the WhatsApp Quickstart page. This page provides a starting point for configuring the WhatsApp API by adding a phone number and sending an initial test message.
Note
If the browser does not automatically redirect to the WhatsApp Quickstart page,
navigate to the Meta Developer Dashboard and select
the Odoo app.
In the menu on the left-hand side of the page, click the (down chevron) icon next to the WhatsApp section heading. A small menu opens, containing the following options:
Quickstart
API setup
Configuration
Click the Quickstart option, and then click Start using the API.
API setup
After clicking on Start using the API, the page navigates to the API setup. Now that the test number has been created, a test message can be sent to confirm that WhatsApp is working properly. Navigate to the Send and receive messages section. Under Step 1 Select phone numbers, click the drop-down menu next to To.
Next, select the only option available: Manage phone number list. Follow the steps and add up to five phone numbers to send the free test messages to. Enter the appropriate country code and phone number, then click Next.
Important
Adding a phone number to send to in this step allows for a successful test to be sent by the terminal. This is critical to ensure the WhatsApp API is working.
On the next page, enter the verification code sent to the phone numbers, and click Next to verify the numbers.
Send a test message via terminal
Once the phone number has been verified, send a test message via the terminal. Under Step 2 Send messages with the API, click Send Message. This should send a test message to the phone numbers that were added.
Upon successfully receiving the message to the numbers, move onto the next section to produce and configure webhooks.
WhatsApp configuration in Odoo
To create a Callback URL and Webhook Verify Token, the phone number, token, app ID, and account ID need to be configured in Odoo; these values are used to set up webhooks, which make it possible to receive messages in the database. The configuration steps in this section are all performed in the Odoo database.
In Odoo, navigate to , then click New to configure the WhatsApp business account in Odoo.
In another browser tab, navigate to Meta Developer Dashboard. Select , and then copy the following values from the Meta developer console into the corresponding fields in Odoo:
Name |
Meta Console |
Odoo Interface |
|---|---|---|
Phone |
Phone number ID |
Phone Number ID |
Token |
Temporary access token |
Access Token |
App ID |
App ID |
App ID |
Account ID |
WhatsApp Business Account ID |
Account ID |
To retrieve the App Secret, navigate to the Meta Developer Dashboard, and select the Odoo app. In the left-hand side menu,
under App settings, select Basic.
Next, click Show next to App secret, and enter the account password. Copy the App secret and then paste it into the App Secret field on the Odoo WhatsApp Business Account configuration dashboard.
To complete the setup of the WhatsApp business account in Odoo, click Test Connection. If the configuration is set correctly, a successful message in green populates the upper-right corner of the dashboard.
Configure webhooks
To configure the webhooks for the Odoo WhatsApp app, navigate to the Meta Developer Dashboard, and select the Odoo app. In the left-hand side menu,
click . Go to Step 3: Configure webhooks to
receive messages and click Configure webhooks.
Tip
Webhook configuration settings can also be accessed by navigating to the Meta Developer
Dashboard, selecting the Odoo app, and then selecting
Webhooks in the left hand menu.
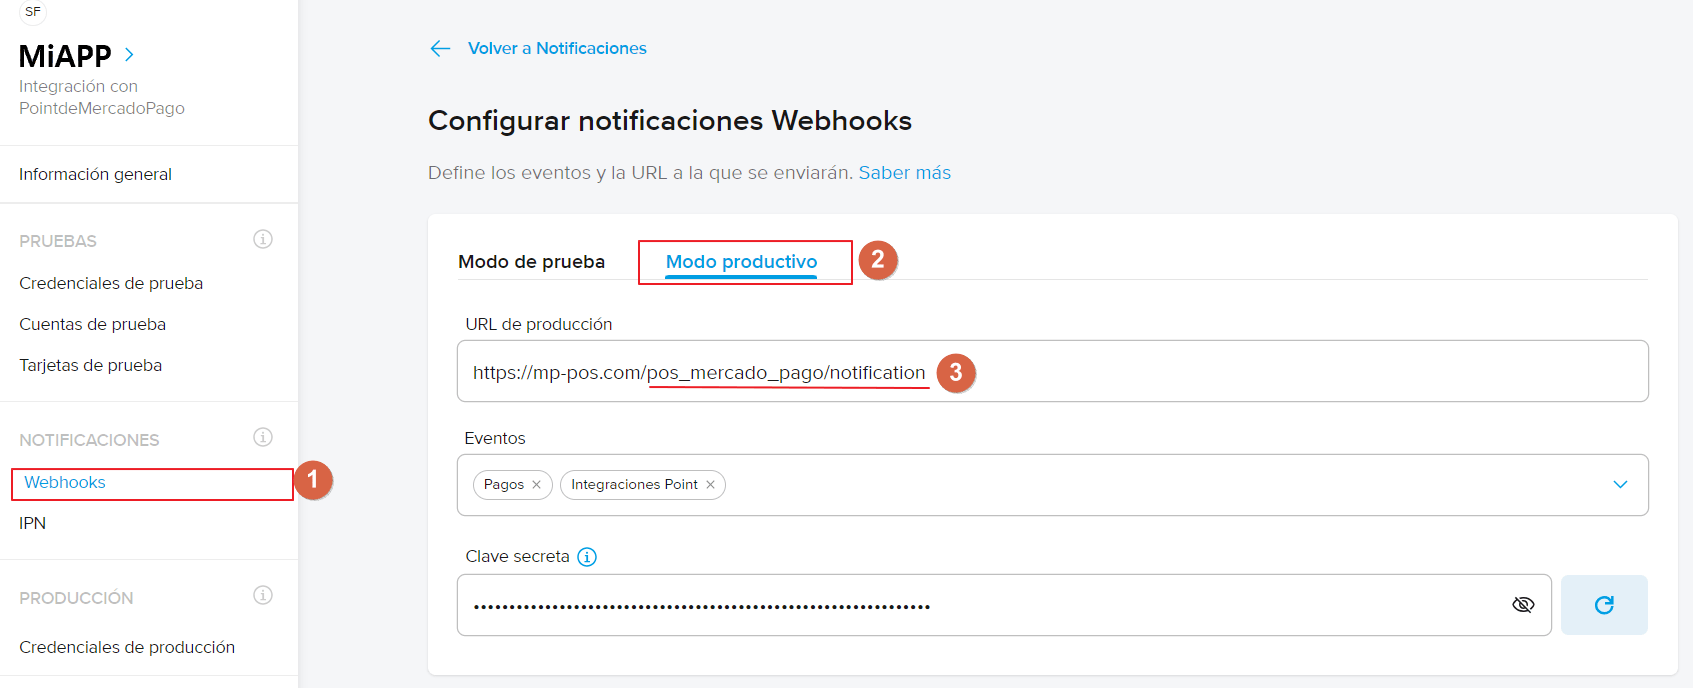
On the page, click Edit. This is where the Callback URL and Webhook Verify Token values from Odoo are added.
Note
The Callback URL and Webhook Verify Token values are both automatically populated after clicking on Test Connection in the previous step.
In a separate browser window, retrieve the necessary values in Odoo by navigating to and then selecting the account that is being configured. The values are located under Receiving Messages.
Copy and paste the Callback URL from Odoo into the Callback URL field in Meta, then copy and paste the Webhook Verify Token into the Verify Token field on the Meta developer console. Click Verify and save.
Add webhook fields
Now that the Odoo database and WhatsApp have been configured to communicate with each other, the next step is to add webhook fields to specify the information that should be sent between the two. To add individual webhook fields in Meta’s developer console, go to the Webhook fields section and click Manage. In the pop-up window that loads, check the boxes in the Subscribe column for the following field names:
account_update
message_template_quality_update
message_template_status_update
messages
template_category_update
After making the selections, click Done.
If the Webhooks configuration is successful, the buttons in the Subscribe column should change from Subscribe to Unsubscribe:
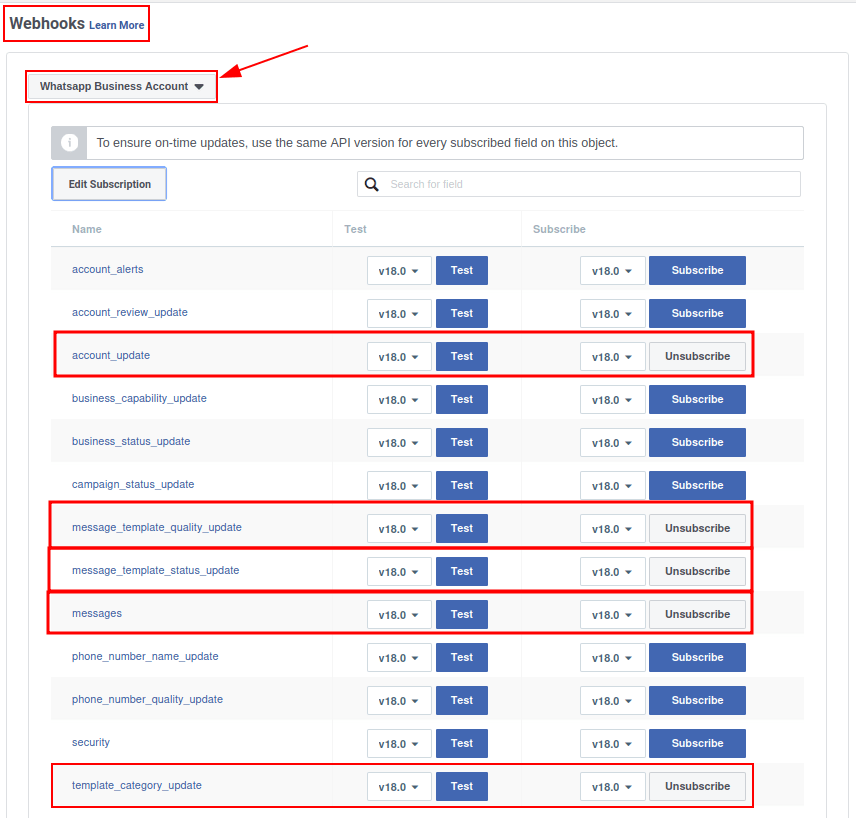
Important
Webhook fields only appear once the subscription is confirmed using the Callback URL and Webhook Verify Token.
Add a phone number
To configure the business phone number to use for WhatsApp in Odoo, navigate back to the Meta
Developer Dashboard and select the Odoo app. Under
WhatsApp in the left-hand side menu, click API setup. Go to Step
5: Add a phone number, and click Add phone number.
Enter a Business name and Business website or profile page.
Tip
The Business website or profile page field can be a link to a social media page.
Select the country that the company does business in from the Country drop-down menu; a business address is optional. After adding the business location, click Next.
On the next page, fill out the following WhatsApp Business profile details:
WhatsApp Business Profile Display Name
Timezone
Category
Business description (optional)
Once these sections are complete, click Next. The page refreshes and then prompts the administrator to Add a phone number for WhatsApp in the respective field. Enter the business phone number to be used with WhatsApp.
Select Text message or Phone call for the phone number verification method, and then click Next to proceed.
The business phone number receives a WhatsApp code through the chosen verification method. Enter the verification code into the Verification code field and click Next to verify the business phone number.
Warning
A payment method must be added to proceed. This is part of Meta’s fraud detection system. In order to ensure that the account/company is real, a payment method is required to proceed. See Meta’s documentation on how to add a payment method in Meta Business Suite.
Phone number status stuck in pending
When adding a phone number in the Meta Developer App, the number may remain stuck in Pending status instead of switching to Connected.
This can prevent the WhatsApp integration from functioning correctly.
To resolve this issue, generate a temporary access token and enable full account access:
Go to https://developers.facebook.com and open your app.
Navigate to .
Click Generate access token.
Select Edit previous settings.
Select the option: Opt in to all current and future WhatsApp accounts.
Click Continue, then Save, and finally Got it.
Generate the temporary access token.
After completing these steps, the phone number status should update from Pending to Connected.
Create a permanent token
After configuration and testing are complete, create a permanent token to replace the Temporary token.
Navigate to Meta Business Suite and then go to . Select an existing system user or create a new system user by clicking Add.
To generate a permanent token, assets must be added to the system user. Click Add
assets, and a pop-up window appears. Select Apps under Select asset type,
then select the Odoo app and toggle the permissions to On under the Full
control option, then click Save Changes. Click Done in the confirmation
window that appears.
Click Generate new token, and a pop-up window appears asking which app this token should
be generated for. Select the Odoo app, then set the expiration date to either 60 days
or Never.
Meta asks which permissions the system user allows. Add both of the following permissions:
business_managementwhatsapp_business_messagingwhatsapp_business_managementwhatsapp_business_manage_events
When permissions are set, click Generate token. Copy the token value that populates on the screen that follows.
With that token value, update the Access Token field in the WhatsApp business account in Odoo by navigating to .
Access token permission
When creating a permanent access token, the business_management permission may not be available.
To resolve this issue:
Ensure that the app is created with the appropriate use case (e.g., Business app type).
Verify that the account used to create the app has sufficient permissions:
Avoid using a standard developer-only account.
Use an account with Product Manager role or higher in the Meta Business account.
If the permission is still missing, recreate the app with the correct configuration and permissions.
Callback URL requirements
When configuring the webhook, the Callback URL must be a fully qualified public URL.
The URL must include:
https://A valid domain name
The full path to the webhook endpoint
Important
The callback URL must be publicly accessible so that Meta servers can successfully send webhook events.
Go live with the Meta app
Finally, to launch the app, the Meta app must be set to Live in the Meta Developer Dashboard. Click the app that is being configured, then toggle the App Mode field from Development to Live.
Important
If the app status is not set to live, then the database is only able to contact the test numbers specified in the developer console.
Warning
A privacy policy URL must be set in order for the app to be set to live. Go to the Meta
Developer Dashboard and select the Odoo app. Then, in
the left-hand side menu, go to . Enter the privacy policy
hyperlink address under the Privacy Policy URL field of the form. Click
Save changes to apply the privacy policy to the app.
Once the app has gone live in the Meta developer console, a confirmation email is sent to the administrator.
WhatsApp templates
WhatsApp templates allow users to store messages that are frequently sent. By creating templates tailored to specific situations, users can send pre-approved messages, without having to compromise on quality or compose the same text repeatedly. This ensures fast turnaround and consistent customer service messaging, and increases the overall engagement rate with the customer.
WhatsApp templates can be created on both the Odoo and Meta consoles.
Important
WhatsApp has an approval process that must be completed before the template can be used. See Meta template approval.
To access WhatsApp templates, navigate to the dashboard.
Each template has three tabs:
Body: stores the message body. The message body may contain placeholders for dynamic content which is populated when the message is sent.
Buttons: adds clickable buttons/hyperlinks at the bottom of the WhatsApp template. Currently, there are three button types: Quick Reply, Visit Website, and Call Number. Visit Website supports static, dynamic, and tracked URLs.
Variables: lists all of the placeholders in the template, as well as the variables that should be populated. For example, messages can contain placeholders for a recipient’s name, purchased products, or sales order number.
Create WhatsApp templates in Odoo
To create a WhatsApp template, go to the dashboard and click New. Enter a Name for the template, and select a Language.
Important
To complete this next task, administrator access rights are needed to edit the Applies to field.
In the Account drop-down menu, select the WhatsApp business account in Odoo that this template should link to. Next, under the Applies to field, select the model the server action should apply to this template.
Tip
These models can also be accessed in developer mode. In a contact form (or similar relevant form in Odoo), navigate to the model to be referenced, and hover over a field name. This displays backend information, including the specific Odoo Model name in the backend. Search for the model’s frontend name in the WhatsApp template, under the Applies to drop-down menu.
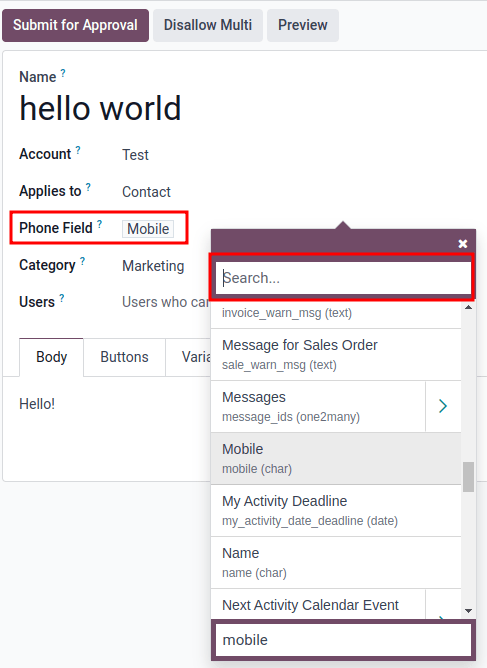
Warning
The Phone Field may produce an error when changing the model or Applies
to field. The Phone Field should always be set to the Phone or Mobile model.
To search available fields, type the frontend name in the Search… box. This displays results from all of the available fields for the model (Applies to) that the template is created for.
Note
To find specific fields, multiple levels may need to be navigated in the search results box. Use the (right chevron) and (left arrow) icons to navigate between the menu levels.
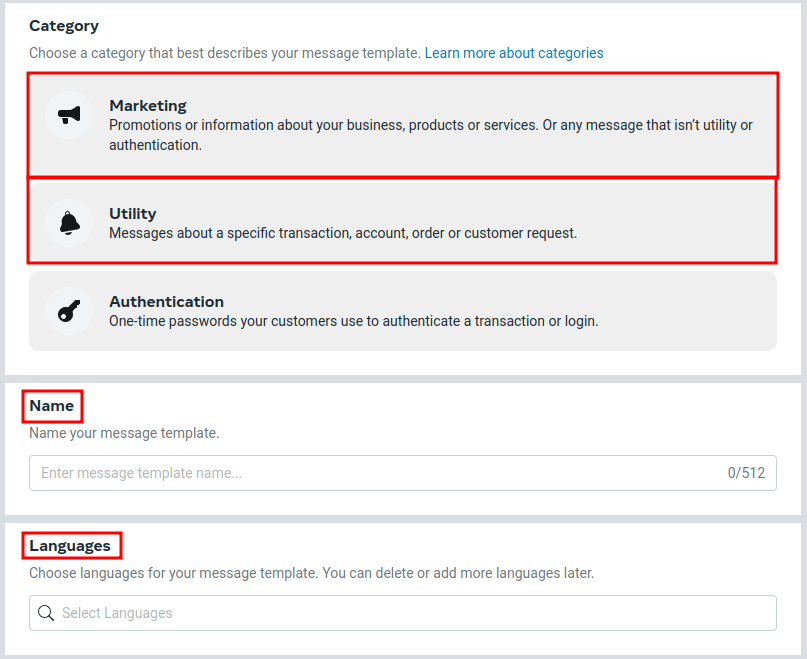
Change the Category to one of the following:
Marketing: Promotions or information about the business, products or services. Or any message that is not utility or authentication.
Utility: Messages about a specific transaction, account, order or customer request.
Authentication: One-time passwords that customers use to authenticate a transaction or login.
Important
Specifying an incorrect category can cause a flag/rejected status from Meta during the approval process.
Add any Users that are allowed to use this template. In the right-side column, a Header type can be configured along with a Header message, as well.
The available Header types are as follows:
Text
Image
Video
Document
Location (variables need to be set)
Navigate to the Body tab to configure the main message of the template.
When all the necessary changes are made to the template, click the Submit for approval button in the upper-left corner, and the status of the template changes to Pending.
The status remains Pending until a decision has been made by Meta, whereby a confirmation email is sent indicating that the template has been approved or rejected. Next, sync the templates from the Odoo database.
See also
Tip
Preconfigured demo data templates are available in Odoo to use or modify. These templates can be used as-is or modified to suit a specific business need.
To use these templates, navigate to and select a preconfigured template. Click Submit for Approval to start the approval process. An email is sent to the administrator of the Meta account when the template has been approved.
Placeholders and variables
Dynamic variables reference certain fields within the Odoo database to produce unique data in the WhatsApp message when using a template. Dynamic variables are encoded to display fields from within the database, referencing fields from within a model.
Example
Many companies like to customize their WhatsApp messages with a personalized piece of customer information to grab attention. This can be accomplished in Odoo by referencing a field within a model by setting a dynamic variable. For example, a customer’s name can be referenced in the email from the Customer field on the Sales Order model.
Dynamic variables can be added in to the Body by adding placeholders in the
text. To add a placeholder in the message body enter the following text {{1}}. For the second
placeholder enter {{2}} and increase incrementally as more placeholders are added to the text.
Example
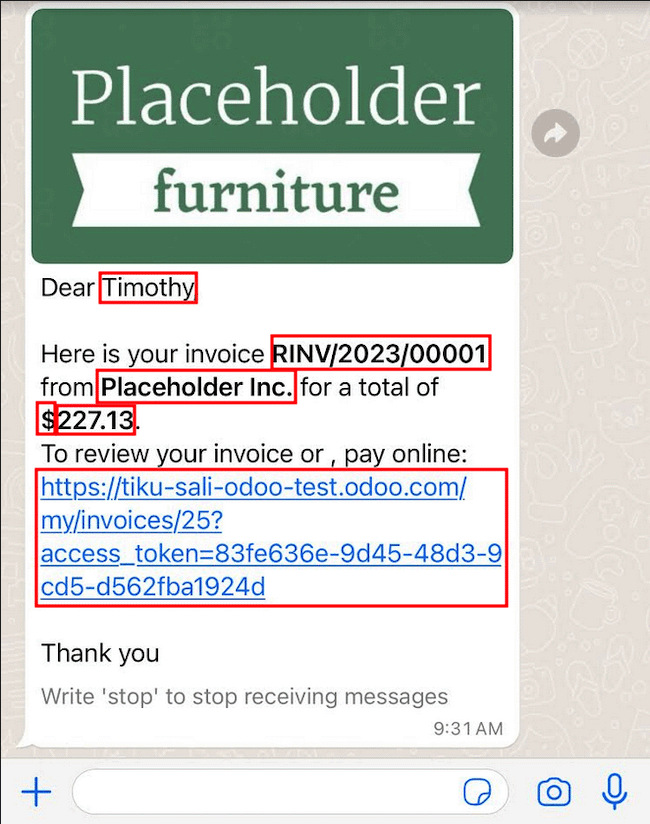
The following is the text from payment receipt template body:
Dear {{1}},
Thank you
See also
These placeholders must be configured on the Variables tab of the template before submitting for approval from Meta. To edit the dynamic variables on a template, first change the Type to Field of Model. This allows Odoo to reference a field within a model to produce unique data in the message being sent.
Next, edit the Field of the dynamic variables. The Applies to field in the template should be edited prior to ensure the correct model and field are referenced.
To search the available fields, type in the front-end name of the field in the search box. This finds a result from all of the available fields for the model (Applies to) that the template is created for. There may be multiple levels that need to be configured.
Example
The following is an example of the variables set for the above placeholders in the payment receipt noted above:
Name |
Sample Value |
Type |
Field |
|---|---|---|---|
body - {{1}} |
Azure Interior |
Field of Model |
|
body - {{2}} |
INV/2022/00001 |
Field of Model |
|
body - {{3}} |
My Company |
Field of Model |
|
body - {{4}} |
$ |
Field of Model |
|
body - {{5}} |
4000 |
Field of Model |
|
body - {{6}} |
https://.. |
Portal link |
Example
For example, in the Body tab, if the following is typed, “Hello {{1}},”, then {{1}}
must be set in the Variables tab. For this specific case, the message should greet
the customer by name, so the {{1}} should be configured to populate the {{1}}
Field with the Customer name.
Warning
Customizing WhatsApp templates is out of the scope of Odoo Support.
Meta template approval
After updating the dynamic variables on the template, the template needs to be resubmitted to Meta for approval. Click Submit for Approval to start the approval process. An email is sent to the administrator of the Meta account when the template has been approved.
Following the approval from Meta, sync the templates again in the Odoo database. See this documentation: Syncing templates.
Tip
To see the status, go to Meta Business Suite and select .
Syncing templates
Templates must be synced on the Odoo database once they are approved by the Meta team. To do so, begin by navigating to and select the configuration that should be synced. Under the section marked , towards the bottom, click Sync Templates. Meta updates the templates that are approved so that they can be utilized with various apps in the database.
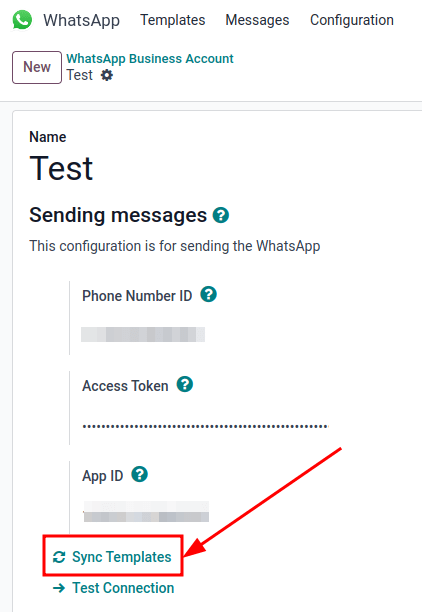
A successful message in green appears in the upper-right corner with the number of templates updated.
Tip
Templates can also be synced individually from the template itself. Navigate to the dashboard and select the template to sync. Then, click the Sync Template button located in the top menu of the template’s form.
Create WhatsApp templates in Meta
First, navigate to Meta Business Suite, and then go to .
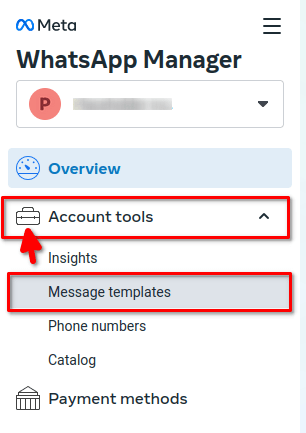
To create a WhatsApp template, click the blue Create template button, and then select the Category from one of the following:
Marketing: Promotions or information about the business, products or services. Or any message that is not utility or authentication.
Utility: Messages about a specific transaction, account, order or customer request.
Authentication: One-time passwords that customers use to authenticate a transaction or login.
Enter the Name of the template and then select the Language for the template.
Note
Multiple languages can be selected by typing the language names, then selecting the other languages as needed.
After making the appropriate selections, click Continue in the top-right corner. The browser redirects to the Edit template page where the Header, Body, Footer, and Buttons are configured. To the right of the template is a preview of what the template looks like in production.
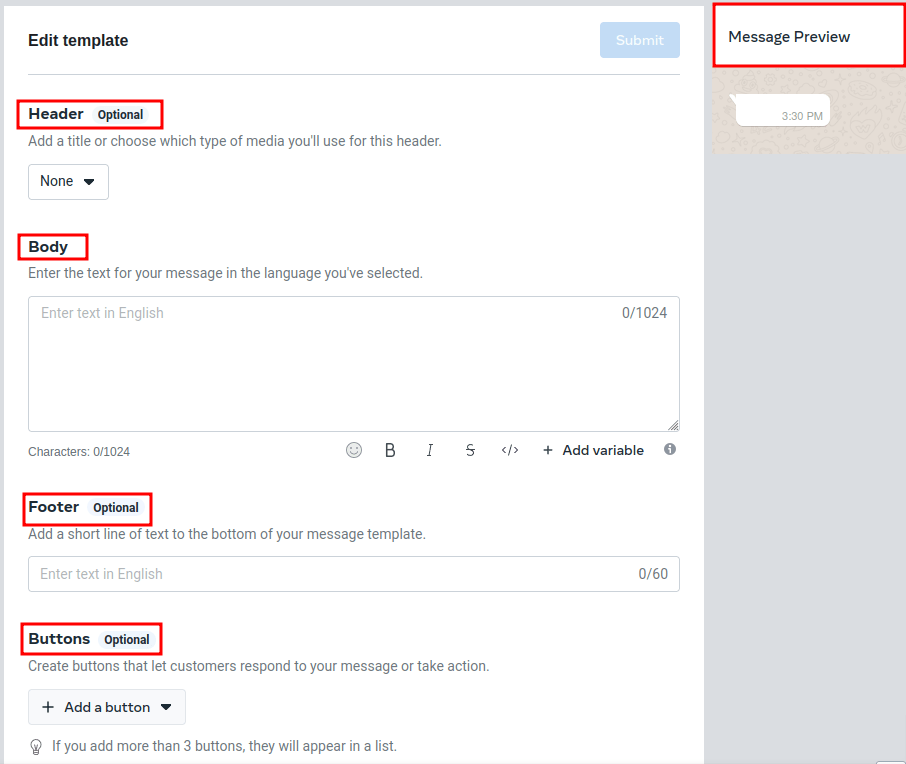
When all necessary changes are made to the template, click Submit button in the top-right corner, and a window populates to confirm the language. Click Confirm to approve and then another window states that the template has been submitted to Meta for review and approval.
The Status of the template remains In review until a decision is made by Meta. Once an email confirmation approving the template is received, the templates need to be synced from within the Odoo database.
Notifications
Notifications in WhatsApp are handled similar to a message conversation in Odoo. A pop-up window appears with the received conversation from the customer. By default, notifications are set in the WhatsApp business account configuration in Odoo.
Notification settings can be adjusted by navigating to . From there, select the account and scroll down to the section where notifications are handled. Under the Notify users heading, type in the field which users should be notified for this particular WhatsApp channel.
Note
Once a conversation is initiated between a user and a customer, notifications to all the users specified in the WhatsApp business account configuration will not occur. Only notifications to the users in the conversation occur. Should the user not respond within 15 days, the customer’s reply after the 15 days populates once again to all the users specified in the WhatsApp configuration.
Add users to a chat
Users can be added to a WhatsApp chat by expanding the WhatsApp pop-up window. WhatsApp conversations are located in the Discuss app. Select a conversation, then click the (Add User) icon in the top-right, and a window appears to invite users to the conversation.

WhatsApp API FAQ
Verification
As of February 1, 2023, if the Meta app requires advanced level access to permissions, a complete business verification may need to be completed. This includes submitting office business documents to Meta. See this documentation.
Cannot receive messages
If the business account cannot receive messages, check all of the webhook configurations. Navigate to , or click here. Log in to the business account if necessary. Under the Request Syntax section, click Try it and fill out the following fields:
authorization: enter the permanent access token.
WABA-ID: enter the WhatsApp Business Account ID (WABA ID).
override_callback_uri: enter the callback URL.
verify_token: enter the verification code.
To retrieve the WABA ID, navigate to in the left-hand side menu of the Meta Developer Dashboard. The WABA ID is located in the Send and receive messages section, under Step 1: Select phone numbers. Once all the fields are filled out, click Send request.
Template errors
Editing templates can cause tracebacks and errors unless the exact process is followed.
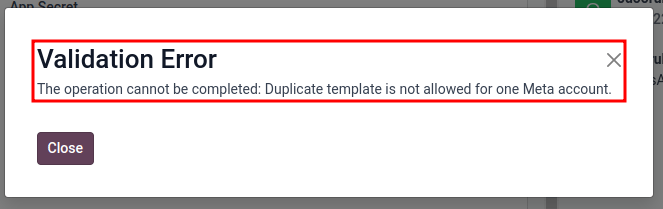
Duplicate validation error
When syncing the templates there may be an instance when there are multiple templates with the same
name on Meta’s business manager and in Odoo. This causes a duplicate validation error. Odoo displays
Validation Error: The operation cannot be completed: Duplicate template is not allowed for one Meta
account
. To correct this issue, rename the duplicate template name on Odoo and sync the
templates once again.
Token errors
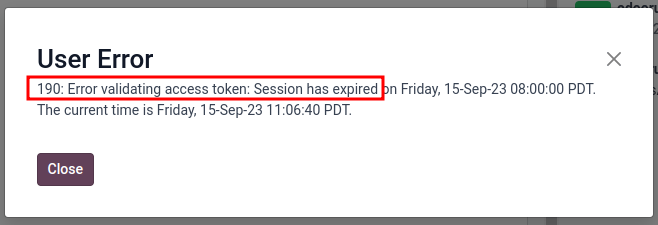
User error 190
If the temporary token is not replaced with a permanent token, Odoo displays User Error 190: Error
validating access token: Session has expired. To correct this issue, add a permanent token.
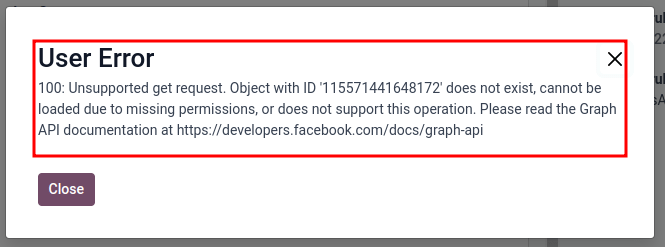
User error 100
If an Employee attempts to set up the permanent token, Odoo displays User Error 100:
Unsupported get request.
To correct this error, create an Admin system user.
Other
Template cannot be sent to multiple contacts
Make sure the Multi-Template feature is enabled on the template.
Message failed to send
Enable the Failure Type and Failure Reason columns under WhatsApp —> Messages.
Other error codes
For other errors, see Meta’s Developer Suite for WhatsApp Error Codes.