Event tracks
Odoo Events provides users the ability to create, schedule, and manage talks, lectures, presentations, and other similar sub-events (known in Odoo as tracks).
Configuration
To enable tracks in Odoo, navigate to , and enable the checkbox for Schedule & Tracks.

Once enabled, two additional options appear beneath it:
Live Broadcast: Broadcast tracks online through a YouTube integration.
Event Gamification: Share quizzes with attendees after a track concludes.
Once all desired settings have been enabled, click the Save button in the corner of the Settings page.
Event tracks dashboard
To access, modify, or create tracks for an event, open the and either select an existing event from the Events dashboard or create a new one.
On the selected event form, click the Tracks smart button at the top to land on the Event Tracks page, which presents all scheduled and proposed tracks for the event.
Views
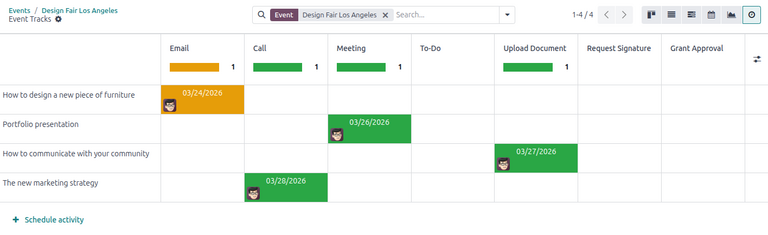
The Event Tracks page can be displayed in six different views:
By default, the Event Tracks page opens in the (Kanban) view, providing users an at-a-glance overview of all tracks for the selected event.

In the default (Kanban) view, the tracks are categorized into several modifiable stages: Proposal Confirmed, Announced, Published, Refused (collapsed), and Cancelled (collapsed).
Records displayed in the Kanban can be narrowed down using grouping and filter options.
For more information about using the Kanban view, see the Kanban documentation.
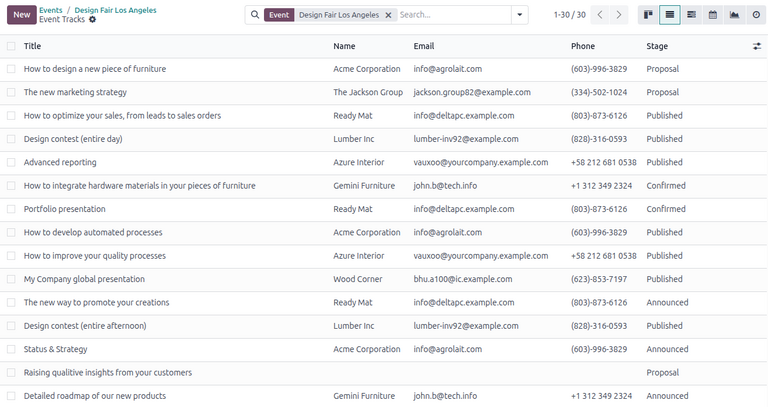
The (List) view displays a detailed list of all tracks for the selected event in a centralized view. Each track is displayed on a line along with its Title, the speaker’s Name, Email, Phone, and the track’s Stage.
Records displayed in the List view can be narrowed down using grouping and filter options.
For more information about using the List view, see the List documentation.
The (Gantt) view displays all tracks as horizontal bars against an adjustable timeline, providing the user a chronological view of their tracks’ progress.

Records displayed in the List view can be narrowed down using grouping and filter options.
For more information about using the Gantt view, see the Gantt documentation.
The (Calendar) view displays all tracks for the selected event as clickable entries in a calendar view, providing users an interactive schedule by day, week, month, or year.

Records displayed in the Calendar view can be narrowed down using filter options.
For more information about using the Calendar view, see the Calendar documentation.
Filter options
The Filters column in the search bar’s drop-down menu filters track-related data by specific criteria in any given view. Multiple filters can be selected at once.
The Filters column has the following options:
My Tracks: Filter by tracks with the Responsible user set to the current user profile.
Published: Filter by published tracks.
Always Wishlisted: Filter by tracks with the Always Wishlisted field enabled.
Track Date: Filter by a specific track date. Click the (down) arrow to reveal a list of month, quarter, and year options.
Archived: Filter by archived tracks.
Custom Filter…: Create and apply a custom filter.
Group By options
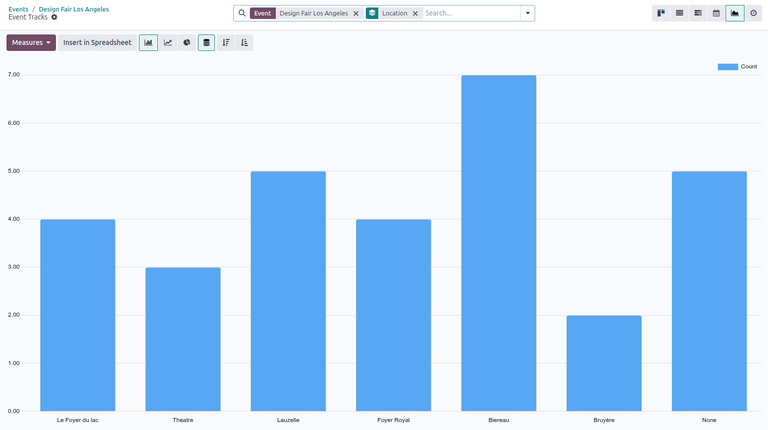
The Group By column in the search bar’s drop-down menu groups track-related data by specific criteria in the Kanban, List, Gantt, and Graph views only. Multiple grouping options can be selected at once.
The Group By column has the following options:
Responsible: Group data by the Responsible user specified across all tracks.
Stage: Group data by stage.
Date: Group data by a specific date. Click the (down) arrow to reveal a list of day, week, month, quarter, and year options.
Event: Group data by event.
Location: Group data by location.
Custom Group…: Group data by a custom group.
Create event track
To create a new event track, click New in the corner to reveal a blank Event Track form.

Start by giving this track a Title. This field is required.
Optionally, upload an image for the track to be displayed on the track’s webpage.
Next, enter details for the track in the following fields:
Track Date: Using the calendar pop-over, specify the date and time of the track.
Location: Using the drop-down menu, specify the track location.
Duration: Enter the duration of the track in a
HH:MMformat.Always Wishlisted: Specify whether to automatically set the track as favorite for each registered attendee.
Responsible: Select the database user responsible for managing the track. By default, this field is assigned to the user who initially created the track.
Event: Select the track’s associated event. By default, this field is already populated with the event from the Event Tracks page.
Tags: Select one or multiple tags for the track to add as filters on the Talks
Tags: Select any relevant tags for the track to add as filters on the Talks webpage.
Agenda Color: Select a color to represent the track on the Agenda webpage.
Tip
Locations can be used to designate names to physical areas (e.g., conference rooms, building levels) of an event venue, allowing users to display track locations at in-person events.
To access a complete list of locations for event tracks, which can be modified (and added to) at any time, navigate to .
Speaker tab
The Speaker tab on an event track form contains various fields to configure information about the track host or speaker.

Contact details section
In the Contact Details section, click the Contact drop-down field to select an existing contact from the database as the main point of contact for the talk.
If this contact is not yet in the database, type in the name of the contact, and click Create to create and edit the contact form later. Or, click Create and edit… to add the contact and configure the rest of the contact details.
Click the event track breadcrumb to return to the Event Track form. The Contact Email and Contact Phone fields are populated with the information on the selected contact form. These fields cannot be modified.
Speaker bio section
In the Speaker Bio section, enter any information related to the specific speaker scheduled to conduct or host the track.
If the chosen contact in the Contact Details section is properly configured, the Name, Email, and Phone fields are automatically populated. Otherwise, manually enter the information.
Note
This information appears on the front-end of the event website, on the specific track webpage, providing more information about the speaker to the track attendees.
Optionally, upload an image to appear alongside the speaker biography on the event website.
Then, enter a Job Position for the designated speaker, followed by the Company Name associated with the speaker.
In the Biography field, enter a custom biography with any speaker-related information.
Description tab
The Description tab of an event track form contains a blank text field to enter any additional information about the track. This information appears on the specific track page on the event website.
Interactivity tab
The Interactivity tab of the track form provides users with the option to display an interactive button for additional attendee engagement.

When the Magic Button checkbox is enabled, Odoo displays a call to action button for attendees on the sidebar of the track webpage while the track is taking place.
When enabled, three more options appear below to configure the button:
Button Title: Enter a name for the button.
Button Target URL: Enter the URL the button navigates to.
Show Button: Enter how many minutes after Track start the button should appear.
Note
The magic button only appears if there is more than one published track.
Publish event track
Once all the desired configurations are complete on an event track form, publish the track in one of three ways:
On the individual Track page. Click the Published stage above the form.
On the main Event Tracks dashboard. Drag-and-drop the Kanban card to the Published stage.
On the Event Track webpage. On the Event Track form, click the Go to Website smart button. Then, toggle the Unpublished button at the top of the page. The button changes to Published and the event is published. event website by clicking the Published stage in the upper corner.

Additional configurations
Users can configure additional options on specific tracks, including live broadcasting, gamification, and displaying track schedules for specific events on physical screens at in-person venues.
Live broadcasting
If the Live Broadcast setting is enabled in the Events app settings, the option to add a corresponding link in the YouTube Video Link field appears in the track form.
Event gamification
If the Event Gamification setting is enabled, an Add Quiz button appears at the top of a track form, allowing the user to create a quiz for attendees to complete after the track ends.
Track quiz form
To add a quiz to the event track, click the Add Quiz button. Doing so opens a form to configure the quiz.

Start by entering a title for the quiz in the blank field at the top of the page.
If participants are allowed to take the quiz multiple times, tick the checkbox beside Allow multiple tries.
The Event and Event Track fields are automatically populated with the corresponding event and track. These fields are non-modifiable.
Add questions and answers
To add questions to the quiz, click Add a line beneath the Question column. Doing so reveals a Create Questions pop-up window.
Note
All track quiz questions are multiple choice.
From the pop-up window, enter the question in the blank field at the top. Then, click Add a line to add an answer option.
Optionally, fill in the following fields:
Correct: Designate whether the option is the correct response.
Points: Specify a point value for the answer option.
Extra Comment: Add any additional comments that should accompany the answer option.

Once all desired answer options are completed, click Save & Close to save the question, close the pop-up window, and return to the track quiz form. Or, click Save & New to save this question and instantly start creating another question on a new Create Questions pop-up form.
Track location display
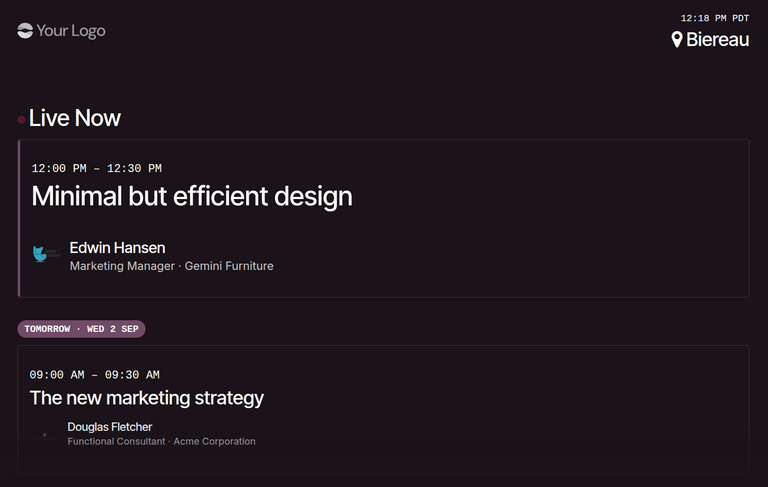
When a Location is specified on a track form, Odoo generates a display page showing all scheduled tracks at the specified location, starting from the user’s current date and time. This page can be left open on a screen or kiosk at the physical location.
Configuration
To begin, ensure that the Event Location Display module is installed in Odoo Apps.
Additionally, to ensure that a track appears on the display page, verify that the following options are configured:
The Showcase Tracks option is enabled for the track’s respective event. Developer mode must be enabled to access this setting on an event form.
Both the event website and the track must be published.
Access location displays
To access track location pages, click the Track Locations smart button at the top of an event form. This opens the Event Locations dashboard, which lists each Location and its Location Display Link.

Click the Location Display Link to open the location’s display page. The date and location name are displayed at the upper corner. Upcoming tracks are displayed below, including their scheduled time, title, and speaker name.
Note
Track location display pages are only accessible to database users or administrators.