CRM activities and activity plans
Within the CRM app, activities are follow-up tasks tied to leads and opportunities that are visible in the chatter. A set of preconfigured activity types is available in the CRM app, but custom activity types may also be created to suit business needs. To view the list of available activity types in the CRM app, open the app and navigate to . This page shows both Odoo-created activities and any custom activities.
Note
Different applications support different activity types. To see the complete list of activity types, go to the , then scroll to the Discuss section, and click the Activity Types link.
Default and custom activity types
The preconfigured activity types for the CRM app are:
Email: Adds a reminder to the chatter prompting the salesperson to send an email.
Call: Opens a calendar link where the salesperson can schedule a phone call.
Meeting: Opens a calendar link where the salesperson can schedule a meeting.
To Do: Adds a general reminder task to the chatter.
Upload Document: Adds a link on the activity where an external document can be uploaded. Note that the Documents app is not required to utilize this activity type.
Note
If other Odoo applications are installed, such as Sales or Accounting, additional activity types may appear in the CRM app’s Activity Types page.
Create a custom activity type
To create a custom activity type, navigate to the Activity Types page and click New at the top-left of the page to open a blank form. Start by entering a Name for the new activity type.
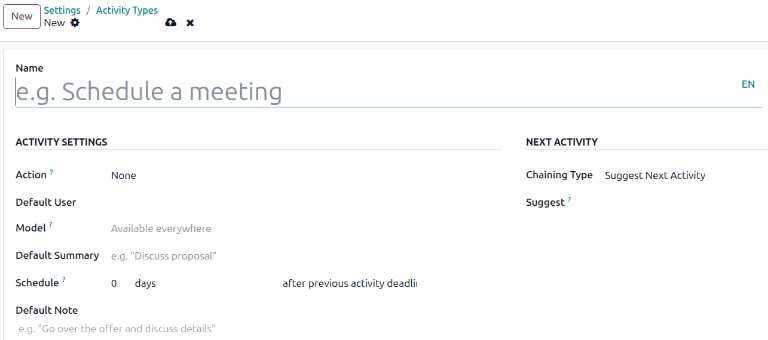
Activity settings
Action
The Action field specifies what action the activity prompts from the salesperson assigned to the opportunity. Some actions trigger specific behaviors after an activity is scheduled instead of when the activity is added to an opportunity.
If Upload Document is selected, a link to upload a document is added directly to the planned activity in the chatter.
If either Phonecall or Meeting are selected, users have the option to open their calendar to schedule a time for this activity.
If Request Signature is selected, a link is added to the planned activity in the chatter that opens a signature request pop-up window.
Note
The actions available for an activity type may vary depending on the applications currently installed in the database.
Default user
To automatically assign this activity to a specific user when this activity type is scheduled, choose a name from the Default User drop-down menu. If this field is left blank, the activity is assigned to the user who creates the activity.
Default summary
The Default Summary serves as the title for activities when choosing them on opportunities and leads. These will be visible to users such as salespeople and managers, whereas the Name at the top of an Activity Type form is how the activity appears within the CRM app’s configuration.
Schedule
Set a default deadline for the custom activity in the Schedule field. To do so, configure the desired number of days, weeks, or months. Then, decide if the deadline should occur after previous activity completion date or after previous activity deadline.
Note
The default setting of after previous activity deadline means the date the deadline is set for, regardless of whether or not the deadline was actually met. To ensure that an activity is scheduled only when the preceding activity is complete, use the after previous activity completion date option.
Default Note
To include notes whenever this activity type is created, enter them into the Default Note field. This can be used to include instructions for another user, as in the sample text in this field.
Note
The information in all of the preceding fields is automatically included when an activity is created within an opportunity. However, the info can still be altered before the activity is scheduled or saved.
Next activity
To automatically suggest or trigger a new activity after an activity has been marked complete, the Chaining Type must be set.
Suggest the next activity
If an activity has the Chaining Type set to Suggest Next Activity, and has activities listed in the Suggest field, users are presented with recommendations for activities as next steps.

In the Chaining Type field, select Suggest Next Activity. Upon doing so, the field underneath changes to: Suggest. Click the Suggest field drop-down menu to select any activities to recommend as follow-up tasks to this activity type.
Trigger the next activity
When an activity has the Chaining Type set to Trigger Next Activity, marking the activity as Done immediately launches the next activity listed in the Trigger field.
Setting the Chaining Type to Trigger Next Activity immediately launches the next activity once the previous one is completed.
If Trigger Next Activity is selected in the Chaining Type field, the field beneath changes to: Trigger. From the Trigger field drop-down menu, select the activity that should be launched once this activity is completed.
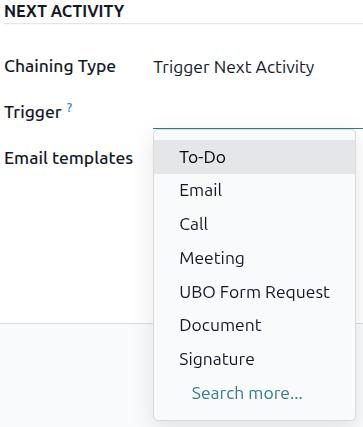
Email templates
Select or create an email template to be suggested when the activity is added to an opportunity. The template will appear alongside the activity in the chatter and can be sent as-is or edited by a user.
Activity tracking
To keep the pipeline up to date with the most accurate view of the status of activities, as soon as a lead is interacted with, the associated activity should be marked as Done. This ensures the next activity can be scheduled as needed. It also prevents the pipeline from becoming cluttered with past-due activities.
The pipeline is most effective when it is kept up-to-date and accurate to the interactions it is tracking.
Activity plans
Activity plans are preconfigured sequences of activities. When an activity plan is launched, every activity in the sequence and any activities set to trigger off of activities within the sequence are scheduled automatically.
To create a new plan, navigate to . Click New at the top-left of the page to open a blank Lead Activity Plans form.
Enter a name for the new plan in the Plan Name field. On the Activities To Create tab, click Add a line to add a new activity.
Select an Activity Type from the drop-down menu. Click Search More to see a complete list of available activity types, or to create a new one.
Next, in the Summary field, either leave this blank to use activity’s Default Summary or enter a new summary of what the activity entails. Entering a new summary does not overwrite an existing Default Summary. The contents of this field are included with the scheduled activity, and can be edited later.
In the Assignment field, select one of the following options:
Ask at launch: Activities are assigned to a user when the plan is scheduled. By default, they will be assigned to the user creating the activity, even if they’re not the user responsible for the opportunity the activity is being created on.
Default user: Activities are always assigned to a specific user.
If Default user is selected in the Assignment field, choose a user in the Assigned to field.
Tip
Activity plans can feature activities that are assigned to default users and users assigned at the plan launch.
Next, configure the timeline for the activity. Activities can be scheduled to occur either before the plan date or after. Scheduling activities before the plan date can be useful for activities scheduled in the future that require some preparation beforehand. Use the Interval and Units fields to set the deadline for this activity. Lastly, in the Trigger field, select whether the activity should occur before or after the plan date.
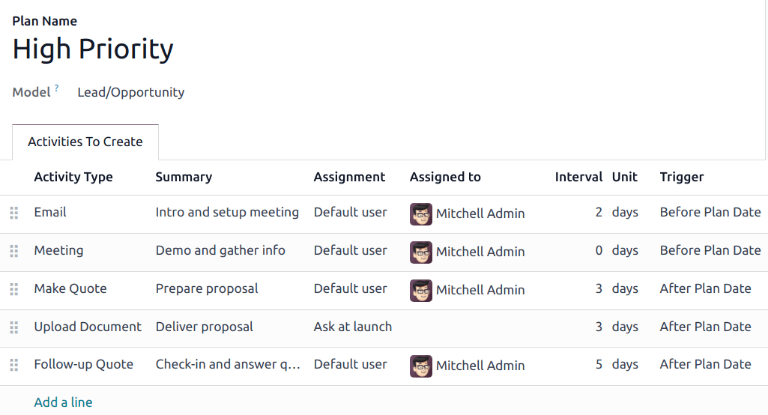
Example
An activity plan is created to handle high priority leads. Specifically, these leads should be contacted quickly, with a meeting scheduled within two days of the initial contact. The plan is configured with the following activities:
Email two days before plan date
Meeting zero days before plan date
Make quote three days after plan date
Upload document three days after plan date
Follow-up five days after plan date
This sets the plan date as the meeting deadline, which is the objective of the plan. Before that date, there is lead time to contact the customer and prepare for the meeting. After that date, the salesperson has time to create a quote, upload the document, and follow-up.
Repeat these steps for each activity included in the plan.
Use an activity plan
To use an activity plan with a CRM opportunity, navigate to and click on the Kanban card of an opportunity to open it.
Above the opportunity’s chatter, click Activity to open the Schedule Activity pop-up window.
In the Plan field, select the desired activity plan to launch from the section above the individual activities. This generates a Plan Summary, listing out the activities included in the plan. Select a Due Date using the calendar popover. This automatically updates the Plan summary with deadlines based on the intervals configured in the activity plan.
Select a user in the Responsible field. This user is assigned to any of the activities on the plan that were configured with Ask at launch in the Assignment field.

Click Schedule. The details of the plan are added to the Planned Activities section of the chatter, in addition to each of the activities that make up the plan.

See also