Request a signature
Via the Odoo Sign app or directly from an Odoo record, you can:
request the signature of one or more signers on a one-off document or an envelope of multiple one-off documents
use templates to request the signature of one or more signers on frequently used documents
Once a document or document envelope has been fully signed, i.e., completed and signed by all signers, the signed document(s) and the certificate of completion are sent via email to the requestor, and to any contacts added in CC when the signature request was configured.
One-off documents
From the Sign app
To request the signature of a one-off document or document envelope from the Sign app:
Go to or , click Upload PDF, then select and open the relevant
.pdfdocument(s). If the document needs to be imported from the Documents app, click the (Actions) icon beside the name of the view, then .Tip
If you are creating a document envelope that includes one document saved in the Documents app, import that document before adding subsequent documents.
Prepare the document(s) for signing by adding the relevant fields; add additional signers and/or documents, if relevant.
Click Send.
Complete the relevant fields of the New Signature Request window.
If you are:
one of the signers and you are ready to sign the document directly, click Sign Now, then complete and sign the document(s).
not one of the signers or a signing order has been defined and you need to sign the document after other signers, click Send.
From an Odoo record
To request the signature of a one-off document or document envelope from an Odoo record:
With the relevant record open, click the Activity button at the top of the chatter.
In the Schedule Activity popup, click Request Signature, then Upload PDF.
Select the relevant
.pdfdocument(s), then click Open.Prepare the document(s) for signing by adding the relevant fields; add additional signers and/or documents, if relevant.
Click Send.
Complete the relevant fields of the New Signature Request window.
Note
When sending a signature request from an Odoo record, the related customer (or the relevant party) is automatically added as a signer.
If you are:
one of the signers and you are ready to sign the document directly, click Sign Now, then complete and sign the document(s).
not one of the signers or a signing order has been defined and you need to sign the document after other signers, click Send.
Note
Once a document or document envelope has been fully signed, the signed document(s) and the certificate of completion are also added to the record’s chatter.
Templates
When the same single document or envelope of multiple documents needs to be used regularly, creating and using a template can save time and streamline the workflow. Templates are prepared for signing in the same way as one-off documents, by adding the necessary fields, signers, documents, and tags, as relevant.
Create a template
To create a template:
Go to .
Click Upload PDF, then select and open the relevant
.pdfdocument(s). If the document needs to be imported from the Documents app, click the (Actions) icon beside the name of the view, then .Tip
If you need to upload multiple documents, i.e., create a document envelope, and one of the documents is saved in the Documents app, import that document before adding subsequent documents.
Once you have created the template, you can start editing it.
Edit a template
A template can be edited at any time, provided it has not yet been used to send a signature request.
To edit a template, go to and click on the relevant template to open it. Alternatively, hover over the template, click the (vertical ellipsis) icon in the top-right corner of the card, then click Edit.
Note
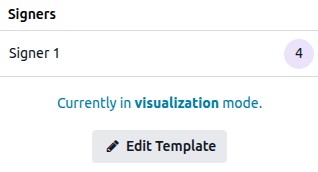
When you open a template that has already been used to send a signature request, the template is in View only mode. Click Duplicate & Edit to create a copy of the template, which can then be edited.
Edit the template:
Prepare the document(s) for signing by adding or editing fields, and, if relevant, adding or removing signers and/or documents.
Optionally, define or edit settings for specific signers, such as requiring additional authentication, allowing a signer to delegate their signature or be replaced, or assigning a fixed signer.
Optionally, define or edit general settings for the template by clicking the (cog) icon beside the template name, then clicking :
By default, the Name of the template is the name of the file that was uploaded, or, in the case of a document envelope, the name of the first file uploaded. If desired, edit the name of the template.
Available in: Select the Odoo model to which the template is linked to restrict the template to signatures requests made from records of that model. Leave the field empty to make the template available from any model.
Documents folder: Define in which folder in the Documents app the documents using this template should be saved once fully signed.
Click More options to access and edit advanced template settings.
Tip
To replace a document in the template, such as with an updated version, while preserving the fields already added, click the (vertical ellipsis) icon next to the relevant document, select Replace document, choose the new document, then click Replace document.
Each replacement creates a duplicate of the template with the fields placed at the same position as in the original. If the new document has a different layout or added text, the fields may no longer align correctly. Reposition them as needed.
Use templates
Templates can be used when initiating a signature request from the Sign app or directly from an Odoo record.
From the Sign app
When using a template, there are two ways a signature request can be sent from the Sign app:
via direct email to one or more specific signers; or
via a shareable link, provided the document or document envelope has only one signer. This option is useful when multiple individuals need to sign a personal copy of a document that requires a single signature, e.g., a non-disclosure agreement.
Note
Each time a template is used to send a signature request via direct email, and each time a recipient of a link signs a document, a new document is created within Odoo Sign and appears in .
To send a signature request using a template to one or more specific signers from the Sign app:
Go to .
From the Kanban or list view, click Send on the line of the relevant template. Alternatively, from the Kanban view, click on a template to open it, then click Send.
Complete the relevant fields of the New Signature Request window.
If you are:
one of the signers and you are ready to sign the document directly, click Sign Now, then complete and sign the document(s).
not one of the signers or a signing order has been defined and you need to sign the document after other signers, click Send.
To copy a link to a templated document or document envelope:
Go to .
From the Kanban or list view, click Share on the line of the relevant template. Alternatively, from the Kanban view, click on a template to open it, then click Share.
Optionally, update the Valid Until date if the signature request link should expire; leave this blank if the signature request does not expire.
Click to copy the link to your clipboard.
Tip
After a link has been shared, a Shared tag appears on the card of the relevant template in the Templates Kanban view.
To stop sharing a link, from the Templates Kanban view, click Share on the line of the relevant template, then click Stop sharing. Alternatively, hover over the relevant template, click the (vertical ellipsis) icon in the top-right corner of the card, then click Stop sharing.
From an Odoo record
To send a signature request using a template from an Odoo record:
With the relevant record open, click the Activity button at the top of the chatter.
In the Schedule Activity popup, click Request Signature, then select the relevant Template from the dropdown.
Complete the relevant fields of the New Signature Request window.
If you are:
one of the signers and you are ready to sign the document directly, click Sign Now, then complete and sign the document(s).
not one of the signers or a signing order has been defined and you need to sign the document after other signers, click Send.
Tip
To set a default template, access the Request Signature activity type form, then select the relevant template in the Default Signature Template field.
Note
Templates linked to the current Odoo model can be selected, as well as templates that are not linked to any model.
When sending a signature request from an Odoo record, the related customer (or the relevant party) is automatically added as a signer.
Once a document or document envelope has been fully signed, the signed document(s) and the certificate of completion are also added to the record’s chatter.
Manage templates
Manage templates by going to . By default, templates are shown in a Kanban view, with cards shown horizontally.
Tip
For each template, the following information is shown:
the name of the template
the month and year in which the template was created
the avatar of the template’s Owner; by default, the owner is the user who created the template.
any tags assigned to the template
the number of documents created using the template for which a signature request is In Progress
the number of documents created using the template that have been fully Signed
Tip
Templates you created yourself are automatically marked as favorites for quicker access. To favorite templates created by others, click the (star) in front of the template name.
Hovering over the template’s card reveals a (vertical ellipsis) icon in the top-right corner. Click the icon to:
Edit a template that has not yet been used to send a signature request. Alternatively, click on a template to open it for editing.
Stop Sharing the link to the templated document or document envelope, if relevant; after sharing is stopped, the link can no longer be opened.
Duplicate a template. The duplicated template can then be edited as needed.
Archive a template that is not currently needed.
Modify a template’s settings by clicking Configuration.
Select a Color to add a colored bar to the left side of a card to visually differentiate it.
Export signer responses
If the Documents app is installed, all signer responses related to a specific template can be exported, which is useful, for example, for parental consent forms, petitions, etc. To do so, go to , click the relevant template’s card, then click the (Actions) icon and select Export Answers.
Responses are exported to an Odoo spreadsheet, with one column per field, one line per signer, and one tab per document for document envelopes.
Note
The spreadsheet is saved in the Sign Request Answers folder in Documents, with the template name referenced in the name of the spreadsheet.
Template settings
To access and modify a template’s settings, go to , hover over the relevant template’s card, click the (vertical ellipsis) icon, and select Configuration.
The following fields are available on the form:
the template’s name
Available in: Select the Odoo model to which the template is linked to restrict the template to signature requests made from records of that model. Leave the field empty to make the template available from any model.
Authorized Users: Specify the users authorized to view, use, and modify the template.
Authorized Groups: If Manage template access is enabled in the main Sign settings, define the user groups whose members are authorized to view and use this template.
Owner: The user who created the template.
CC: Add contacts or email addresses to notify when the document is fully signed or refused.
Valid for: Set a default number of days after which signature requests using this template expire; enter
0if signature requests should not expire.Note
The expiry date and CC contacts of a signature request can always be modified when configuring the signature request.
Tags: Add tags to categorize the template.
Redirect Link: Add a URL to redirect signers after signing the document, such as a Thank you page, or the website’s homepage.
In the Communication tab, type a default text to include when a signature request using this template is sent via email. The text can still be edited before sending.
In the Signers tab, view and edit any signer settings defined for the template.
Tip
Access all signed documents related to the template by clicking the Signed Document smart button.
Template settings can also be configured while editing the template.
Prepare a document for signing
To prepare any document for signing, add the relevant fields for each signer.
It is also possible to:
Add fields to a document
To add a field to a document, drag it from the left panel and drop it in the appropriate place in the document.
Note
Various fields are available by default. These fields can be edited and additional fields can be created if needed.
Fields of the following field types require some additional configuration when they are added to a document:
Initial: When adding this field to a multi-page document, choose whether to add it to all pages of the document, or only the current page.
Radio: By default, two radio buttons are added; there must always be a minimum of two options. To increase or decrease the number of options, click on one of the radio buttons, then under Options, use the (increase) or (decrease) icons as needed. Each radio button can be repositioned independently by clicking and dragging it.
Selection: To define options, type each option on a new line in the Options text box, ensuring you have pressed
Enterafter each option. To delete options, remove the corresponding text from the text box.Strikethrough: To use this field to allow signers to reject a certain phrase or phrases, position the field on top of the relevant text by dragging it. Ensure that the field is neither Mandatory nor Read-only to allow the signer to freely decide which phrases to reject.
Once a field has been added, it is possible to:
Reposition the field: Hover over the field until the (hand) icon appears, then click and drag the field to the desired position.
Tip
To reposition or duplicate multiple fields at once, select the fields by drawing a selection area around them with your mouse. Then:
to reposition the fields, hover over one of the selected fields until the (hand) icon appears, then click and drag the fields to the desired position.
to copy and paste the fields, use your regular keyboard shortcut to copy the fields, place your cursor where you want to paste the fields, then use your regular keyboard shortcut to paste them.
Change the size of the field: Hover over the bottom edge, right edge, or bottom-right corner to reveal resize arrows. Drag the vertical or horizontal resize arrows to adjust the height or width, respectively, or drag the diagonal resize arrows to scale both dimensions simultaneously.
Modify certain attributes of the field: Click on the field to open it, make the necessary changes, then click Save.
Depending on the field type, attributes that can be modified include:
the Placeholder text, i.e., the temporary text the signer sees before starting to complete the field
whether or not a field is a Mandatory field
whether or not a field is Read-only
the horizontal alignment of the text within the field
Note
Any changes made to the attributes of a field after adding the field to a document apply to the current document only. To make permanent changes to the field, edit the field.
Remove a field: Click on the field to open it, then click (remove) to remove the field from the document.
Duplicate a field: Click on the field to open it, then click (duplicate) to create a copy of the field. Alternatively, use your regular keyboard shortcuts to copy and paste a field.
Document envelopes
A document envelope allows for multiple documents to be signed at the same time or sent for signing in a single signature request. It is possible to create a one-off document envelope or a template based on a document envelope.
To create a document envelope during the initial file upload, after clicking
Upload PDF, select the relevant .pdf documents and click Open.
Tip
If, when creating a document envelope via the Sign app, you need to include one document saved in the Documents app, import that document before adding subsequent documents. To do so, click the (Actions) icon beside the name of the view, then Import from Documents.
To add one or more documents after the initial file upload:
Open the initial document or document envelope, then click Add in the Documents section.
Select the relevant
.pdfdocument(s), then click Open.
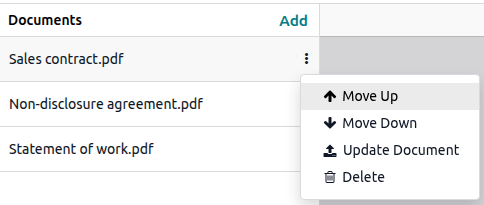
Tip
To change the order in which documents are presented to the signer, click the (vertical ellipsis) icon beside the relevant document in the Documents section, then click Move Up or Move Down as appropriate. To remove a document from the envelope, click Delete.
Add and configure signers
By default, a document or document envelope has one signer. Additional signers can be added and advanced configuration can be defined for one or more signers.
Add signers
To add additional signers to a document or document envelope:
Open the document or document envelope, then click Add in the Signers section.
Optionally, edit the name of the signer by hovering over the name, e.g.,
Signer 2, clicking the (pencil) icon, then typing the new name.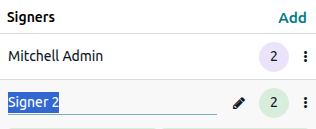
Tip
Each signer is assigned a unique color and all fields associated with a specific signer have the same background color.
When a document or document envelope has multiple signers, it is possible to define the order in which signers receive and sign when configuring the signature request.
Signer settings
To define additional configuration for signers, click the (vertical ellipsis) icon on the row of the signer. For each signer, the following options are available:
Extra Authentication Step: Require the signer to authenticate using a specific authentication method.
Can delegate: Allow the signer to delegate their signature or be replaced after the signature request has been sent.
Assign to: Assign a specific contact as signer by selecting them from the dropdown.
Configure the signature request
After preparing a one-off document or document envelope for signing or selecting a template, click Send, then configure the signature request in the New Signature Request window.
For each signer, select a contact or type an email address. Optionally, enable Signing Order to control the order in which the document or document envelope is signed.
Tip
A signer’s email address can be modified after the signature request has been sent if needed.
It is also possible to:
set a Valid Until date after which the signature request expires
set Reminders to be sent at fixed intervals
enable Hide certificate key on pages to hide the reference of the certificate of completion displayed by default on each page of the document(s)
have one or more parties notified when the document is fully signed or refused by adding the relevant contact(s) or email address(es) in the CC field
add a message to the signature request email
Tip
When creating a template, it is possible to define a default message to be added to the signature request; this can still be edited before sending.
add attachments to the signature request via the (paperclip) icon at the bottom of the window, or, to add an attachment saved in the Documents app, click the Documents app icon
schedule the sending of the signature request via the (clock) icon
Signing order
When a document or document envelope needs to be signed by multiple parties, and the order of signing is important, it is possible to define the Signing order when configuring the signature request. This controls the order in which the recipients receive the document(s) for signature.
To define a signing order:
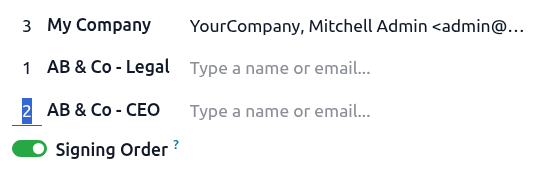
In the New Signature Request window, enable Signing Order.
Change the order by editing the number beside each signer, e.g., changing a
3to a2in the first column.
The signer indicated in position 1 receives the signature request first, and each recipient
receives the request only once the previous recipient has signed the document.
Example
In the example, the AB & Co Legal contact will receive the signature request first, the AB & Co CEO second, and Mitchell Admin last.
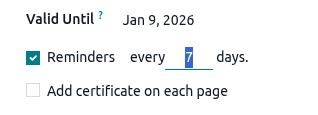
Validity dates and reminders
For documents that need to be signed within a certain timeframe, you can indicate the last possible signing date using the Valid Until field when configuring the signature request. After this date, the document is no longer accessible via the link in the signature request email.
If the signature request does not expire, leave this field blank.
Note
When using a template for which a default validity period has been defined, the Valid Until date is updated automatically in the signature request email; this date can be changed if desired.
To set automatic reminders, enable Reminders, then define the interval, in days, at which reminders should be sent until the document has been signed by the signer.
Manage signature requests and signed documents
All signature requests that have been sent are visible in . The list view and Kanban view offer different possibilities:
In the list view:
See the overall Status of the signature request, e.g., To Sign, Signed, Cancelled.
Resend a signature request manually.
Sign a document or document envelope.
Download the fully signed document(s).
For a canceled signature request, click Details to see the details of the request.
Tip
Click the (slider) icon in the upper-right corner to see more information for each request, such as each document included, tags, and, in the case of requests sent from an Odoo record, the linked record.
In the Kanban view:
See the status of individual signers, per signature request:
When a signer has fully signed the document(s), the checkbox is ticked, the signer’s name appears in green, and the date of the signature is added after the name.
When a signer has declined to sign a document, or the sender has canceled a signature request, the name of the signer appears in red with a (cross) beside it, followed by the date of the decline or cancellation.
See any tags added to the document(s).
Click the (clock) icon to schedule an activity related to the signature request.
Click the (vertical ellipsis) icon in the top-right of the card to reveal more options:
See the signature request’s details.
Cancel a signature request that has not been fully signed.
Archive a signature request.
Select a color dot to add a colored bar to the left side of a card to visually differentiate it.
Signature request details
To view the details of a signature request, go to , then:
click the relevant signature request in the list and click Details, or
switch to the Kanban view, click the (vertical ellipsis) icon on the relevant signature request’s card, and select Details.
Using the buttons at the top of the form, you can:
Preview the document.
Download the document and, if available, its certificate of completion.
Cancel the signature request if it has not been fully signed.
The following information is available on the form:
Note
Fully signed signature requests cannot be edited, except for their tags and the linked Odoo model and record, if applicable.
The overall Status of the signature request, i.e., To Sign, Signed, or Cancelled
Tags: any tags added to the signature request
Valid until: the expiration date of the signature request
Reminder: the reminder settings of the signature request
Linked to: the Odoo model and record linked to the signature request, if applicable.
Signers: the list of signers, including their Role (i.e., the name given to the signer when the document was being prepared for signing; by default,
Signer 1,Signer 2, etc.), email address, and signature status. Click Resend to manually resend the request to a signer.Contacts in copy: contacts added in the CC field when the signature request was created
Activity Logs: a complete log of actions performed on the signature request, such as its creation, views, downloads, signatures, or refusals.
Replace a signer or update a signer’s email address
A signer can be replaced if the Can delegate option was enabled for that signer when the document was being prepared for signing. To replace a signer, click their name in the Signers tab, then click the name again and select the new signer.
To update a signer’s email address, click the signer’s name twice or, if the Can delegate option was enabled for the signer, click the name, then click the (Internal Link) icon next to it and update the email address in the contact form.
The signature request is automatically sent to the new signer or email address upon saving or navigating away from the signature request or contact form.