Unattended leads report
Unattended leads are leads that have scheduled activities that are either due or past due. Whenever an activity is scheduled, Odoo tracks the due date, and sends email reminders to the users the activity is assigned to.
An unattended leads report compiles all active leads in the pipeline with due or past due activities, allowing a sales manager to identify which opportunities require immediate attention.
By pulling a daily unattended leads report, sales managers can remind their teams to address outstanding activities before they become past due, helping avoid neglected leads and reinforcing proactive behaviors in their salespeople.
Example
A sales manager starts their day by pulling an unattended leads report, and upon switching to list view, they see the following:

Their team member, Mitchell, has two leads in the Proposition stage with activities that are due.
The yellow 📞 (phone) icon indicates that the Modern Open Space lead has a phone
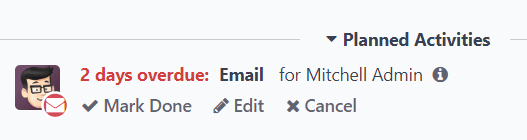
call activity scheduled for today. The red ✉️ (envelope) icon indicates that the 5 VP
Chairs lead has an email activity scheduled that is past due.
Clicking on the 5 VP Chairs lead, the sales manager opens the record of the lead and reviews the
chatter. They see that the email was scheduled to be sent two days ago, but Mitchell never marked
this activity as done.
Important
In order to pull a unattended leads report, sales teams must be regularly utilizing activity in the CRM pipeline, on individual lead and opportunity cards.
It is not possible to compile a complete report if the sales people are not using the Activities feature in the chatter
For more information, refer to Activities
Create an unattended leads report
To create an unattended leads report, first navigate to to open the Pipeline Analysis dashboard. Click into the Search… bar at the top of the page, and remove all of the default filters.
Note
The Created on filter can remain active, as this variable may be useful to include in the report.
Next, add custom filters by clicking the 🔻(triangle pointed down) icon to the right of the Search… bar to open the drop-down menu that contains Filters, Group By, and Favorites columns. Under the Filters column, click Add Custom Filter, which opens an Add Custom Filter pop-up window.
The Add Custom Filter pop-up window allows for the creation of more specific filters.
Add custom filters
In order to generate an unattended leads report, filters need to be created for the following conditions:
Past due activities: limits the results to only include leads with an assigned activity where the due date has past. This can be altered to include activities due to occur on the date the report is generated as well.
Unassigned leads: excludes leads without an assigned salesperson.
Specific sales teams: limits results to only include leads assigned to one or more sales teams. This filter is optional and should not be included if the report is intended for the entire company.
Add filter for past due activities
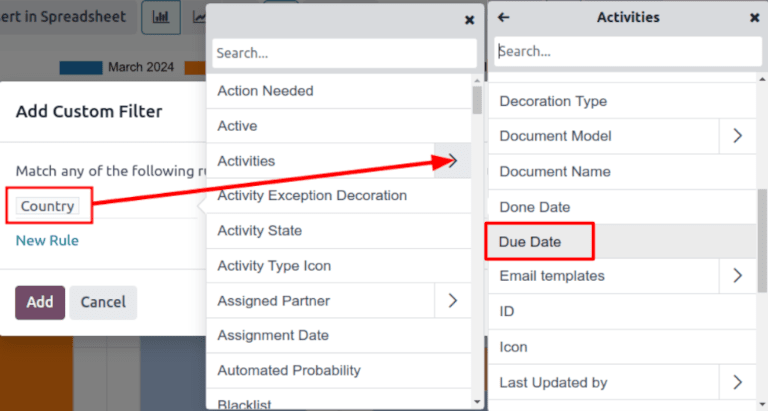
Click the first field for the new rule, and type Activities in the Search… bar, or
scroll to search through the list to locate it. Then, next to Activities, click the
> (greater than sign) to open a new drop-down menu with secondary conditions.
Type Due Date in the Search… bar, or scroll to search through the list. Click
Due Date to add it to the rule.
Then, click into then next field and select <= from the drop-down menu. Selecting this operator includes all activities with a due date up to, and including, the date selected in the next field.
The third field can be left as today’s date, or adjusted as needed.
Exclude unassigned leads
After filtering for activities, add a New Rule. Then, click into the first field for the
new rule, and type Salesperson in the Search… bar, or scroll to search through the
list to locate it.
In the rule’s second field, select is set from the drop-down menu. Selecting this operator excludes any leads not assigned to a specific salesperson.
Add a Sales team
Note
This filter is optional. To view results for the entire company, do not add this filter, and continue to View results
To limit the results of the report to one or more sales teams, click New Rule. Next,
click the first field for the new rule, and type Sales Team in the Search… bar, or
scroll to search through the list to locate it.
In the rule’s second field, select is in from the drop-down menu. Selecting this operator limits results to the sales teams selected in the next field.
Lastly, in the third field, select the desired sales team from the drop-down menu. Multiple teams can be added in this field, where each parameter is treated with an “or” (e.g. “any”) operator in the search logic.
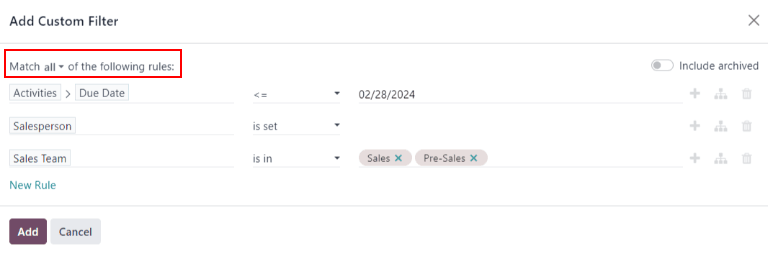
An example of the Add Custom Filter pop-up window with all of the rules configured.
View results
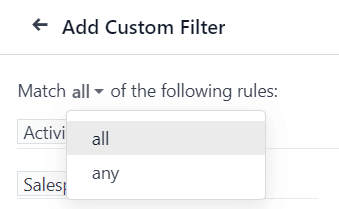
At the top of the Add Custom Filter form, there is an option to match any or all of the rules. In order to properly run the report, only records that match all of the following filters should be included. Before adding the filters, make sure all is selected in this field.
After the filters are configured, click Add. The resulting report displays all leads assigned to a salesperson where an activity is past due, or is due on the current date. The default display is a bar graph, where the leads are grouped by stage.
To group the results by salesperson, click the 🔻(triangle pointed down) icon to the right of the Search… bar to open the drop-down menu that contains Filters, Group By, and Favorites columns. Under the Group By heading, select Salesperson.
Note
The option to group by Sales Team is also available under the Group By heading.
To change to a list view, click the ≣ (list) icon in the top-right corner of the screen.
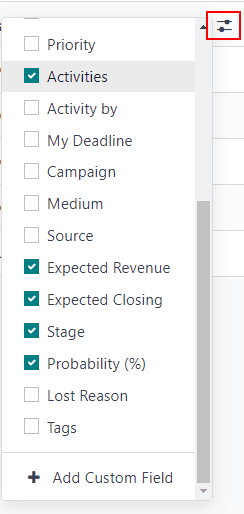
Tip
Clicking the (toggle) icon opens a drop-down menu of additional columns that can be added to the report.
Some options that are beneficial for this report include:
Activities: the summary of the latest activity for this lead.
Expected Closing: the estimated date on which the lead will be won.
Probability: estimated success rate based on the stage.
See also