
Blog
Odoo Blog lets you manage blog pages and posts, and customize them with the website builder.
Tip
Install the Blog app by clicking New on the website builder, then selecting Blog Post, and clicking Install.
See also
Blog posts
To create a blog post, click New on the website builder and click Blog Post. Select a blog, define a Blog Post Title, and click Save. Write the post’s content and customize it using the website builder.
To publish a post, toggle the Unpublished switch in the top-right corner of the page.
To delete a blog post, go to . Select the blog post to delete, click Actions, and Delete.
Customize blog posts
To customize the layout of all blog posts, open one and click . Under the Blog Page section, different categories of options can be used to customize the posts:
Layout:
Breadcrumb: display the breadcrumb trail.
Style: choose how the post’s title and cover are arranged:
Title Above Cover: display the title above the cover. Enable Full Width Cover to make the cover use the page’s full width.
Split Cover: display the title on the left and the cover on the right.
Title Inside Cover: display the title over the cover.
Then, select the elements to display in the post’s header:
Tags: create or select existing tags and display them on the post.
Author: display the post’s author and publication date.
Share Links: add clickable icons that link to your social network profiles. This option is not available with the Title Inside Cover style.
Container Size: choose the width of the post’s content: Small, Regular, or Full.
Note
The Small size is not available with the Split Cover style.
Content:
Share Links: add clickable icons that link to your social network profiles.
Tags: create or select existing tags and display them on the post.
Comments: allow visitors to comment.
Bottom: display another post at the end of the page; by default, the next post of the same blog. Use the Recommended Post field to select another post instead.
Sidebar:
Author: display the post author.
Table of Contents: display a table of contents for the post.
Share Links: add clickable icons that link to your social network profiles and a subscription field for your newsletter.
Tags: create or select existing tags and display them on the post.
Blogs List: display links to all blog pages.
Archive: allow visitors to view all posts from a specific month by selecting it.
Note
The sidebar is only displayed if at least one of its options is enabled.
To add tags or customize the cover of a specific post, click the cover and use the following settings under the Blog Post Cover section:
Tags
Background: add an image by clicking the (camera) icon, or use a background color by clicking the (None) icon and selecting a color.
Size: select the size of the cover (Full screen, Half screen, or Fit text).
Filter Intensity: choose the cover filter’s intensity (Low, Medium, High) or disable it by selecting No filter.
After applying the desired changes, click Save.
Tip
Tag category
Tag categories let you organize tags displayed on the sidebar into groups.
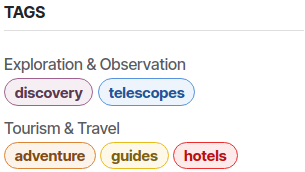
To create tag categories, go to and click New.
Blog landing pages
To create multiple blogs, go to and click New. Next, enter the Blog Name and the Blog Subtitle.
The Blog menu gathers all the blogs and their posts.
Note
With two or more blogs, the blog landing page (/blog) aggregates posts from all blogs and lets visitors choose which blog to view.
Customize blog landing pages
To customize the blog landing pages, go to and use the available options as desired.
Note
The settings are shared by the page listing the posts of all blogs (/blog) and the page of
each individual blog. Only two options differ: Top Banner is available on the page
of an individual blog, and Show Title on the page listing all blogs.
Layout:
Top Banner: display the blog’s cover image and subtitle at the top of the page:
Full Width: make the banner use the page’s full width.
Show Title: display the title at the top of the page.
Style: choose how the posts are listed:
Thumbnails: display the posts in a grid. Two additional options are available:
Promote Last: emphasize the most recent post by displaying it in a larger size.
Cards Design: display the posts with the card effect.
Grid: display the posts in a grid with borders around each post.
Split: display the latest post in a fixed column on the left and the other posts in a scrollable grid on the right.
Minimal: display the posts in a list showing only their title and date.
Compact: display the posts in a list showing only their date, title, and tags.
Regular: display the posts in a list with all their information.
Large: display the posts in a larger list with all their information.
With the Grid style, or the Thumbnails style when Promote Last is disabled, use the Size option to choose the number of columns.
Content Width: choose whether the page’s content should be Regular or Full.
Text & Content:
Cover Image: display the posts’ covers.
Teaser: display the posts’ first sentences.
Tags: create or select existing tags and display them on the post.
Stats: display the number of comments and views for each post.
Author: display the posts’ authors.
Date: display the posts’ publication date.
Sidebar:
About Us: display an about us section.
Follow Us: add clickable icons that link to your social network profiles and a subscription field for your newsletter.
Tags List: allow visitors to view all blog posts that share a specific tag by selecting it.
Archives: allow visitors to view all posts from a specific month by selecting it.
After applying the desired changes, click Save.
Note
Increase your blog’s visibility in search engines, attract more visitors while improving the SEO by:
Updating the content of the website regularly.
Using meta tags and ensuring that both the content and metadata are translated.
Never having more than one Heading 1 per page, so search engines can easily identify the page’s main topic.
Use the Blog building blocks anywhere on the website.