Sign a document
Depending on the situation, you may need to sign:
a single document or an envelope of multiple documents that you or another person prepared for electronic signature using Odoo Sign; or
one or more
.pdfdocuments that have not been prepared for electronic signature by the sender
Sign a document prepared using Odoo Sign
Documents prepared using Odoo Sign contain a series of fields to indicate what information must be completed by the signer(s).
Note
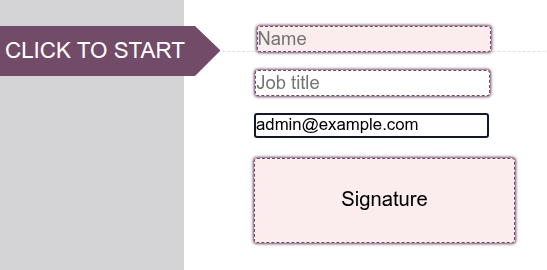
Fields with a colored background are mandatory, while fields with a dotted border and a white background are optional. Fields that have been auto-completed and set to read-only have a solid border and a white background; these fields are populated as soon as the document is opened.
Example
In the example below, the Name and Signature fields are mandatory, while the Job title field is optional. The Email field has been auto-completed and set to read-only.
To sign a document prepared using Odoo Sign:
Click on each field to enter the requested information, or, to be guided through the fields in order, click the Click to start arrow, click on the indicated field to enter the requested information, then use the arrows to progress through the document.
Note
Fields set to be auto-completed but not read-only are populated when clicked or when arriving at the field using the navigational arrows; these fields can still be edited.
When completing an Initial or Signature field, you may need to define the visual representation of your initials/signature.
When all required fields have been completed, click Validate & Send Completed Document at the bottom of the document.
If there are multiple documents to sign, click Next at the bottom of the document, enter the requested information for the next and any subsequent documents. Once all documents have been signed, click Validate & Send Completed Document.
After signing the document:
If other signers still need to sign the document, a message informs you of this. Click Next signatory.
If you are the only or last signer, you can Download the document directly.
If you are an internal user, a list shows any other documents awaiting your signature; you can then Sign or View the documents.
Once a document or document envelope has been fully signed, i.e., signed by all signers, the signed document(s) and the certificate of completion are sent via email to the signers and to any other parties defined by the sender.
Auto-completed fields
In Odoo Sign, certain field types can be configured to be auto-completed using data about the signer, e.g., name or email address, that is stored in the sender’s Odoo database.
Depending on the configuration, these fields can be read-only or can still be edited after auto-completion.
Define a signature and initials
If you are an:
internal user, the first time you use Odoo Sign to complete an Initial or Signature field, you need to define how your initials or signature appear. Thereafter, your initials/signature are stored for future use.
external user, you need to define how your initials or signature appear the first time you complete such a field in a document or document envelope prepared using Odoo Sign.
To define how your initials/signature should appear after clicking the relevant field in a document:
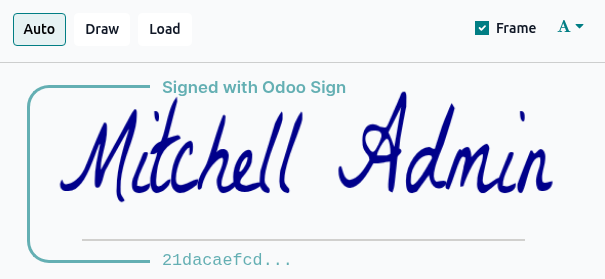
In the Adopt Your Signature window, enter your full name.
Choose whether to:
use the Auto-generated initials/signature, and select your desired font from the (font) dropdown;
Draw your own initials/signature using your mouse; or
Load an image file of your initials/signature.
Tip
Internal users can choose to keep or turn off the security Frame that contains the beginning of the signatory hash, i.e., the unique digital signature of the operation.
Click Sign all to add the initials/signature to all instances in the current document or click Sign to only add the initials/signature to the current instance in the current document.
If there are multiple documents to sign within the same document envelope, the defined initials/signature can thereafter be added directly by clicking the relevant field.
Delegate signing
A signer can delegate their signature to someone else if the Can delegate option was enabled for them when the document was being prepared for signing. The person to whom signing is delegated then signs the document in their own name.
To delegate the signing of a document or document envelope, click Options in the top-right corner next to the name(s) of the signer(s), then select Delegate. Enter the Name and Email address of the person you are delegating to, then click Delegate. The signature request is then sent to the new signer.
Note
Delegation is only available when accessing the signature request through the link sent by email, not when the document is accessed directly from Odoo.
It is not possible to delegate the signature of an individual document within a document envelope.
The original signer is replaced by the new signer in the Signers tab of the signature request’s details form, moved to the Contacts in copy tab, and the change is recorded in the chatter.
Decline a signature request
To decline a signature request, click Options in the top-right corner next to the name(s) of the signer(s), then select Decline to sign. Enter the reason for the refusal, then click Decline. The other signers are notified and any remaining signers can no longer sign the document.
Note
Declining is only available when accessing the signature request through the link sent by email, not when the document is accessed directly from Odoo.
It is not possible to decline the signature of an individual document within a document envelope.
Once a signer has declined to sign, the signature request is marked as Cancelled and the refusal is recorded in its activity logs and chatter.
Sign an unprepared .pdf document
When you are asked to sign a .pdf document that has not been prepared for electronic signature,
this typically involves adding your name, date, and signature to the document. Depending on how the
document has been shared with you, you can sign the document electronically in Odoo:
from the Sign app
from a record’s chatter
from the Documents app
Tip
To be able to sign documents via the Documents app, ensure that the Sign action is enabled for the folder in which the document is stored.
To sign a document in Odoo:
Open the document:
From the Sign app: Go to or , click Upload PDF, select the relevant
.pdfdocument(s), then click Open.From a record’s chatter or from the Documents app: Click on the
.pdfdocument to open it, then click Sign in the upper-right corner.
Add the relevant fields to the document, then click Sign Now.
In the New Signature Request window, ensure you are selected as the signer. Optionally:
to add the reference of the certificate of completion to each page of the document(s), enable Add certificate on each page
to have one or more parties notified when the document is fully signed, add the relevant contact(s) or email address(es) in the CC field
Click Sign Now.
Tip
When signing a document that contains only auto-completed fields, e.g., name, email, etc., click Download to immediately download a fully signed version, without having to complete the fields manually.
The signed document(s) and the certificate of completion are sent to you, and to any contacts mentioned in the CC field, via email; to download the signed document immediately, click Download.
Note
After signing, a list of any other documents awaiting your signature is shown. You can then Sign or View the documents.
If the document was signed from a record’s chatter, the signed document and the related certificate of completion are added to the chatter.
Enable the Sign option in Documents
Enabling the Sign option for a folder or sub-folder in the Documents app allows any document saved in that folder to be signed without having to leave the Documents app.
Note
This option can be particularly useful if you receive documents directly in Documents folders
thanks to email aliases set on certain folders, e.g., sales
contracts sent to the alias salescontracts@yourcompany.com.
To enable the Sign option:
In the Documents app, with the relevant folder or sub-folder open, click the (Actions) icon beside the name of the folder.
Click .