Receiving tickets
Odoo’s Helpdesk app offers multiple channels where customers can reach out for assistance, such as email, live chat, and through a website’s submission form. The variety of these contact options provides customers with multiple opportunities to receive support quickly while also allowing the support team to manage multi-channel support tickets from one central location.
Enable channel options to submit tickets
Go to , and choose an existing team, or click New to create a new team.
On the team’s settings page, scroll down to the Channels and Help Center sections. Enable one or more channels by checking the respective boxes.
Email Alias
The Email Alias setting creates tickets from messages sent to that team’s specified email alias.
Important
The following steps are for Odoo Online and Odoo.sh databases. For On-premise databases, external servers are required for email aliases.
When a new Helpdesk team is created, an email alias is created for it. This alias can be changed on the team’s settings page.
To change a Helpdesk team’s email alias, navigate to , and click on a team name to open its settings page.
Then, scroll to . In the Alias field, type the desired name for the team’s email alias.

Note
Custom email domains are not required in order to use an email alias, however, they can be configured through the Settings app.
If the database does not have a custom domain already configured, click Set an Alias Domain to be redirected to the Settings page. From there, enable Custom Email Servers.
When an email is received, the subject line becomes the title of a new Helpdesk ticket. The body of the email is also added to the ticket, under the Description tab, and in the ticket’s chatter.
Live Chat
The Live Chat feature lets website visitors connect directly with a support agent or chatbot.
Helpdesk tickets can be instantly created during these conversations using the response
command /ticket.
To enable Live Chat, navigate to the list view, select a team, and on the team’s settings page, click the checkbox next to Live Chat, under the Channels section.
Note
If this is the first time Live Chat has been enabled on the database, the page may need to be saved manually and refreshed before any further steps can be taken.
After the Live Chat setting is enabled on a Helpdesk team, a new Live Chat channel is created. Click on Configure Live Chat Channel to update the channel’s settings.
Live Chat channel configuration
On the channel’s settings page, Channel Name can be edited, though, Odoo names the channel to match the Helpdesk team name, by default.
Example
If a Helpdesk team is named Customer Care, a Live Chat channel is created called
Customer Care.

On the channel form, navigate through the tabs to complete the setup.
Operators tab
Operators are the users who act as agents and respond to live chat requests from customers. The user who created the live chat channel is added by default.
To add additional users, click on the Operators tab, then click Add.
Click the checkbox next to the users to be added on the Add: Operators pop-up window that appears, then click Select.
Click New to create new operators, if needed.
When the desired addition is complete, click Save & Close, or Save & New to add multiple new operators.
Danger
Creating a new user can impact the status of an Odoo subscription, as the total number of users in a database counts towards the billing rate. Proceed with caution before creating a new user. If a user already exists, adding them as an operator will not alter the subscription or billing rate for a database.
Additionally, current operators can be edited or removed by clicking on their respective boxes in the Operators tab, and then adjusting their form values on the pop-up form that appears, or by using one of the buttons located at the bottom of the form, such as Remove.
Tip
Users can add themselves as an operator by clicking the Join Channel button on a Live Chat channel.

Options tab
The Options tab contains the visual and text settings for the live chat window.

Notification Text: This field updates the greeting displayed in the text bubble when the live chat button appears on the website.
Livechat Button Color: This field alters the color of the live chat button as it appears on the website. To change the color, click on a color bubble to open the color selection window, then click and drag the circle along the color gradient. Click out of the selection window once complete. Click the refresh icon to the right of the color bubbles to reset the colors to the default selection.
Show: The chat button displays on the selected page.
Show with notification: The chat button is displayed, with the addition of the Notification text from the Options tab.
Open automatically: The chat button is displayed, and automatically opens the chat window after a designated amount of time. The amount of time is designated in the Open automatically timer field, which appears only when this display option is selected.
Hide: The chat button is hidden from display on the webpage.
Tip
Color selection, for the button or header, can be made manually, or through RGB, HSL, or HEX code selection. Different options are available, depending on the operating system or browser.
Channel Rules tab
The Channel Rules tab determines when the live chat window opens on the website by logic of when a URL Regex action is triggered (e.g., a page visit).
Tip
A regex, or regular expression, is sometimes referred to as a rational expression. It is a sequence of characters that specifies a match pattern in text. A match is made within the given range of numbers or for the set of characters.
Edit existing rules by selecting them from the Channel Rules tab, or create a new rule by clicking Add a line.
Then, proceed to configure the details for how the rule should apply on the pop-up form that appears.
Choose how the Live Chat Button displays on the webpage.
Show: The chat button displays on the selected page.
Show with notification: The chat button is displayed, with the addition of the Notification text from the Options tab.
Open automatically: The chat button is displayed, and automatically opens the chat window after a designated amount of time. The amount of time is designated in the Open automatically timer field, which appears only when this display option is selected.
Hide: The chat button is hidden from display on the webpage.
To include a Chatbot on this channel, select it from the drop-down menu. If the chatbot should only be active when no operators are available, check the box labeled Enabled only if no operator.
Note
If a chatbot is added to a live chat channel, a new Chatbots smart button appears on the channel settings form. Click here to create and update the chatbot script.
Each line in the script contains a Message, Step Type, Answers, and conditional Only If logic that applies when certain pre-filled answers are chosen.
To create more steps in the script, click Add a line, and fill out the script steps form, according to the desired logic.
Add the URLs for the pages where the channel should appear in the URL Regex field. Only the path from the root domain is needed, not the full URL.
If this channel should only be available to users in specific countries, add those countries to the Country field. If this field is left blank, the channel is available to all site visitors.

Widget tab
The Widget tab on the live chat channel form offers a website widget that can be added to third-party websites. Additionally, a URL is available, that can provide instant access to a live chat window.
The live chat Widget can be applied to websites created through Odoo by navigating to the . Then, scroll to the Live Chat field, and select the channel to add to the site. Click Save to apply.
To add the widget to a website created on a third-party website, click the Copy button
next to the first listed code, and paste the code into the <head> tag on the site.
To send a live chat session to a customer or supplier, click the Copy button next to the second listed code, and send the URL via email.
Create a support ticket from a live chat session
Operators who have joined a live chat channel are able to communicate with site visitors in real-time.
During the conversation, an operator can use the shortcut command /ticket to create a ticket without leaving the chat
window. The transcript from the conversation is added to the new ticket, under the
Description tab.
Tip
Helpdesk tickets can also be created through the WhatsApp app using the same /ticket command.
Website Form
Enabling the Website Form setting adds a new page to the website with a customizable form. A new ticket is created once the required form fields are filled out and submitted.
To activate the website form, navigate to a team’s settings page under , and selecting the desired team from the list.
Then, locate the Website Form feature, under the Help Center section, and check the box.
If more than one website is active on the database, confirm the correct website is listed in the Website field. If not, select the correct one from the drop-down list.
After the feature is activated, click the Go to Website smart button at the top of the Teams settings page to view and edit the new website form, which is created automatically by Odoo.
Note
After enabling the Website Form setting, the team’s settings page may need to be refreshed before the Go to Website smart button appears.
Additionally, if a Help Center is published, the smart button navigates there first. Simply click the Contact Us button, at the bottom of the forum, to navigate to the ticket submission form.

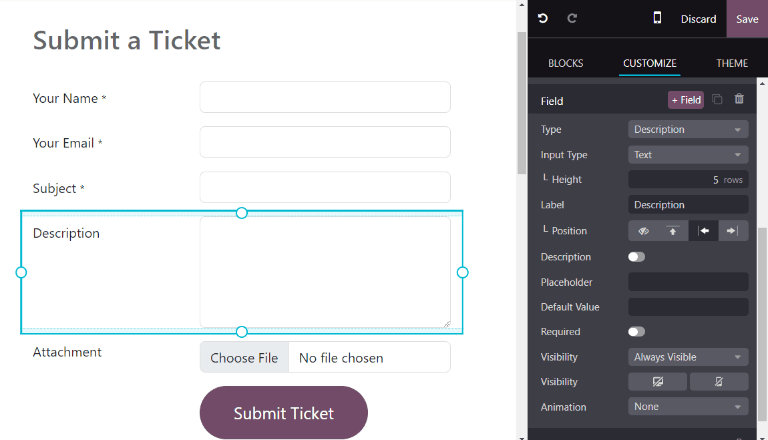
Website ticket form customization
To customize the default ticket submission form, while on the website, click the Edit button in the upper-right corner of the page. This opens the editing sidebar on the right side. Then, click on one of the fields in the form, on the body of the website, to edit it.
To add a new field, go to the Field section of the sidebar, and click + Field.
Click the 🗑️ (trash can) icon to delete the field, if necessary.
Edit the other options for the new field in the sidebar, as desired:
Type: matches an Odoo model value to the field (e.g.
Customer Name).Input Type: determine what type of input the field should be, like
Text,Email,Telephone, orURL.Label: give the form field a label (e.g.
Full Name,Email Address, etc.). Also control the label position on the form by using the nested Position options.Description: determine whether or not to add an editable line under the input box to provide additional contextual information related to the field.
Placeholder: add a sample input value.
Default Value: add common use case values that most customers would find valuable. For example, this can include prompts of information customers should include to make it easier to solve their issue, such as an account number, or product number.
Required: determine whether or not to mark a field as required, in order for the form to be submitted. Toggle the switch from gray to blue.
Visibility: allow for absolute or conditional visibility of the field. Nested options, such as, device visibility, appear when certain options are selected.
Animation: choose whether or not the field should include animation.
Once the form has been optimized, and is ready for public use, click Save to apply the changes. Then, publish the form by toggling the Unpublished switch to Published at the top of the page, if necessary.
Prioritizing tickets
All tickets include a Priority field. The highest priority tickets appear at the top of the Kanban and list views.

The priority levels are represented by stars:
0 stars = Low Priority
1 star = Medium Priority
2 stars = High Priority
3 stars = Urgent
Tickets are set to low priority (0 stars) by default. To change the priority level, select the appropriate number of stars on the Kanban card, or on the ticket.
Warning
As priority levels can be used as criteria for assigning SLAs, changing the priority level of a ticket can alter the SLA deadline.