Restaurant features
Odoo Point of Sale provides various features to manage a restaurant or a bar:
To create a restaurant from scratch, go to the POS settings and click + New Shop. Enter a name and enable the Is a Bar/Restaurant setting, then click Save.
Three main buttons in the POS interface allow for navigating between tables, the register, and orders:
Tables: Access the Floor plan view to manage table occupancy.
Register: Access the POS register to process orders.
Orders: Access the overview of all orders.
Note
When Booking is enabled in the POS settings, a Booking button appears in the POS interface to view and manage bookings.
Default start screen
To define the point of sale’s default start screen, go to the POS settings, scroll down to the PoS Interface section, and set the Default Screen setting to Tables (i.e., Floor plan view) or Register.
Floors and tables
Creating a restaurant from scratch creates a Floor in the Floors & Tables Map setting, under the Point of Sale section of the POS settings, that is named after the database and automatically assigned to the restaurant.
There are two alternatives to create a floor plan:
Go to the Point of Sale section of the POS settings. Under Floors & Tables Map, type the floor name in the Floors field, and press
Enter.Go to and click New.
Tip
To edit the names of automatically-created floor plans in the backend, go to and click the desired floor plan. In the frontend, click the (Edit Floor) icon.
The Floor plan view allows for managing restaurant floors and tables and monitoring table status in real time (occupancy, reservations, kitchen orders) using the following action buttons:
New Order: Create a direct sales order that is not linked to any table. Take the order, click Set Table to assign it to an existing table, or click Set Tab to record the open order’s name.
Buttons for navigating between configured floors (e.g., Main Floor/Patio).
(Edit Floor Plan): Edit the floor plan.
(Table Selector): Enter an existing table number and click Jump to access it.
Note
Following the onboarding by selecting the Restaurant card automatically creates and assigns the Main Floor and Patio floor plans to the restaurant.
Selecting a table on the Floor plan view or accessing it through the Table Selector automatically confirms the table’s occupancy.
To order free physical QR codes adapted to the floor plan, activate the QR menu setting, then click Get QR Codes in the Floor plan view. This offer is available worldwide and for all subscription types.
Example
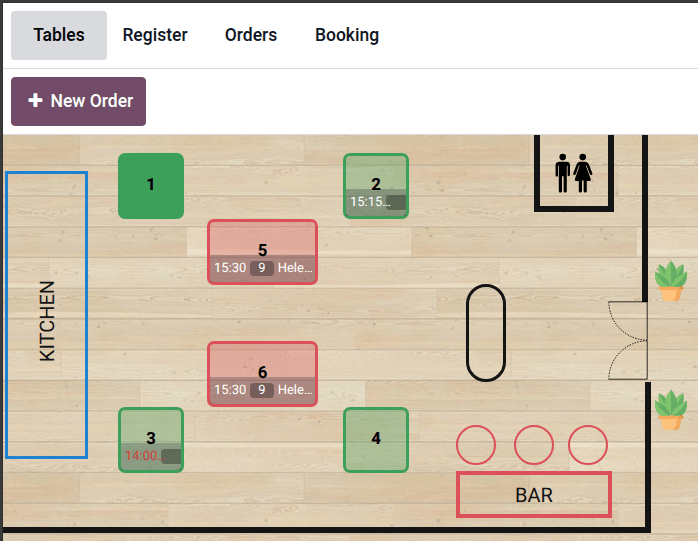
Table 1: The table is occupied.
Table 2: The table is available but booked for 15:15.
Table 3: The 14:00 table is running late.
Table 4: The table is available.
Table 5: The table has been merged with Table 6 for a larger group.
Decor: Edit the floor plan with walls, images, and shapes.
Floor plan configuration
To edit a floor plan from the frontend, open the POS register, access the Floor plan view, click the (Edit Floor Plan) icon in the top-right corner to open the Floor plan editor, then customize the plan using the relevant buttons:
The dropdown menu (e.g., Main Floor ): Select the floor plan to edit. Additionally, click Add Floor to create a new one.
Add Table: Select the table shape among Square, Rectangular, Round, and Oval.
Add Decor: Customize the Floor plan with Walls, Images, and Shapes.
(Edit Floor): Change the floor’s Name, select a Background, or click Set a Background Image to upload your own. To delete the Floor plan, click Delete Floor.
Click an existing table or decor to perform additional actions:
(Properties): Edit the table or decor using the tools in the side panel.
(Duplicate): Copy the table’s or decor’s properties.
(Delete): Delete the table or decor.
Click the turquoise borders to manually reduce or increase the table’s or decor’s shape. Hold the (spin) icon to rotate the table.
The following table and decor editing tools are available. To discard all changes, click Discard. To save all changes, click Save:
Tool |
Use |
|---|---|
Alignment |
Set the text alignment. |
Color |
Click the preferred color. |
Corner rounding / Size / Thickness |
Adjust the slider using the cursor. |
Layers |
Arrange the order within the Floor plan. Send backward or move forward. |
Number of Seats |
Click the (plus) or (minus) icons to increase or decrease the number of seats. |
Shape |
Click the desired shape. |
Style (Text) |
Select the preferred text formatting style. |
Style (Walls) |
Select the preferred line style. |
Table Number |
Enter a number. |
Text |
Enter a text and click Apply. |
Warning
Removing a Table, Decor, or the whole Floor plan is permanent.
Note
To revert the last change or reapply the last undone change, click the (undo) or (redo) icons.
Tip
To get a simpler Floor plan view, click the (hamburger) menu, then Switch Floor View. Repeat this action to get back to the customizable view.
Booking
The Booking setting allows for creating and managing reservations for a designated point of sale directly from the POS interface.
Note
Enabling the Booking setting automatically installs the Appointments app.
See also
Booking configuration
To enable and configure bookings, follow these steps:
Go to the POS settings, scroll down to the PoS Interface section, and enable Booking.
Enter a name in the Appointment type field and click Create and edit.
Configure the Appointment type form and click Save.
Click Save in the POS settings.
Important
To ensure that only existing resources can be booked for a specific point of sale, set the Book field to Resources in the Appointment type form and select tables. Then, enable Manage Capacities to define the maximum amount each resource can handle.
Tip
To accommodate a booking that exceeds the capacity of a single table, click the (Resources) icon in the Appointment Type form, select a table, and add additional tables in the Linked Resource field to merge them.
See also
Booking management
To manage table bookings from the POS interface, click Booking, then:
Click New to create a booking. Add a name, the date and time, number of guests, phone number, duration, resources, and comments, then click Save.
Click a booking to Edit or Delete it. Click a stage name (e.g., Booked, Checked-In, or No Show), or drag the booking card to the relevant stage.
Tip
To quickly edit a booking from the Floor plan view, click the booking notification on the booked table.
Order management
The POS register allows for processing and transferring orders, defining presets, and managing courses.
Order process
To process an order from the POS register, follow these steps:
Click products to add them to the cart.
Define how the order is handled:
Click Set Table to link the order to a table. Enter a table number and click Assign, or click Plan to return to the Floor plan view and manually select a table.
Click Set Tab to enter the open order’s name and click Apply.
Click Send to validate the order.
When ready, process the order payment.
Note
Clicking Send redirects to the Floor plan view if Tables is selected as the default start screen.
Tip
To cancel an order, click the (Actions) icon, then Cancel Order. If an order printer is configured, a cancellation ticket is automatically printed for an order sent to the kitchen.
After selecting a table in the Floor plan view, click Release table in the cart to cancel the table’s occupancy. This action is available when the cart is empty.
Configure a printer to send an order to the kitchen printer when clicking Send.
Order transfer
To transfer an order to another table from the POS register, click the (Actions) icon, then Transfer/Merge, and choose the target table in the Floor plan view:
Select an available table to transfer customers and their orders.
Select an occupied table to merge customers and their orders.
Presets
Presets are used to apply preconfigured settings to orders and determine whether an order is for Dine In, Takeout, or Delivery. They also control whether customer contact information is required and apply capacity limits based on opening hours and order quantity.
To use preconfigured presets, go to the POS settings and enable the Take out / Delivery / Members setting under the Point of Sale section. Set the Default field to the preferred preset, then save. From the register, select the relevant preset, and process the order:
Dine In: Assign a table or open a tab.
Takeout: Enter the order’s name and click Apply, then select a date and a time slot, or click Continue to apply the first available date and time slot.
Delivery: Select an existing customer, or click Create to add one. Then, select a time slot.
Tip
Click the preset button to switch to another one.
Courses
The Course button allows for splitting orders into multiple courses, sending each course to the kitchen sequentially.
To split an order into courses from the register, click Course and add products. Repeat the action as many times as needed, then click Send to send the order to the kitchen, which also fires the first course.
When ready for the second course, retrieve the order from the Floor plan view or the Orders overview, and click Fire Course 2. Repeat the action as many times as needed.
Tip
Alternatively, click Course as often as needed to display the desired number of courses in the cart. Then, click each course, add products, and click Send.
To transfer a product or an entire course into another course, select it in the cart, click the (Actions) icon, then Transfer course, and select the preferred course.
See also
Order printing
To enable sending orders to a kitchen or a bar printer, connect a printer to Odoo, go to the POS settings, and follow these steps:
Scroll down to the Preparation section and enable the Preparation Printers setting.
Type the printer’s name in the Printers field and click Create and edit.
Set the Type field to Preparation.
Enter the Printer IP Address.
Optionally, enable the Use Local Network Access setting to allow connecting the printer to the browser without requiring an SSL certificate.
Select the relevant categories in the Printed Product Categories field.
Click Save.
In the POS settings, click Save.
The printer is then connected to the point of sale and can print preparation tickets.
Note
To create a Printed Product Category on the Create Preparation Printers form, click inside the Printed Product Categories field, then click Search more. In the Search: Printed Product Categories popover, click Create New. Enter a name, select a Parent Category, choose a Color, indicate the type of Course it belongs to, click the (Edit) icon to add an image, determine the product availability, then click Save.
Tip
To test the printer’s configuration in the Create Preparation Printers form, click Test.
To access all created printers from the POS settings, scroll down to the Preparation section and click Manage Printers. Alternatively, go to .
After processing an order, click the (order) icon in the POS register next to Payment to reprint a duplicate of the last kitchen order.
Bills and payment
Bill splitting
To split a bill from the POS register, follow these steps:
Click the (Actions) icon, then Split.
Select at least one product and perform one of the following actions:
Payment: Process the direct payment for the selected product(s).
Split Order: Create a sub-order.
Transfer: Transfer one or all products to another table.
Process the payment.
Click Continue and repeat the process for each guest.
Note
Splitting a bill requires ordering at least two products and creates a sub-order that must be paid before returning to the main order.
See also
Order payment
To proceed with the order payment from the POS register, follow these steps:
Click Payment.
Select a payment method.
Optionally, select a customer and send an invoice to them:
Click Customer to select or create a customer account.
Enable Invoice to allow sending an invoice to the customer.
Click Validate.
Receipt printing
To allow receipt printing, go to , and enable Early Receipt Printing under the Point of Sale section.
After a successful order payment, click Print to generate and print a bill.
Important
If a printer is configured and linked to a point of sale, the receipt is automatically printed upon payment confirmation.
See also
Tips
Configuration
To allow tipping in a POS, go to the POS settings, scroll down to the Payment section, enable Tips, and click Save.
Important
The Add tip after payment setting only works for a POS in the United States of America with an Adyen or a Stripe payment terminal.
The Add tip through payment terminal (Adyen) setting only works with an Adyen terminal.
Note
Saving the Tips setting automatically fills the Tip product field with the preconfigured [TIPS] Tips product, which is only used for tips. When selecting another product in the Tip product field, the chosen product is no longer available on the POS register.
Tip and payment
To process a tip during payment, follow these steps:
Click Tip, then (euro) to add an amount or (percent) to add a percentage, and click Confirm.
Select a payment method.
Click Validate.
Tip
If the order and the tip are paid using different payment methods, select a payment method for the order first. Then, select a payment method for the tip, click Tip, add the tip amount, and click Confirm. Finally, Validate the payment.
Tip after payment (US only)
To allow tipping after payment for a POS in the United States of America, ensure the Add tip after payment setting is enabled in the POS settings. To process tips after payment, follow these steps:
On the Payment screen, select a Card payment method linked to a Stripe or Adyen terminal.
Click Close Tab and select the relevant option in the Add a tip screen:
15%, 20%, or 25%: Tip rates based on order total.
No Tip.
Tip Amount: Enter the relevant amount in the field.
Click Settle to validate.