Access rights
Access rights are permissions that determine the content and applications users can access and edit. In Odoo, these permissions can be set for individual users or for groups of users. Limiting permissions to only those who need them ensures that users do not modify or delete anything they should not have access to.
Only an administrator can change access rights.
Danger
Making changes to access rights can have a detrimental impact on the database. This includes impotent admin, which means that no user in the database can make changes to the access rights. For this reason, Odoo recommends contacting an Odoo Business Analyst, or our Support Team, before making changes.
Tip
A user must have the specific Administration access rights set on their user profile, in order to make changes on another user’s settings for access rights.
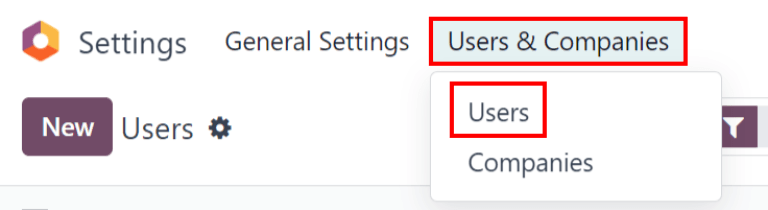
To access this setting, navigate to .
Once at the setting, an already existing administrator must change the setting in the Administration field to Access Rights.
Once complete, click Save to save the changes, and implement the user as an administrator.
Manage user permissions
The access rights for individual users are set when the user is added to the database, but they can be adjusted at any point in the user’s profile.
To make changes to a user’s rights, click the desired user to edit their profile.
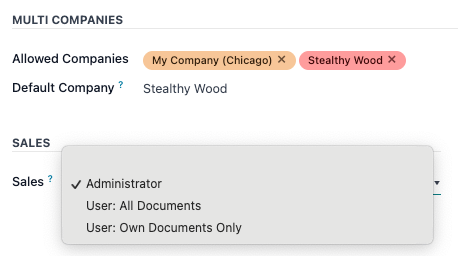
On the user’s profile page, in the Access Rights tab, scroll down to view the current permissions.
For each app, use the drop-down menu to select what level of permission this user should have. The options vary for each section, yet the most common are: Blank/None, User: Own Documents, User: All Documents, or Administrator.
The Administration field in the Access Rights tab has the following options: Settings or Access Rights.
Manage specific permissions
While access rights are typically assigned in bundles under specific roles, they can also be set as explicit permissions.
Example
When a user is assigned the Administrator permission for Timesheets, it gives them full access to that app. That user, while holding full access, can still have their ability to manage their own timesheets restricted — such as in the case of a salaried payroll administrator who does not need to track time.
To manage specific permissions, developer mode must be enabled.
After that, navigate to the app. Then click Manage Users, select a user, and go to the Technical Access Rights tab. From here, Groups can be edited, and specific access rights can be managed across the various sections. If no changes are made to these groups, then their permissions will mirror the selections made in the Access Rights tab.
Selected groups: a list of detailed access rights, set by choices made in the Access Rights tab.
Groups added automatically: implied permissions that are inherited with the explicit permissions already granted to the user. The values here will match the values listed under a given Group’s form located under the menu, in the Inherited tab.

Example
When the Sales Administrator permission set is assigned to a user, the Canned Responses Administrator permissions are inherited automatically. These assignments are reflected across the values listed in the Selected Groups and Groups added automatically tables, respectively.
To add a permission to this user profile, click Add a line in the Selected groups table, and then add permissions to this user profile. To remove a permission, click the (cancel) icon at the end of that permission’s row.
Warning
Removing permissions from the Selected Groups list can impact what permissions are listed in the Groups added automatically list, since selected permission groups inform what permission groups are added automatically.
Clicking on the permission itself will open a group management form. Learn more about managing groups.
Any permission in the Groups added automatically section is implied or required by the permission shown in the Selected groups section. These cannot be removed, but more users can be given these permissions by clicking on the permission itself, and then adding the user to that permission’s group.
Note
Any permission in green is already provided by another permission (for example, setting the Website app’s permission to Editor and Designer will also give that user the Restricted Editor permission).
Any permissions in red are conflicting and cannot be active at the same time.
Any permissions in italics are implied by a Selected group (these are usually found in the Groups added automatically).
Create and modify groups
Groups are app-specific sets of permissions that are used to manage common access rights for a large amount of users. Administrators can modify the existing groups in Odoo, or create new ones to define rules for models within an application.
To access groups, first activate Odoo’s developer mode, then go to .

To create a new group from the Groups page, click Create. Then, from the blank group form, select an Application, and complete the group form (detailed below).
To modify an existing group, click an existing group from the list displayed on the Groups page, and edit the contents of the form.
Enter a Name for the group and tick the checkbox next to Share Group, if this group was created to set access rights for sharing data with some users.
Important
Always test the settings being changed to ensure they are being applied to the correct users.
The group form contains multiple tabs for managing all elements of the group. In each tab, click Add a line to add a new row for users or rules, and click the (cancel) icon to remove a row.
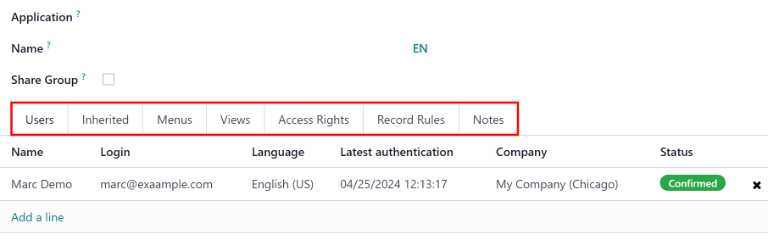
Users tab: lists the current users in the group. Users listed in black have administrative rights. Users without administrative access appear in blue. Click Add a line to add users to this group.
Inherited tab: Inherited means that users added to this group are automatically added to the groups listed on this tab. Click Add a line to add inherited groups.
Example
For example, if the group Sales/Administrator lists the group Website/Restricted Editor in its Inherited tab, then any users added to the Sales/Administrator group automatically receive access to the Website/Restricted Editor group, as well.
Menus tab: defines which models the group can have access to. Click Add a line to add a specific menu.
Views tab: lists which views in Odoo the group has access to. Click Add a line to add a view to the group.
Access Rights tab: lists the first level of rights (models) that this group has. The Name column represents the name for the current group’s access to the model selected in the Model column.
To link a new access right to a group, click Add a line. Select the appropriate model from the Model drop-down, then enter a name for the access right in the Name column. For each model, enable the following options as appropriate:
Read: Users can see the object’s existing values.
Write: Users can edit the object’s existing values.
Create: Users can create new values for the object.
Delete: Users can delete values for the object.
Tip
While there are no conventions for naming access rights, it is advisable to choose a name that identifies its purpose.
For example, the access that purchase managers have to the Contact model could be named
res.partner.purchase.manager. This consists of the technical name of the model, followed by a name identifying the group of users in question.
To find the model’s technical name from the current view, first enter a placeholder text in the Name field, then click the Model name, then the (Internal link) icon.
Record Rules: lists the second layer of editing and visibility rights. Record Rules overwrite, or refine, the group’s access rights. Click Add a line to add a record rule to this group. For each rule, choose values for the following options:
Apply for Read.
Apply for Write.
Apply for Create.
Apply for Delete.
Important
Record rules are written using a domain, or conditions that filter data. A domain expression is a list of such conditions. For example:
[('mrp_production_ids', 'in', user.partner_id.commercial_partner_id.production_ids.ids)]This record rule is to enable MRP consumption warnings for subcontractors.
Odoo has a library of preconfigured record rules for ease of use. Users without knowledge of domains (and domain expressions) should consult an Odoo Business Analyst, or the Odoo Support Team, before making changes.
Session and inactivity timeouts
When the auth_timeout module is installed, administrators can configure automatic logout rules for
users assigned to a specific user group. This module may be installed automatically by certain
localizations (for example, the Australian Payroll localization).
Once installed, a Timeouts tab appears on user group forms. This tab allows administrators to define how long users can remain logged in under different conditions.
Two types of timeouts can be configured:
Inactivity timeout
Inactivity timeout controls whether users are automatically logged out after a period of inactivity.
To enable inactivity timeout, click the Timeouts tab and tick the Inactivity checkbox. Next, choose either Screen lock or Screen lock with two-factor authentication from the drop-down menu. This determines whether the user must to complete 2FA verification when logging back in.
Then, enter the desired amount of time before enforcing screen lock, and select a unit of measure from the drop-down menu. Inactivity can be measured in minutes, hours, or days.
Session timeout
Session timeout controls whether users are logged out after a fixed session duration, regardless of activity.
To enable session timeout, click on the Timeouts tab, and tick the Session checkbox. Next, choose either Logout or Logout with two-factor authentication from the drop-down menu. This determines whether the user must to complete 2FA verification when logging back in.
Then, enter the desired amount of time before the user is logged out, and select a unit of measure from the drop-down menu. Session timeouts can be measured in minutes, hours, or days.
Superuser mode
Superuser mode allows the user to bypass record rules and access rights. To activate Superuser mode, first, activate developer mode. Then, navigate to the debug menu, represented by a (debug) icon, located in the top banner.
Finally, towards the bottom of the menu, click Become Superuser.
Important
Only users with Settings access for the Administration section of the Access Rights (in their user profile) are allowed to log in to Superuser mode.
Danger
Superuser mode allows for circumvention of record rules and access rights, and therefore, should be exercised with extreme caution.
Upon exiting Superuser mode, users may be locked out of the database, due to changes that were made. This can cause impotent admin, or an administrator without the ability to change access rights/settings.
In this case contact Odoo Support here: new help ticket. The support team is able to restore access using a support login.
To leave Superuser mode, log out of the account, by navigating to the upper-right corner, and clicking on the OdooBot username. Then, select the Log out option.
Tip
An alternative way to activate Superuser mode is to log in as a superuser. To do that, navigate to the login screen, and enter the appropriate Email and Password.
Instead of clicking Login, click Log in as superuser.