Adding vehicles
Odoo’s Fleet app manages all vehicles, and the accompanying documentation that comes with vehicle maintenance and driver records.
Upon opening the application, all vehicles are organized within the Vehicles dashboard, which is the default dashboard. Each vehicle is displayed in its corresponding Kanban stage, based on its status. The default stages are New Request, To Order, Registered, and Downgraded.
Settings
Before registering any vehicles, review two Fleet settings that directly affect day-to-day operations and employee benefits:
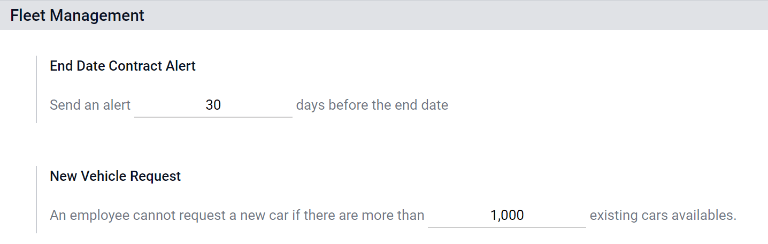
End Date Contract Alert: Emails the contract’s Responsible person a set number of days before the vehicle agreement expires, so renewals or returns are not missed.
New Vehicle Request: (Only for the Belgian payroll localization) Blocks employees from requesting a new company car through the salary configurator, once the available vehicles already exceed the defined limit, helping control benefits costs.
To access the settings menu, go to .
End Date Contract Alert
The End Date Contract Alert field shows how many days before the end of a vehicle contract an alert should be sent. The responsible parties receive an email informing them that a vehicle contract is about to expire in the number of days defined in this field.
Responsible parties
To determine the responsible person for a contract, open an individual contract. The person listed as Responsible under the Contract Information section of the contract receives the alert.
To open a contract from a list of all contracts, navigate to , and all contracts appear in the list. Click on a Contract to open it. In the Information section of the contract, look under Responsible to see who receives expiration alerts.
An individual contract can also be opened from a specific vehicle by navigating to and clicking on an individual vehicle. On the vehicle form, click the Contracts smart button at the top of the page. Only contracts associated with the vehicle appear in the list. Click on an individual contract to open it. The Responsible person is listed on the contract.
New vehicle request
Enter the maximum fleet size that may be reached through the salary-configurator flow. When the total number of available vehicles (vehicles without an assigned driver) is equal to or below this limit, employees can request a new company car. Once the available vehicles exceed the limit, the request option is hidden.
Example
If the New Vehicle Request limit is set to 20 vehicles, and there are 25 vehicles available, employees cannot request a new car and must select from the 25 already available. If there are only 10 cars available, then the employee would be able to request a new vehicle.
Note
This settings option only appears if the Belgian-Payroll-Fleet module is installed for the Belgian localization.
Add a vehicle
To add a new vehicle to the fleet from the Vehicles dashboard, click the New button in the top-left corner, and a blank vehicle form loads. Then, proceed to enter the vehicle information on the vehicle form.
Vehicle form fields
Model: Using the drop-down menu, select the vehicle’s model. Once a model is selected, additional fields may appear on the form. If the model is not listed, type in the model name, and click either Create “model”, or Create and edit… to create a new model and edit the model details.
License Plate: Enter the vehicle’s license plate number.
Tags: Select any tags from the drop-down menu, or type in a new tag. There is no limit on the amount of tags that can be selected.

Note
The Model is the only required field on the new vehicle form. When a model is selected, other fields appear on the vehicle form, and relevant information auto-populates the fields that apply to the model. If some of the fields do not appear, this may indicate there is no model selected.
Driver
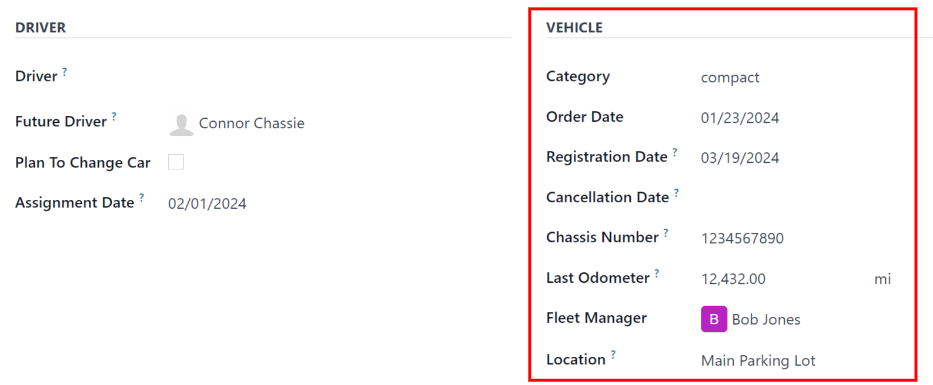
This section of the vehicle form relates to the person who is currently driving the car, as well as any plans for a change in the driver in the future, and when.
Driver: Using the drop-down menu, select the driver for the vehicle. If the driver is not listed, create the new driver and edit the driver details.
Important
A driver does not have to be an employee. When creating a new driver, the driver is added to the Fleet app and the Contacts app (if installed), not in the Employees app.
Mobility Card: If the selected driver has a mobility card (such as a gas card) listed on their employee record in the Employees application, the mobility card number automatically appears in this field. If there is no mobility card listed, and one should be added, edit the employee record in the Employees application.
Future Driver: If the next driver for the vehicle is known, select the next driver from the drop-down menu. Or, type in the next driver and click either Create “future driver” or Create and edit… to create a new future driver, and edit the driver details.
Note
If this field is populated, an Apply New Driver button appears on the vehicle form. Click the Apply New Driver button to change the driver information.
Assignment Date: Using the calendar selector, select when the vehicle is available for another driver. If this field is left blank, that indicates the vehicle is currently available, and can be assigned to another driver. If it is populated, the vehicle is not available for another driver until the selected date.
Company: Select the company from the drop-down menu. This field only appears in a multi-company database.
Create a new driver
If a driver is not already in the system, the new driver should first be configured and added to the database. A new driver can be added either from the Driver or Future Driver fields on the vehicle form.
First, type in the name of the new driver in either the Driver or Future Driver field, then click Create and edit…. A Create Driver or Create Future Driver form appears, depending on which field initiated the form.
Both the Create Driver and Create Future Driver forms are identical, and are stored in the Contacts app. Configure the new contact, then click Save.
Note
Depending on the installed applications, different tabs or fields may be visible on the Create Driver and Create Future Driver forms.
Vehicle
This section captures key physical details of a vehicle. Selecting an existing Model may auto-fill some fields.
Fill in the following fields on the form:
Category: Using the drop-down menu, select the vehicle category from the available options. If the Inventory app is installed, the category affects any configured dispatch management system.
Order Date: Using the calendar selector, select the date the vehicle was ordered. Keeping track of how long vehicles have been in the fleet can help when making decisions on expensive repairs, or help decide when to surrender a vehicle.
Registration Date: Using the calendar selector, select the date the vehicle was registered. Many regions require proper registration, so keeping track of registration dates is important.
Cancellation Date: Using the calendar selector, select the date the vehicle lease expires, or when the vehicle is no longer part of the fleet (e.g., sold, plates surrendered).
Chassis Number: Enter the chassis number in the field. This is known in some countries as the VIN number. Every vehicle has a unique number, so in the event of a theft or accident, a vehicle can be identified with this unique number.
Last Odometer: Enter the last known odometer reading in the number field. Using the drop-down menu next to the number field, select whether the odometer reading is in kilometers (km) or miles (mi). Keeping track of a vehicle’s mileage is crucial when determining the value of the vehicle for both tax purposes and resale value.
Fleet Manager: Select the fleet manager from the drop-down menu, or type in a new fleet manager, and click either Create or Create and edit….
Location: Type in the specific location where the vehicle is typically located in this field. The entry should clearly explain where the vehicle can be found, such as
Main GarageorBuilding 2 Parking Lot. This is crucial information for companies with many locations where vehicles are stored.Make Vehicle Available: Click the checkbox if the vehicle can be selected when an employee fills out the salary configurator.
Tax Info tab
Depending on the localization setting for the database, and what additional applications are installed, other fields may be present on the form.
The sections below are default and appear for all vehicles, regardless of other installed applications or localization settings.
Fiscality
Horsepower Taxation: Enter the amount that is taxed based on the size of the vehicle’s engine. This is determined by local taxes and regulations, and varies depending on the location. It is recommended to check with the accounting department to ensure this value is correct.
Deductibility Rates: Configure the dates and percentages of the vehicle-related costs (fuel, maintenance, depreciation, etc.) that can be deducted from the company’s taxable income. The Start Date field indicates when the deduction begins, and the Deductibility (%) field indicates the percentage to be deducted.
Contract
First Contract Date: Select the start date for the vehicle’s first contract using the calendar selector. Typically this is the day the vehicle is purchased or leased.
Catalog Value (VAT Incl.): Enter the MSRP for the vehicle at the time of purchase or lease.
Purchase Value: Enter the purchase price or the original value of the lease for the vehicle.
Residual Value: Enter the current value of the vehicle.
Note
The values listed above affect the accounting department. It is recommended to check with the accounting department for more information and/or assistance with these values.

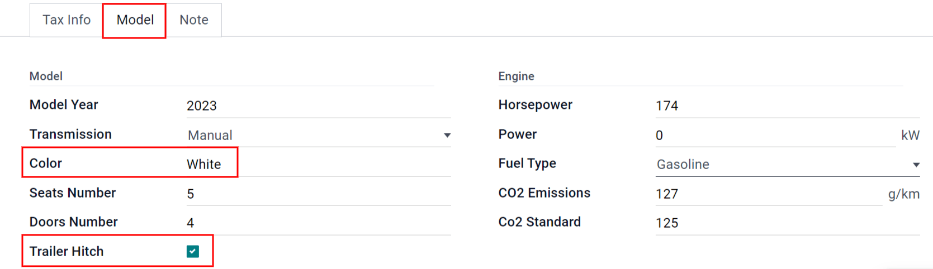
Model tab
If the model for the new vehicle is already configured in the database, the Model and Engine sections are populated with the corresponding information. If the model is not already in the database and the Model tab needs to be configured, configure the new vehicle model.
Check the information in the Model tab to ensure it is accurate. For example, the color of the vehicle or whether a trailer hitch is installed are examples of common information that may need updating.
Note tab
Enter any notes for the vehicle in this section.
See also