
Work centers
Work centers are where Manufacturing work orders are processed, and they can be used to track costs, make schedules, plan capacity, organize equipment, and track efficiency. Specifying a work center is required when a work order is defined in the Operations tab of a bill of materials (BoM) for a product.
Important
Work centers only appear if the Work Orders setting is enabled. To do so, navigate to , then select the Work Orders checkbox. Work orders can be managed in the Manufacturing app by selecting .
See also
Work center configuration
Create a new work center
Open and click the New button to open a new work center form.

Work Center Name: Enter the label for the work center used to select it on a work order or on the reporting dashboards.
Tag: Specify reusable labels that can be used to sort work centers in the list view.
Alternative Workcenters: Specify the work centers where a work order should be carried out if the specified work center is unavailable.
Code: Specify the reference ID for the work center that is displayed in the list view.
Working Hours: Specify the hours during which the work center can be used each week.
Company: In multi-company databases, select the company the work center belongs to.
Working hours
Working hours define when a work center should operate, based on a one- or two-week schedule. These hours also form the basis for calculating overall equipment effectiveness (OEE).
Note
By default, Odoo uses the Work Center 40 hours/week working hours, which expects work centers
to operate between 8:00 AM and 4:00 PM on Monday through Friday.
To change the working hours, hover over the current Working Hours value and click the (Internal link) icon to open the working hours form.

To create a new set of working hours, click the New button and give it a name. From here, edit any Work from or Work to value to adjust the time range. Remove a line by clicking the (trash) icon. To create a new time range, click Add a line at the bottom of the list.
Set productivity standards and allowed employees
The General Information tab on the work center form allows for productivity goals to be assigned to a work center. These are used as the basis for calculating how much of the potential time the work center is being used and its operating costs.

Time Efficiency: Set the multiplier for how using this work center affects the normal execution speed of a work order. This is specified as a percentage.
Example
If a work center has older equipment and work orders take twice as long to produce, the
Time Efficiencywould be50.00%.OEE Target: Set the target for efficiency at the work center.
Example
If a work center is available for
8 hours per daybut is only expected to be used for7 hours per day, the OEE would be87.50%. \(7/8*100=87.5\)
See also
Setup Time: Specify the time required before work can commence on a work order.
Cleanup Time: Specify the breakdown or cleanup time required after a work order is finished.
Cost per hour: Set the operating expense of that work center. The per employee value is used to estimate the average cost per employee.
Expense Account: Specify the account to be used when the manufacturing order is marked as done. If this value is not set, the expense account of the final product is used.
See also
Allowed Employees: Specify the employees who can perform work at the work center. If this field is left blank, all employees are allowed.
Example
If equipment at a work center requires a certification to operate, the Allowed Employees field could list only those employees who have the certification.
Set production capacities
The Product Capacities tab creates a default value for how many units of a product can be produced at one time in a work center, along with the product’s Setup Time (in minutes) and Cleanup Time (in minutes).

Tip
To specify production capacities in different measurements from a count of units, enable the Units of Measure feature in the Inventory app.
Integrate IoT devices
The IoT Triggers tab enables the integration of IoT devices with a work center:
Device: Specify the IoT device to be triggered.
Key: Specify the security key for the device.
Action: Select the IoT device action that is triggered.

Assign equipment to work centers
The Maintenance app makes it possible to add specific equipment to a work center and individually track its costs and productivity. It also adds the Equipment and Maintenance tabs to the work center form, used to list equipment and schedule maintenance activities.
See also
Configure equipment
Use the Equipment tab to assign equipment to a work center. Click Add a line to add the equipment in the Add: Maintenance Equipment window. The following information is displayed for each piece of equipment:
Equipment Name: The name of the piece of equipment.
Technician: The technician responsible for servicing the equipment.
Equipment Category: The category the equipment belongs to.
MTBF: Mean time between failures; the average time that the piece of equipment will operate before failing.
MTTR: Mean time to repair; the average time it takes for the equipment to become fully operational again.
Est. Next Failure: An estimate of when the next equipment failure will occur.

Note
The MTBF, MTTR, and Est. Next Failure values are all calculated automatically based on past failure data, if any exists.
Work center planning
The currently scheduled work orders can be viewed by accessing the planning views from the pages.

Different pages show how many individual work orders are scheduled, how hours the work center is in production, and the dates and times that are currently scheduled for work orders. Times and planned work centers can be changed by clicking to access the individual work order.
See also
Work center performance
Performance for an individual work center can be viewed by selecting and opening a work center. Metrics are displayed in smart buttons at the top of the form.

OEE: Overall equipment effectiveness, or the percentage of time that the work center has been productive out of its available work hours.
See also
Lost: The amount of time lost due to work stoppages.
Load: The amount of time it will take to complete the current workload.
Performance: The real duration of work time, shown as a percentage of the expected duration.
Use case: measuring performance by shift using work centers
Work centers support defined working hours, enabling the tracking of production efficiency by shift. To configure shift-based tracking, create working hours for each of the shifts, then duplicate versions of each work center for each of the shifts. With this setup, comparing shift productivity can be done with any of the available reporting tools.
Working hours for multiple shifts
To create working hours for multiple shifts, open a work center form and in the Working Hours field click the (Internal link), and then click the New button to create a new set of hours for the second shift.
Example
A manufacturer has two shifts: a day shift from 5 AM to 1 PM and a night shift from 1 PM to 9 PM. Starting from any existing work center, edit the existing working hours to match the day shift.
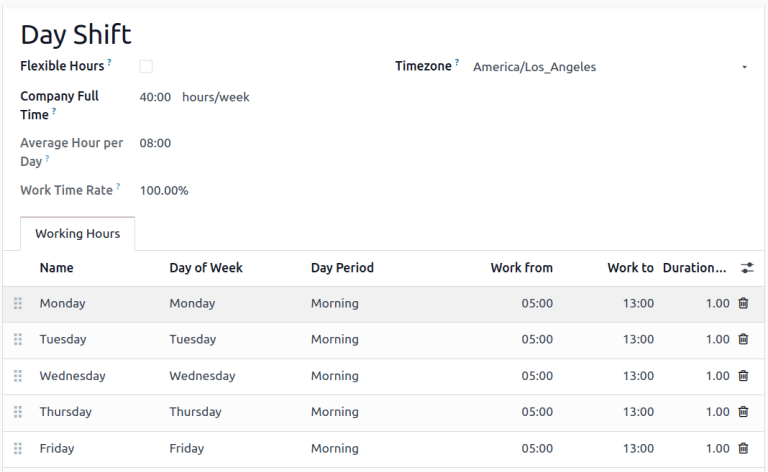
Once the day shift is saved, click the (cog) icon and select
Duplicate. Rename this new schedule Night Shift and change each Work
from to 13:00 and Work to to 21:00.

Work centers for multiple shifts
To create the duplicate work centers, return to the work center view by navigating to and duplicating each of the work centers that are used by both shifts, either on the individual work center forms, or directly from the list view.
Tip
To duplicate work centers directly from the list view, click the (checkbox) that appears above the list items to select all. Then, click the Actions button at the top of the list and select Duplicate.
Example
A manufacturer has two work centers, Assembly Line 1 and Assembly Line 2, and two working
hours, Day Shift and Night Shift.

To create versions of Assembly Line 1 and Assembly Line 2 for each shift, duplicate each of
the work centers. Select the first work center and add the shift name in that work center’s name
and assign it the appropriate working hours. Optionally, configure each work center to use its
opposite shift counterpart as an alternate work center to ensure that manufacturing orders get
assigned to both. Tags can also help make a visual distinction between each shift.
Tip
Use the (left arrow) and (right arrow) buttons in the top corner to move on to the next form in the list without returning to the list view.
Reports comparing different shifts
With multiple work centers created to represent shifts, reports that sort by work center will now compare shifts. This can be used to compare the number of work orders that are being assigned each shift, the OEE, or actual time that each shift is taking to produce a product.
Example
A report has been created to compare the time efficiency of two shifts producing the same product in the same work center.
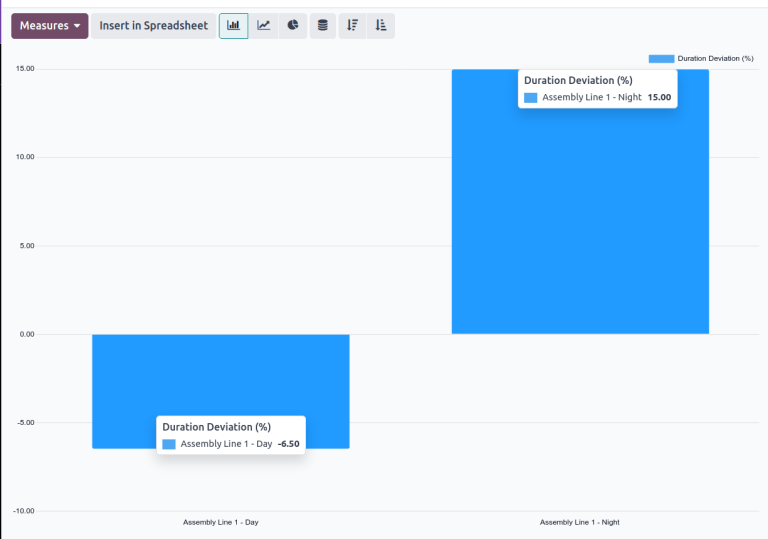
To create this report, go to and click to remove the To Do or Blocked or In Progress filter by clicking the (Remove) icon on its right side. Next, click the measures button and select Duration Deviation (%).
In this case, the day shift has on average taken more than the expected time to produce products (-6.50%) while the night shift took less than the expected time (15.00%).