Rental
The Odoo Rental application provides comprehensive solutions for configuring and managing rentals.
Send quotations, confirm orders, schedule rentals, register products at pickup and return, and invoice customers from a single platform.
Rental products
Explore how to create and manage rental products.
Service products
Discover how to rent services alongside products.
Manage deposits
Learn how to create a refundable deposit for rental products. Discover how to rent services alongside products.
Product types
Learn about the different rental product types, general configuration, and possible app integrations.
Price computing
Odoo uses two rules to compute the price of a product when a rental order is created:
Only one price line is used.
The cheapest line is selected.
Example
A bike rental company offers the following rental prices for its electric bikes:
1 day: $100
3 days: $250
1 week: $500
A customer wants to rent this product for eight days. What price will they pay?
After the order is created, Odoo chooses the second line because it is the lowest price. The customer pays three times the ‘3 days’ rate to cover eight days, totaling $750.
Therefore, the customer pays $750 for the eight-day rental period.
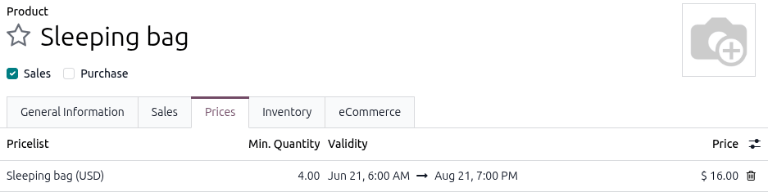
Rental pricelist rules
Extra rental prices are configured in the product’s Prices tab. The prices are configured like advanced pricelists, where the following fields work as conditions for the price to be applied:
Pricelist: The pricelist for which the pricelist rule is valid.
Min Quantity: To trigger the Pricelist rule, the quantity must meet or exceed the minimum quantity value. The unit of measure follows the product’s Periodicity setting.
Validity: The starting date or date range when the pricelist rule is active.
Company: The company for which the pricelist rule is valid.
How Minimum Quantity is computed
Configuring discounted prices based on rental duration requires price rules with a Min. Quantity. The Min. Quantity field is computed differently for the Rental app than for the Sales and Subscription apps.
The Min. Quantity is computed based on the rental duration and the quantity on the sales order line (SOL). The unit of time for the Min. Quantity field is based on the product’s Periodicity setting.
The formula used is:
Example
A sports store rents sleeping bags, and for the summer, they offer 20% off their standard rental rate of $20 per night. They set up a rental pricelist rule with a Min. Quantity of four nights to apply the discount.
The following customer orders can trigger the discount:
A group of people rents four sleeping bags for one night.

A person rents one sleeping bag for four nights.

Two people rent two sleeping bags for two nights.
