Spain
Modules
The following modules are installed automatically with the Spanish localization:
Name |
Technical name |
Description |
|---|---|---|
Spain - Accounting (PGCE 2008) |
|
Spanish fiscal localization package, complete with the Spanish chart of accounts, taxes, tax report, and fiscal positions. |
Spain - Accounting (PGCE 2008) Reports |
|
Accounting reports for Spain. |
Spain - Accounting Reports (2024 Update) |
|
Adds extra fields regarding Rectificación for Modelo 303. |
Spain - Accounting Reports (2025 Update) |
|
Adds tax return functionalities. |
Spain - Facturae EDI |
|
Creates EDI Facturae files required to send to AGE (Administración General del Estado). |
Spain - Intrastat Declaration |
|
Adds Interstat report. |
Additionally, the following modules must be manually installed:
Name |
Technical name |
Description |
|---|---|---|
Spain - Point of Sale + TicketBAI |
|
Sends invoices to the Diputaciones Forales of Araba/Álava, Bizkaia and Gipuzkoa. |
Spain - SII EDI Suministro de Libros |
|
Sends taxes information to SII (Suministro Inmediato de Información). |
Spain - TicketBAI |
|
Sends invoices and vendor bills to the Diputaciones Forales of Araba/Álava, Bizkaia and Gipuzkoa. |
Spain - Veri*Factu |
|
Sends Veri*Factu XML to AEAT (Agencia Estatal de Administración Tributaria). |
Spain - Veri*Factu for Point of Sale |
|
Adds Veri*Factu support to Point of Sale. |
Note
In some cases, such as when upgrading to a version with additional modules, it is possible that modules may not be installed automatically. Any missing modules can be manually installed.
Localization overview
The Spanish localization package ensures compliance with Spanish fiscal and accounting regulations. It includes tools for managing taxes, fiscal positions, reporting, and a predefined chart of accounts tailored to Spain’s standards.
The Spanish localization package provides the following key features:
Chart of accounts: a predefined structure tailored to Spanish accounting standards.
Taxes pre-configured tax rates, including standard VAT, zero-rated, and exempt options.
Fiscal positions: automated tax adjustments based on customer or supplier registration status.
Note
There are several distinct Spanish fiscal localization packages available, each featuring its own pre-configured PGCE (Plan General de Contabilidad) chart of accounts:
Spain - SMEs (2008)
Spain - Non-profit entities (2008)
Spain - Cooperatives - Complete (2008)
Spain - Cooperatives - SMEs (2008)
Spain - Complete (2008)
New Odoo Online databases created with Spain as the selected country are set up by default with the Spain - SMEs (2008) fiscal localization package.
Reports
The Spanish-specific statement reports available are:
Balance Sheet
Profit & Loss (ES)
EC Sales List
Tax report
To access Spain-specific tax reports (Modelo), go to , click Report: and select one of the following:
Tax Report (Mod 111)(ES)
Tax Report (Mod 115)(ES)
Tax Report (Mod 303)(ES)
Tax Report (Mod 347)(ES)
Tax Report (Mod 349)(ES)
Tax Report (Mod 390)(ES)
Tip
To export the VAT records books (Libros de IVA) in XLSX format, click Report: and select Generic Tax report. Then, click the (down arrow) and select VAT Records Books (XLSX) to generate the XLSX file.
Modelo 130
Change the percentage
If you wish to change the percentage computation of the box [04] under the I section and/or of the box [09] under the II section:
Activate the developer mode, go to , and select the report Tax report (Modelo 130).
Click the (cogs) icon to the right of Report: Tax Report (Mod 130) (ES).
Click the box you wish to change, and in the pop-up window, click on the percentage line. In the new pop-up window, change the value in the Formula field to the percentage you wish to apply. Repeat this action if you wish to modify the other box as well.
Report agriculture activity
If you wish to have any amount input in the II section (from boxes [08] to [11]), you must change the industry of the corresponding contact to Agriculture:
Go to the contact form ( or , for example), and select a contact.
In the Sales & Purchase tab, set the Industry field to Agriculture.
Repeat this operation for all contacts related to the agriculture industry.
Veri*Factu
Note
Producers of Veri*Factu billing systems must self-certify their compliance with the regulations.
Download Odoo's "declaración responsable"
Veri*Factu is the Spanish Tax Agency’s verifiable invoice issuance system. It is mandatory for most taxpayers in Spain, except for those who use the SII system or are under a regional tax regime (i.e., TicketBai).
Odoo allows invoices and Point of Sale orders to be automatically sent to the tax authorities.
Configuration
To enable Veri*Factu, follow these steps:
Open the Settings app to make sure your company’s Country and Tax ID are correctly set in the Companies section.
Install the Spain - Veri*Factu (
l10n_es_edi_verifactu) module.Go to or , scroll to the Veri*Factu section, check the Enable Veri*Factu option, and click Manage certificates to add a certificate.
In the Certificates for Veri*Factu list view, click New.
Click Upload your file, then select a certificate file and enter the Password needed to open the certificate (if there is one).
Note
At least one certificate has to be uploaded.
By default, Veri*Factu is in testing mode. The data is sent to test servers and is not considered official. When official data can be sent to the production servers, go to the Veri*Factu section in the Settings and disable Test Environment.
Invoices
Once an invoice is confirmed, it can be sent. In the Send window, the Veri*Factu option is available if Veri*Factu has been enabled.
Click Send to generate a JSON file containing the invoice details. This file is stored as a Veri*Factu document. In the Veri*Factu tab, all corresponding documents are listed by their creation date and current status.
Tip
To download a JSON file, click on its document in the Veri*Factu tab. Then, in the Open: Veri*Factu Documents window, click the link in the JSON field.
Note
The document should be sent to the AEAT immediately. However, it may be delayed due to mandatory waiting periods between submissions required by the AEAT. In such cases, the document is automatically sent the next time a scheduled action runs.
A Veri*Factu QR code appears on the invoice PDF. Scan this code to verify that the invoice has been received and recognized by the AEAT.
Point of sale orders
Once an order has been paid, a JSON file containing the order details is generated. This file is stored as a Veri*Factu document.
Go to . In the Orders list view, select the relevant order. In the Veri*Factu tab, all the corresponding documents are listed by their creation date and current status.
Tip
To download a JSON file, click on its document in the Veri*Factu tab. Then, in the Open: Veri*Factu Documents window, click the link in the JSON field.
Note
The document should be sent to the AEAT immediately. However, it may be delayed due to mandatory waiting periods between submissions required by the AEAT. In such cases, the document is automatically sent the next time a scheduled action runs.
If an invoice is generated for an order during the payment process, the Veri*Factu document is created and sent for the invoice instead.
Note
A Veri*Factu QR code appears on the order receipt, even if an invoice is created for the order. Scan this code to verify that the invoice has been received and recognized by the AEAT
TicketBAI
Ticket BAI or TBAI is an e-Invoicing system used by the Basque government and its three provincial councils (Álava, Biscay, and Gipuzkoa). Odoo supports the TicketBAI (TBAI) electronic invoicing format for all three regions of the Basque Country.
Note
To use TicketBAI, make sure:
Country and Tax ID fields on the company record are filled in.
Spain -TicketBAI (
l10n_es_edi_TBAI) module is installed.
To configure TicketBAI, follow these steps:
Go to and scroll down to the Spain Localization section.
In the Registro de Libros connection TicketBAI section, select a region in the Tax Agency for TBAI field and Save.
Click Manage certificates (TicketBAI).
In the Certificates for EDI TicketBAI invoices on Spain view, click New.
Click Upload your file to upload the certificate, enter the Certificate Password provided by the tax agency, and select TBAI in the Certificate scope field.
Warning
To test certificates, go to and, in the Spain Localization section, enable TBAI Test Mode.
Use case
Once an invoice is created and confirmed, follow these steps:
Click Send.
In the Print & Send window, make sure the TicketBAI option is enabled and click Send
In the TicketBAI invoice tab, the TicketBAI status is updated to Sent, and the XML file is available in the TicketBAI Post File field.
Note
The TBAI QR code is displayed on the invoice PDF.

FACe
Note
Make sure the Spain - Facturae EDI (l10n_es_edi_facturae) module is installed.
FACe is the e-Invoicing platform used by the public administrations in Spain to send electronic invoices.
To configure FACe, follow these steps:
Go to or , and select Certificates in the Spain Facturae EDI section.
Click New to create a new certificate.
Click Upload your file to upload the certificate, enter the Certificate Password provided by the tax agency, and select Facturae in the Certificate scope field.
Use case
Once an invoice is created and confirmed, follow these steps:
Make sure the customer has a valid VAT number and that their country is set to
Spain.Click Send.
In the Print & Send window, make sure the Factura-e option is enabled and click Send.
The generated XML file, available in the chatter, must then be sent manually.
Warning
The XML file is NOT sent automatically.
Tip
FACe XML files can be sent in batch through the governmental portal.
Administrative centers
For FACe to work with administrative centers, the invoice must include specific data about the centers.
Note
Make sure the Spain - Facturae EDI (l10n_es_edi_facturae) module is
installed.
To add administrative centers, create a new contact for the partner company. Select FACe Center as the type, assign one or more role(s) to that contact, and Save. The three roles usually required are:
Órgano gestor: Receptor (Receiver);
Unidad tramitadora: Pagador (Payer);
Oficina contable: Fiscal (Fiscal).
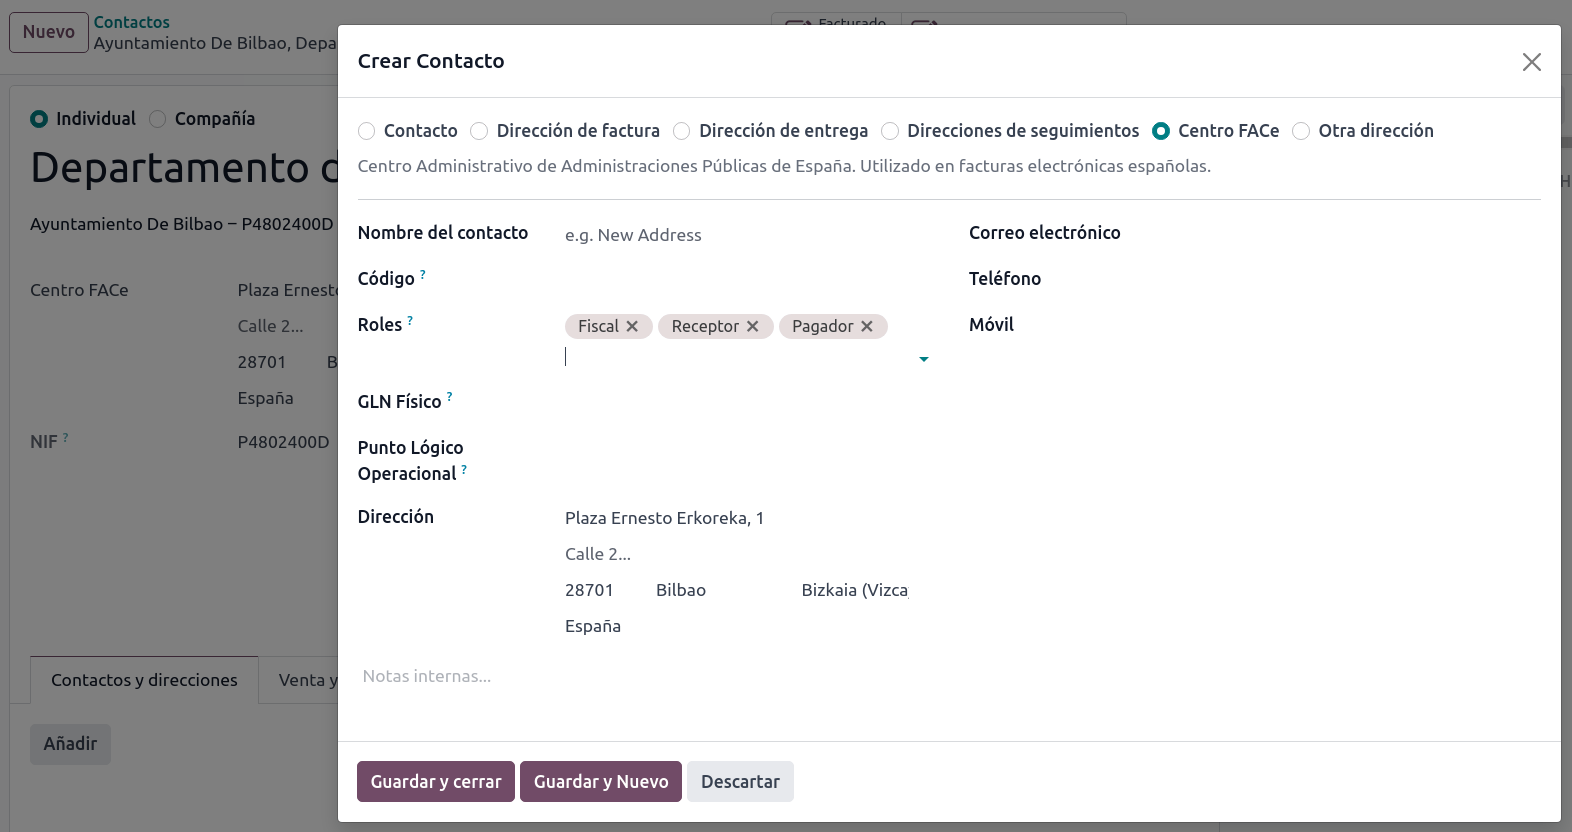
Tip
If administrative centers need different Codes per role, different centers must be created for each role.
When an electronic invoice is created with a partner that has administrative centers, all administrative centers are included in the invoice.
A contact can hold multiple roles, or multiple contacts can each have different roles.