Marketing Card
The Marketing Card application allows users to create and manage promotional campaigns with personalized, digital cards as well as view analytics about their campaign performance. Event marketers can design dynamic card templates using different layouts. They can also expand their reach by emailing cards to recipients in bulk and allow recipients to share the cards to their own networks.
Card campaigns
To see a dashboard of all created card campaigns, navigate to the Marketing Card app. By default, card campaigns appear in the (List) view, providing users with detailed information about each campaign. Alternatively, the (Kanban) view provides users with a card-view of all campaigns, along with icons displaying each campaign’s performance metrics.
Create a campaign
To create a campaign, click New. This opens a new campaign form, allowing users to configure campaign information, design the card layout, and customize the campaign message.

Begin by providing a name for the campaign in the Name field. This field is required.
Then, in the Recipients drop-down menu, users must select the type of recipient of the campaign. The following recipient types are provided:
Contact: Send cards to existing contacts.
Event Booth: Send cards contacts with registered event booths.
Event Registration: Send cards to contacts with event registrations.
Event Track: Send cards to contacts with event tracks.
Once selected, a Preview on… field appears, allowing the user to preview the campaign on a specific contact from the selected recipient type. After choosing a preview target, a Preview button appears above the campaign form.
Next, fill out the following fields:
Post Link: Relative URL of a page on the user’s Odoo website.
Post Suggestion: Description below the card when sharing on X.
Responsible: Internal user responsible for managing the card campaign.
Tags: Relevant tags for the campaign.
Note
If the Post Link is left unspecified, Odoo automatically sets the target to the chosen record’s webpage. If the record is unpublished, the target defaults to the corresponding event’s homepage.
Card Layout tab
The Card Layout tab on the campaign form provides options to configure the text and appearance of the card.
To customize the card, users can configure the following fields:
Background: Upload an image to be displayed as the card background.
Header: Enter the main header text.
Sub-Header: Enter a sub-header text, displayed above the header.
Section: Enter a text to be displayed in the lower section.
Sub-section 1: Enter a text to be displayed below the lower section.
Sub-section 2: Enter a text to be displayed next to Sub-section 1.
Dynamic Image 1: Select an existing image from the selected recipient’s model to be displayed in a corner of the card. This field only takes a dynamic placeholder as input.
Dynamic Image 2: Select an existing image from the selected recipient’s model to be displayed in a corner of the card. This field only takes a dynamic placeholder as input.
Button: Enter a text for the button.
A preview of the resulting card allows the user to interactively visualize their configuration. Above the preview are selectable themes to change the appearance of the card.
Note
The following fields allow users to configure the translations of the inputted text into all other available languages in the database:
Header
Sub-Header
Section
Sub-Section 1
Sub-Section 2
To do so, click EN at the edge of the field. In the resulting pop-up window, make any modifications to the translations. Finally, click Save to save or Discard to cancel.
Dynamic placeholders
By default, the text content of each field is static. However, the fields listed (except for Background and Button) can also be populated automatically using dynamic placeholders to personalize the card content for different recipients.
To do this, click the checkmark next to the field. Then, browse and select a placeholder value to be populated from the selected recipient.
Recipient Message tab
The Recipient Message tab on the campaign form provides options to configure messages sent to recipients when sharing the card.
Users can configure the following fields:
Request: Enter a request to be displayed at the top of the campaign.
Request Description: Enter a description of the request, displayed below the request.
Reward Link: Provide a link to reward recipients who share the campaign.
Thank You Message: Enter a message to thank recipients for sharing the campaign.

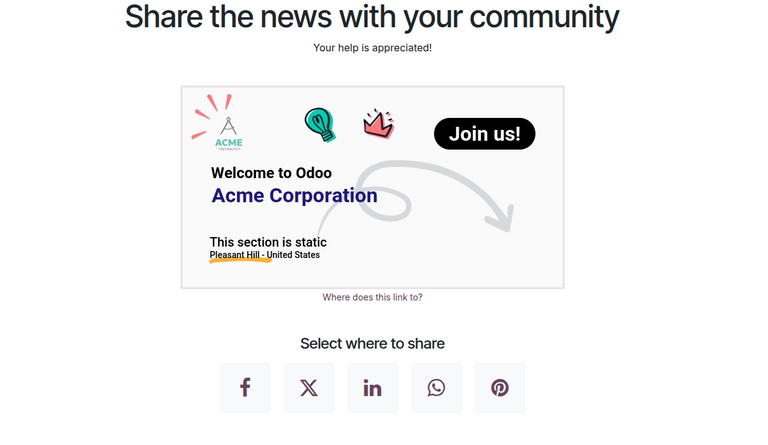
Preview campaign
Once the card campaign form has been configured, click the Preview button to view a copy of a campaign to be sent to recipients.
The campaign layout is organized with the request and the request description displayed at the very top, followed by the card, then a list of social media icons allowing the user to share the campaign across different platforms.
Campaign mailing
After configuring a card campaign, users can configure mailing options then share the cards with recipients.
Configure mailing
To configure the campaign mailing, click Send. On a separate page, users configure the email form to filter or specify recipients and customize the body of the message.
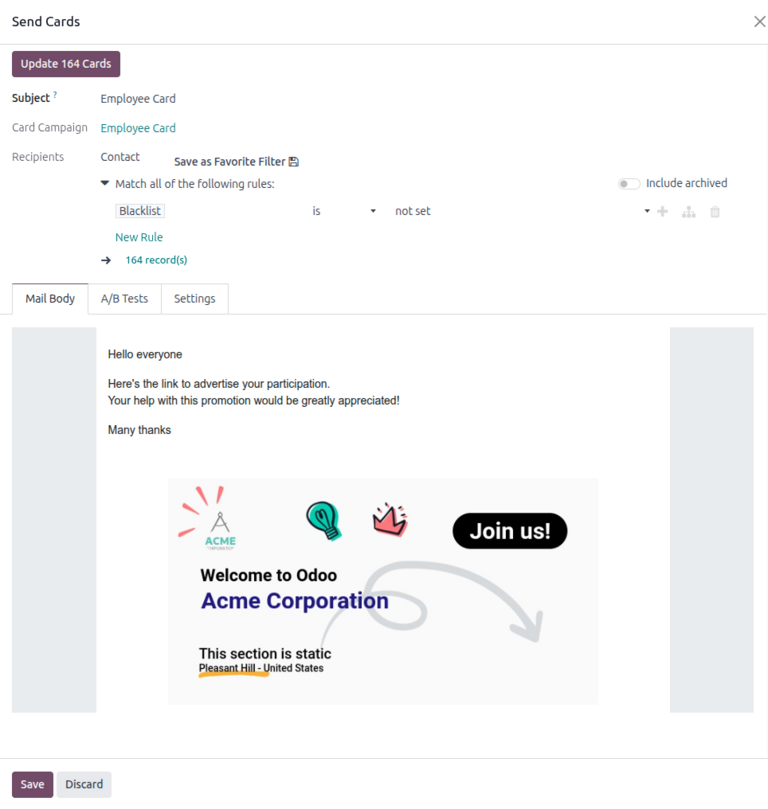
To start, enter the subject of the mailing in the Subject field.
Next, under the Card Language, select the language in which to render the cards.
The Card Campaign and Recipients fields are already populated. The filtering rule under the Recipients field can be modified to update the mailing list.
The Mail Body tab is automatically populated with a default message along with the card. This message can be modified using the website editor.
After configuring the email form, click the Update (#) Cards button to generate or update the personalized cards for each recipient. Then, on the Confirm Cards Update pop-up window, click Update Cards to create a draft mailing, or click Cancel to cancel.
Note
Alternatively, clicking Save also creates a draft mailing.
Send cards
Once the cards have been updated, users can either send the cards or schedule the mailing for a future date.
To send the mailing, navigate to , select the campaign, then click the Mailings.
Next, select the mailing and click Send. On the Ready to unleash emails? pop-up window, click Send to all to send the cards to the specified recipients.
Alternatively, to schedule for a later date, click Schedule. On the pop-up window, select a date in the Send on field. Finally, click Schedule to schedule the mailing.
After sending or scheduling a mailing campaign, a series of smart buttons appear, showing the engagement metrics for the campaign.
Campaign metrics
At any point, users can view metrics about the campaign, displayed as smart buttons at the top of the campaign form.
The following buttons provide specific information about the performance of the campaign:
Mailings: View a list of recipients of the campaign.
Clicks: View how many times the campaign was clicked. This button is not clickable.
Cards: View how many cards were sent to recipients.
Opened: View how many times the campaign was opened.
Shared: View how many times the campaign was shared.
Clicking on a smart button opens a list of occurrences or instances of the metric (e.g., a list of times a card was created for a recipient).