Australia
Modules
Name |
Technical name |
Description |
|---|---|---|
Australia - Accounting |
|
The base accounting module for the Australian localization. It is installed automatically when the Australia fiscal localization package is selected. This module also installs the ABA Credit Transfer module. |
Australian Reports - Accounting |
|
Adds the Taxable Payments Annual Report (TPAR) and the Business Activity Statement (BAS) report. It is installed automatically when the Australia fiscal localization package is selected. |
Australia - Payroll |
|
The base payroll module for the Australian localization. |
Australia - Payroll with Accounting |
|
Contains the necessary accounting data for the Australian payroll rules. It is installed automatically when the Payroll Entries option is enabled. |
Employment Hero Payroll |
|
Synchronizes all pay runs from Employment Hero with Odoo’s journal entries. |
Note
It is not possible for users of the Australian fiscal localization to deactivate two-factor authentication (2FA) as it is required by the Australian government.
Accounting
Taxes and GST
In Australia, the standard Goods and Services Tax (GST) rate is 10%, but different rates and exemptions exist for specific categories of goods and services.

Note
The taxes impact the BAS report.
Tax mapping
Within the Australian localization, tax names encompass the tax rate as an integral part of their naming convention. Despite the high number of taxes configured in Odoo, their rates are often similar (0% or 10%).
GST sales taxes
The GST sales taxes available in Odoo are listed below.
GST name |
Description |
Label on invoices |
|---|---|---|
10% GST |
GST Sales |
10% GST |
0% EX |
GST Free on Export Sales |
0% GST Free |
0% F |
GST Free Sales |
0% Exempt |
0% INP |
Input Taxed Sales |
0% Input Taxed Sales |
100% Adj |
This is for adjustment, amounts can be modified to fit your needs |
Tax Adjustments (Sales) |
GST purchase taxes
The GST purchase taxes available in Odoo are listed below.
GST name |
Description |
Label on invoices |
|---|---|---|
10% GST |
GST Purchases |
10% GST |
10% C |
Capital Purchases |
10% Capital Purchases |
10% INP |
Purchases for Input Taxed Sales |
10% Purchases for Input Taxed Sales |
10% PRIV |
Purchases for private use or not deductible |
10% Purchases for Private Use |
0% F |
GST Free Purchases |
0% GST Free |
0% TPS |
Purchase (Taxable Imports) - Tax Paid Separately |
0% GST Paid Separately |
100% ONLY |
GST Only on Imports |
GST Only on Imports |
100% Adj |
Tax Adjustments (Purchases) |
Tax Adjustments (Purchases) |
100% DGST |
Deferred GST Liability |
100% DGST |
No ABN |
Tax Withheld for Partners without ABN |
Withholding Tax for No ABN |
PAYGW - W3 |
Other amounts withheld (excluding any amount shown at W2 or W4) |
Other Amounts Withheld (W3) |
Variants
Businesses from certain industries need to report payments made to subcontractors from relevant services during the financial year. Odoo combines the use of taxes and fiscal positions to report these payments on the TPAR. In order to be compliant with the TPAR’s obligations, two variants of the main purchase taxes are available in Odoo, but they are inactive by default.
Example
For the 10% GST tax, the variants are:
Tax name |
Description |
Reports impacted |
Default status |
|---|---|---|---|
10% GST |
Default 10% GST tax |
BAS |
Active |
10% GST TPAR |
TPAR variant of the tax, if the contractor provided an ABN |
BAS
TPAR
|
Inactive |
10% GST TPAR NO ABN |
TPAR variant of the tax, if the contractor did not provide an ABN |
BAS
TPAR
|
Inactive |
Deferred GST
Odoo allows companies under the Deferred Goods and Services Tax (DGST) scheme to automate their deferred GST flows.
Configuration
It is recommended to:
go to and set the Tax Return Periodicity to monthly (= monthly BAS); and
create a new journal to store all deferred GST entries by going to , and selecting Miscellaneous as its Type when configuring it.
By default, a tax (100% DGST, inactive by default) and an account (21340 Deferred GST Liability)
are available for Australian companies. Activate the tax by going to . Search for the Name 100% DGST (remove the default filter if
necessary), and click the Activate toggle switch.
Flow
1. Importing goods: purchase order and vendor bill
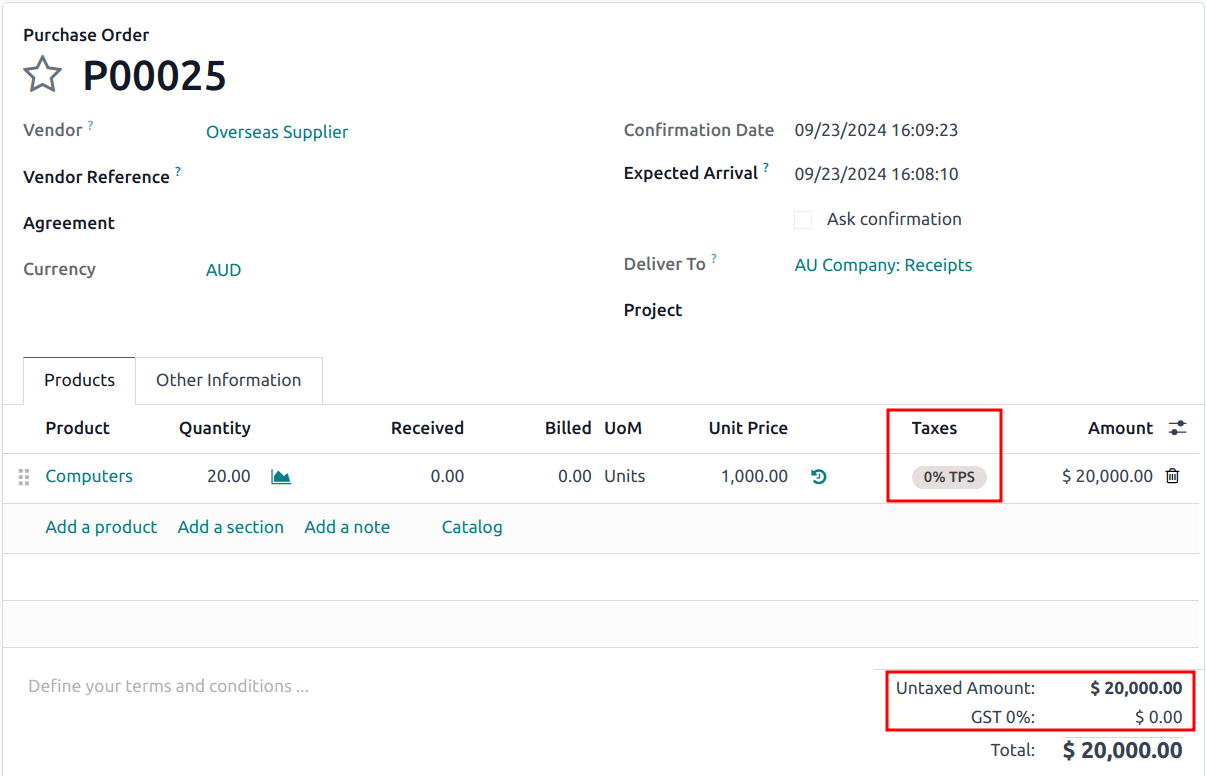
When importing goods from abroad, the GST liability can now be deferred for companies under the DGST scheme. On the purchase order, select the 0% TPS tax (tax paid separately) for the relevant order lines.
2. Recording the DGST balance on the BAS report
When the Australian Taxation Office (ATO) is advised electronically of the aggregated liability for the company by the Integrated Cargo System (ICS), the GST balance deferred during the previous month becomes available on the ATO’s BAS portal.
Important
Odoo does not yet fetch the DGST balance automatically from the ATO. A manual entry with the liability amount needs to be created in Odoo. We recommend using a new journal for this purpose since deferrals will be recurring.
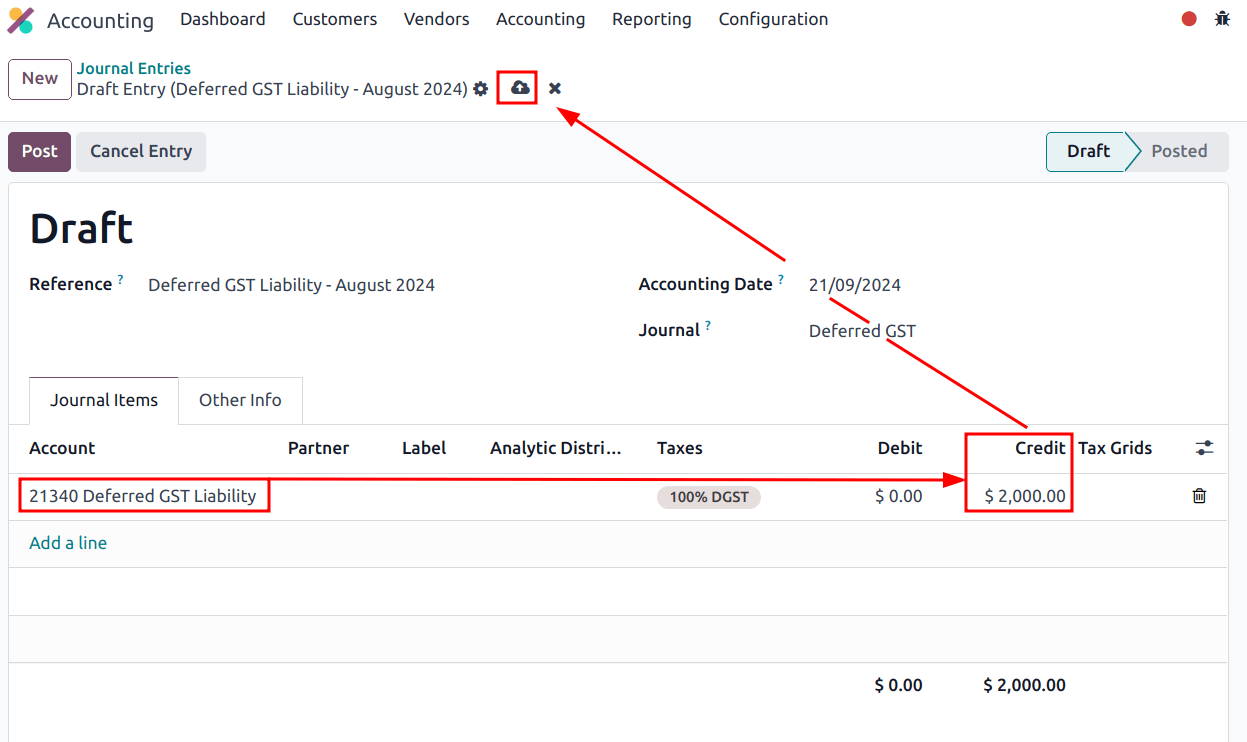
Go to . On the first journal item line, add
the Account 21340 Deferred GST Liability and the deferred GST balance as a
Credit. To resume the example shown above, we credit $2,000 and save.
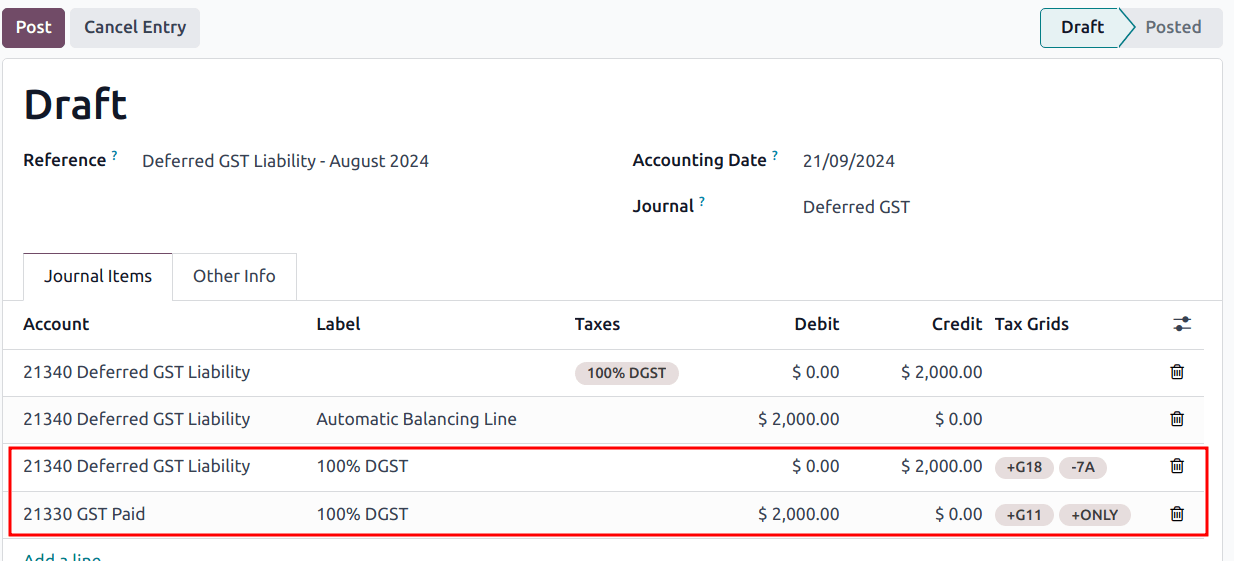
An auto-balancing line is created, along with journal items correctly assigning the right values in the BAS Tax Grids. Sections G11, G18, 7A, and ONLY are updated correctly.
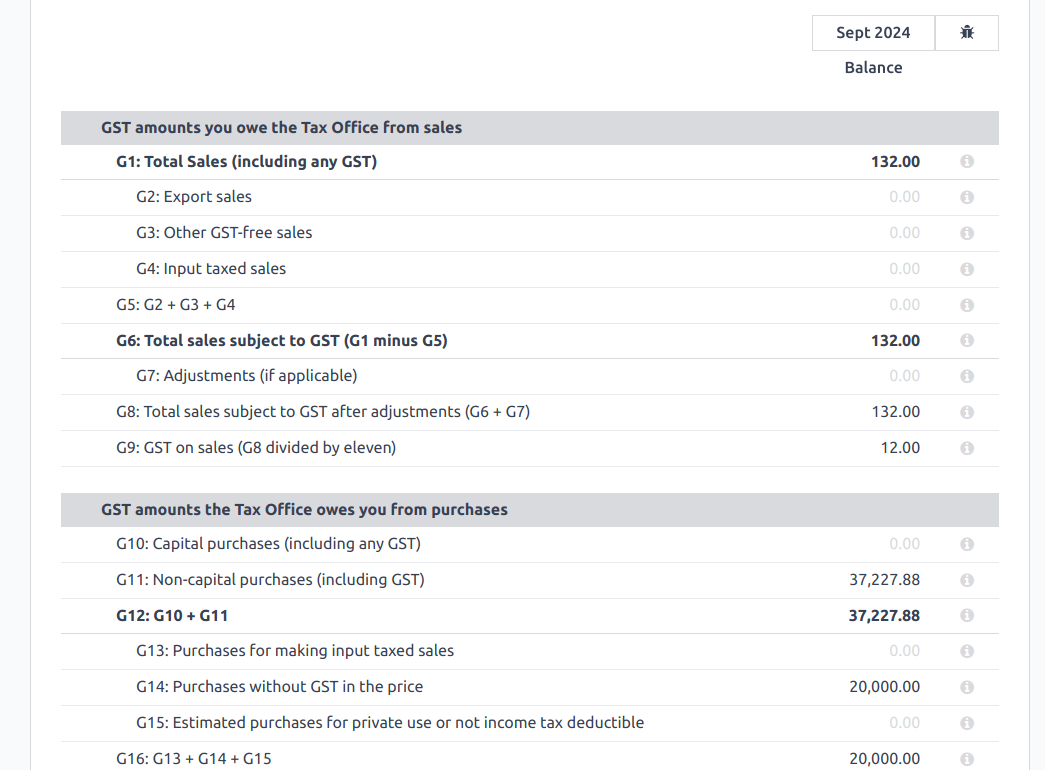
After posting the journal entry, the BAS report displays the correct values for each section, along with the DGST offset.
Reports
Business Activity Statement (BAS)
The BAS report is a critical tax reporting requirement for businesses registered for GST in Australia. The BAS is used to report and remit various taxes to the ATO. With the Odoo BAS feature, businesses can report on the following:
GST
PAYG tax withheld
DGST
Access the report from the Accounting dashboard by clicking BAS Report (AU) under the Miscellaneous Operations section.
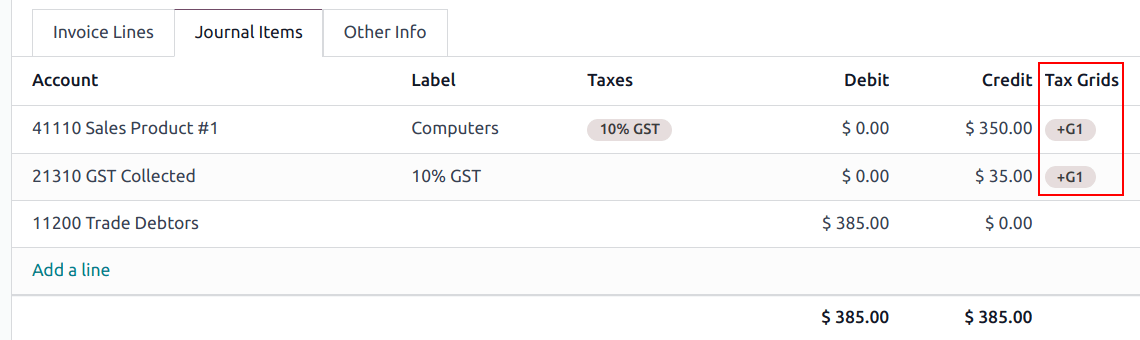
The base and tax amounts are collected from the tax grid, which is pre-configured in the system. The tax grid can also be manually set up for any additional special use-case of GST (e.g., wine equalization tax). Once the tax for each account is set up, the system automatically slots journal items into the correct tax category. This ensures the BAS report is accurate and reflective of the business’s financial activities.
Besides the GST sections, the BAS report also includes the PAYG tax withheld components (W1 to W5, then summary, section 4). This integration ensures that all payroll-related withholding taxes are accurately captured and reflected within the report.
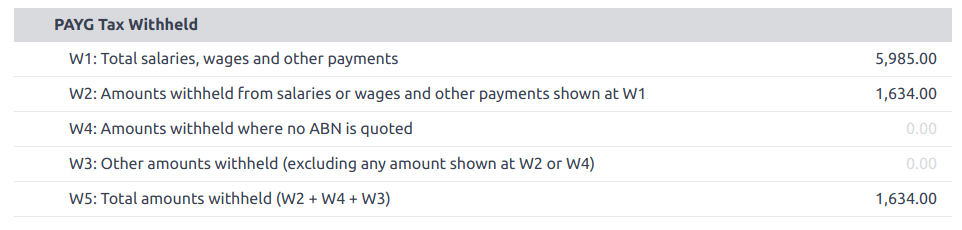
The module incorporates built-in rules that facilitate the automatic calculation of taxes for types W1 to W5. For a detailed walkthrough and more information on the calculation process for these taxes, refer to the Payroll section.
Closing
When it is time to file the tax return with the ATO, click Closing Entry. The tax return period can be configured under . The start date of the tax return period can also be defined on the report itself through the period button ( period year).
See also
Note
Odoo uses calendar quarters rather than the Australian FY quarters, which means July to September is Q3 in Odoo.
Before closing the entry for the first time, the default GST payable account and GST receivable account need to be set. A notification pops up and redirects the user to the tax groups configuration.
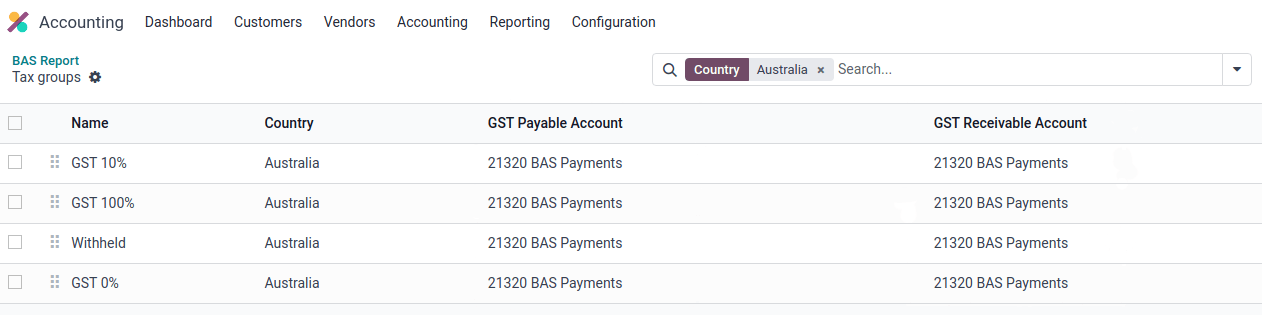
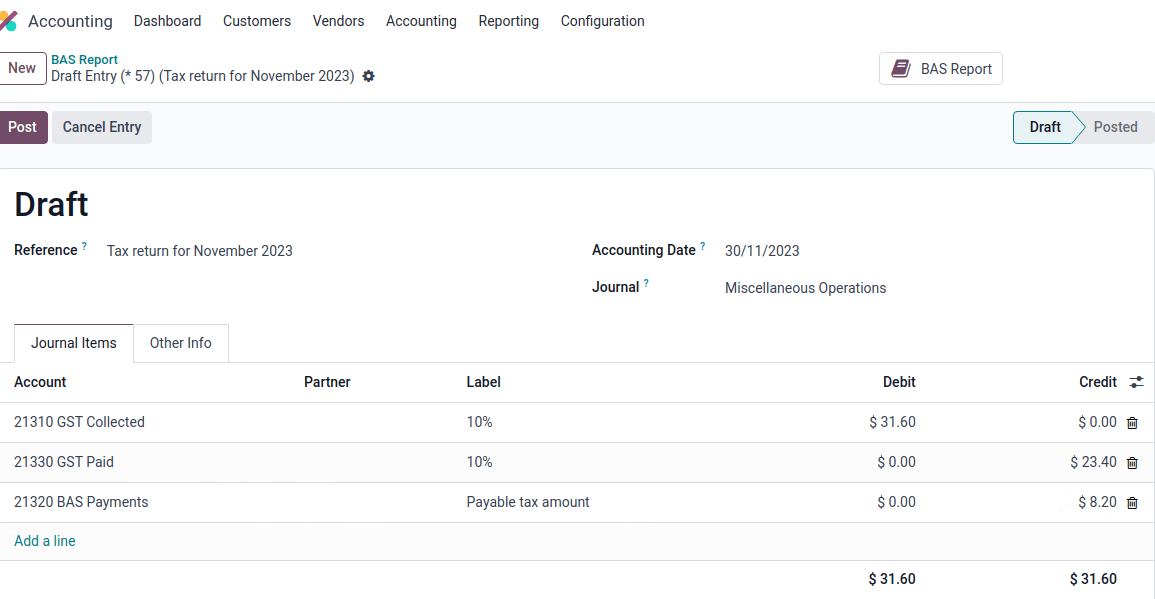
Once the GST payable and GST receivable accounts are set up, the BAS report generates an accurate journal closing entry automatically, which balances out the GST balance with the GST clearing account.
The balance between GST receivable and payable is set against the tax clearing account defined on the tax group. The amount to be paid to or received from the ATO can be reconciled against a bank statement.
Important
The BAS report is not directly submitted to the ATO. Odoo helps you automatically compute the necessary values in each section, with the possibility to audit them to better understand the history behind these numbers. Businesses can copy these values and enter them on the ATO portal.
Taxable Payments Annual Report (TPAR)
Odoo allows businesses to report payments made to contractors or subcontractors during the financial year. This is done by generating a TPAR. If you are unsure your business needs this report, refer to the ATO’s TPAR web page.
Access the TPAR in Odoo by going to .
Configuration
First, it is required to assign fiscal positions to your contractors before billing them to update the TPAR. To do so, go to , select a contractor, and set a Fiscal Position under the Sales & Purchase tab.
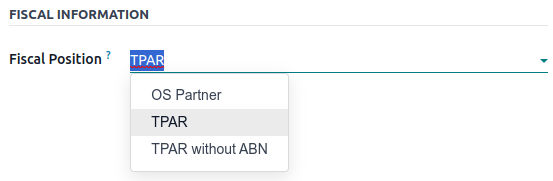
Based on the chosen fiscal position, the correct tax mapping will apply to the contractor’s vendor bills.
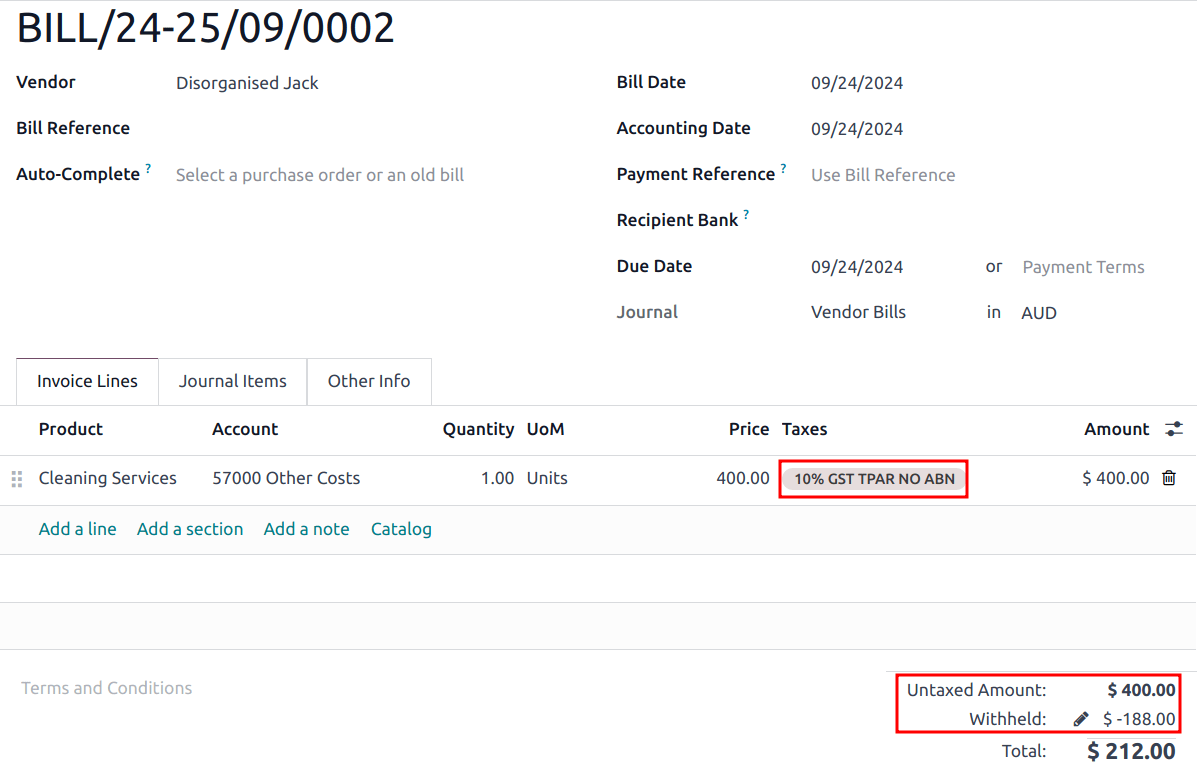
The TPAR includes the following information from contractors:
ABN
Total GST (the total tax paid)
Gross Paid (the amounts are displayed after a vendor bill has been marked as paid)
Tax Withheld (displayed if the contractor is registered with a fiscal position set to TPAR without ABN)
The TPAR can be exported to multiple formats: PDF, XLSX, and TPAR.
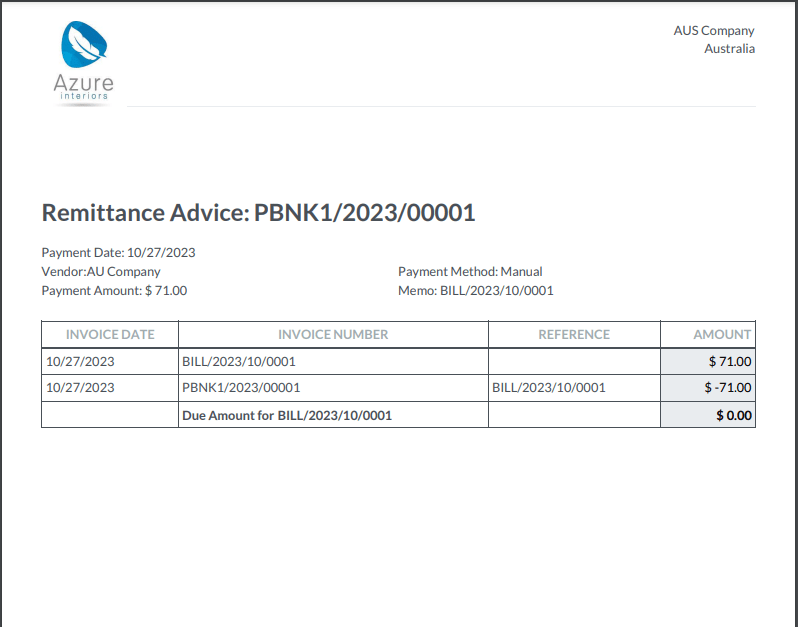
Remittance advice
A remittance advice is a document used as proof of payment to a business. In Odoo, it can be accessed by going to , selecting the payment(s), and clicking .
E-invoicing
Peppol
Odoo is compliant with Australia’s Peppol requirements. Set up your customers and vendors by going to or , selecting one, clicking the Accounting tab, and configuring the Electronic Invoicing section as needed.

Important
Validating an invoice or credit note for a partner on the Peppol network will download a compliant XML file that can be manually uploaded to your Peppol network. Odoo is currently in the process of becoming an access point for the ANZ region.
ABA files for batch payments
An ABA file is a digital format developed by the Australian Banking Association. It is designed for business customers to facilitate bulk payment processing by uploading a single file from their business management software.
The main advantage of using ABA files is to improve payment and matching efficiency. This is achieved by consolidating numerous payments into one file for batch processing, which can be submitted to all Australian banks.
Configuration
Batch payments
Go to and enable Batch Payments.
Bank journal
Go to and select the Bank journal. Enter the Account Number, click Create and edit…, and fill in the following fields:
Bank
BSB
Account Holder
Then, toggle on the Send Money switch and click Save & Close.
Note
Using the Currency field is optional.
Back on the Journal Entries tab, fill in the following fields under the ABA section:
BSB: the BSB code from the bank account is used to fill in this field.
Financial Institution Code: the official 3-letter abbreviation of the bank (e.g.,
WBCfor Westpac)Supplying User Name: 6-digit number provided by the bank. Contact your bank or check its website if you do not know it.
APCA Identification Number: 6-digit number provided by the bank. Contact your bank or check its website if you do not know it.
Include Self Balancing Transaction: selecting this option adds an additional “self-balancing” transaction to the end of the ABA file, which is required by some banks.
Customers’ and vendors’ bank accounts
Go to or and select a customer or vendor. Open the Accounting tab, and, under the Bank Accounts section, click Add a line to fill in their:
Account Number
Bank
BSB
Account Holder
Then, toggle on the Send Money switch and click Save & Close.
Generating an ABA file
To generate an ABA file, create a vendor bill, confirm it, and ensure the vendor’s banking information is set up correctly.
Next, click Pay on the vendor bill, and select, for the following fields:
Journal: Bank
Payment Method: ABA Credit Transfer
Recipient Bank Account: the vendor’s account number
Once payments are created, go to , select the payments to be included in the batch, and click Create Batch. Verify all information is correct and click Validate. Once validated, the ABA file is available in the chatter on the right.
After uploading the file to your bank’s portal, an ABA transaction line will appear in your bank feed at the following bank feed iteration. You will need to reconcile it against the batch payment made in Odoo.
Industry-specific features
Starshipit shipping
Starshipit is a shipping service operator that facilitates the integration of Australasian shipping couriers with Odoo. Refer to the Starshipit documentation for detailed information.
Buy Now, Pay Later solutions
Buy Now, Pay Later solutions are popular payment methods for eShops in Australia. Some of these solutions are available via Stripe and AsiaPay.
POS terminals
To establish a direct connection between Odoo and a POS terminal in Australia, a Stripe payment terminal is required. Odoo supports the EFTPOS payment solution in Australia.
Note
A Stripe payment terminal is not required to use Odoo as the main POS system. However, without one, cashiers must manually enter the final payment amount on the terminal.