After-Sales services
After-Sales services can be configured in the Helpdesk application for individual teams. Once enabled, users can issue refunds, generate coupons, process returns, and schedule repairs or field service interventions directly from a ticket.
Set up after-sales services
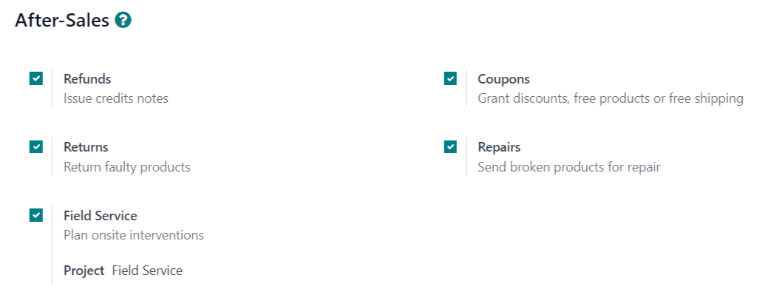
Start by enabling the after-sales services on a specific Helpdesk team, by going to and click on the team the services should be applied to. Then, scroll to the After-Sales section on the team’s settings page, and choose which of the following options to enable:
Refunds: issues credit notes to refund a customer, or adjust the remaining amount due.
Coupons: offers discounts and free products through an existing coupon program.
Returns: initiates a product return from a customer through a reverse transfer.
Repairs: creates repair orders for broken or faulty products.
Field Service: plans onsite intervention through the Field Service application.
The services that are enabled can vary based on the type of support a team provides.
Danger
Since all the after-sales services in Odoo require integration with other applications, enabling any of them may result in the installation of additional modules or applications. Installing a new application on a One-App-Free database triggers a 15-day trial. At the end of the trial, if a paid subscription has not been added to the database, it will no longer be accessible.
Issue refund with credit note
A credit note is a document issued to a customer informing them that they have been credited a certain amount of money. They can be used to provide a full refund to a customer, or to adjust any remaining amount due. While they are usually created through the Accounting or Invoicing applications, they can be created through a Helpdesk ticket, as well.
Important
Invoices must be posted before a credit note can be generated.
To create a credit note, navigate to a ticket on the , and click the Refund button in the top-left corner of the ticket form. This opens a Refund pop-up window.

Fill out the fields with the necessary information:
Sales Order: if a sales order was referenced on the original ticket, it automatically populates in this field.
Product: the product the ticket is about. If an item is selected in this field, only the sales orders, deliveries, and invoices including this product can be selected.
Lot/Serial Number: this field is only visible if the Product selected has associated lot or serial numbers.
Invoices to Refund: this field is required. If no invoices are available in the drop-down, it indicates this customer currently has no posted invoices, or the Product has no related invoices.
Reason displayed on Credit Note: this field automatically populates with the ticket number, though it can be edited with additional information.
Journal: the accounting journal where the credit note should be posted. After an invoice is selected, this field defaults to the journal listed on the original invoice, though it can be changed, if necessary.
Reversal date: when this field is clicked, use the pop-up calendar that appears to select a date for the credit note invoice. This field is required.
After the necessary fields are filled in, click Reverse or Reverse and Create Invoice.
Reverse creates a credit note in a draft state that can be edited before it is posted. This option can be used to provide a partial refund.
Reverse and Create Invoice creates a credit note that is automatically posted as well as an invoice in a draft state. The invoice contains the same information as the original invoice, though this information can be altered.
Once the credit note has been posted, a Credit Notes smart button is added to the Helpdesk ticket.

See also
Generate coupons from a ticket
Coupons can be used to alter the price of products or orders. Conditional rules define the usage constraints of a coupon. Coupon Programs are configured in the Sales, Point of Sale, or Website applications.
Important
The eCommerce module must be installed to create coupon codes from the Website.
To generate a coupon, open a Helpdesk ticket and click on the Coupon button in the top-left corner. Select an option from the Coupon Program drop-down menu in the Generate a Coupon pop-up window that appears.

Note
To create a new Coupon Program, navigate to and click New. To make the program available to share with Helpdesk customers, the Program Type must be set to Coupons. This generates single-use coupon codes that grant immediate access to rewards and discounts.
Coupon programs can also be created in the Point of Sale or Website applications. Refer to discount and loyalty programs for more information.
Click on the Valid Until field, and use the pop-up calendar to select an expiration date for this coupon code. If this field is left blank, the code does not expire.
Click Send by Email to compose an email to send to the customer with the coupon code.
Click Get Share Link to generate a link to send directly to the customer. Doing so opens a Share Coupons pop-up window. Click the Copy button next to the Share Link field and paste the results to any communication with the customer. When the customer uses the link, the code is automatically applied to their cart.
After a Coupon Code has been generated, a Coupons smart button is added to the top of the ticket; click the smart button to view the coupon code, expiration date, and additional information.

See also
Return products
Returns are completed through reverse transfers, which generate new warehouse operations for the returning products. Click the Return button at the top of a ticket to open the Return pop-up window.

Important
The Return button only appears on a ticket if the customer has a recorded delivery in the database.
Select a Sales Order or Delivery to Return to identify the products that need to be returned.
By default, the quantity matches the validated quantity from the delivery order. Update the Quantity field, if necessary. To remove a line, click the (trash) icon.
Select a Return Location where the items should be directed after the return is completed.

To confirm the return, click Return. This generates a new warehouse operation for the incoming returned products.
To exchange the received item with a new one, click Return for Exchange. Doing so generates a warehouse operation in Odoo to deliver the replacement product.
Use the breadcrumbs to return to the helpdesk ticket. A new Return smart button can now be accessed at the top of the ticket.

See also
Send products for repair from a ticket
If the ticket is related to an issue with a faulty or broken product, a repair order can be created from the Helpdesk ticket, and managed through the Repairs application.
To create a new repair order, open a ticket and click on the Repair button in the top-left corner. This opens a Repair Reference form.

Fill out the fields with the necessary information:
Customer: this field carries over from the ticket, though a new contact can been selected from the drop-down menu.
Product to Repair: if a product was specified in the Product field on the ticket, it is added to this field automatically. If not, click into the field to select a product from the drop-down menu.
Lot/Serial: this field is only visible if the products being repaired are tracked, via lot or serial numbers.
Return: return order from which the product to be repaired comes from.
Under Warranty: if this box is checked, the sale price for all products from the repair order are set to zero.
Scheduled Date: this field defaults to the current date. To select a new date, click into the field and select a date using the drop-down calendar.
Responsible: assign a user from the drop-down menu to manage the repair.
Tags: click into this field to assign an existing tag or create a new one. Multiple tags can be assigned.
If parts are required for the repair, they can be added in the Parts tab. Additional information for the internal repair team can be added to the Repair Notes tab.
Once the form is complete, click Confirm Repair. To create, edit, and send a quote for this repair, click Create Quotation.
A Repairs smart button is then added to the ticket, linking to the repair order.

Tip
Once a user creates a repair order from a Helpdesk ticket, they can access it through the ticket’s Repair smart button, or from a link in the chatter, even if they do not have access rights to the Repair application.
Create field service task from a ticket
On-site interventions can be planned from a ticket and managed through the Field Service application. Customers with portal access are able to track the progress of a Field Service task the same as they would a Helpdesk ticket.
Tip
To change the default Field Service project for the team, go to to select a Team. Scroll to the After-Sales section, and choose a project under Field Service.
To create a new Field Service task, navigate to a ticket. Click Plan Intervention to open the Create a Field Service task pop-up window.

Confirm or update the task Title.
The Project field on the Create a Field Service task pop-up window defaults to the same Field Service project that was identified on the team’s settings page. To change the project for this specific task, select one from the Project field.
If applicable, select a Worksheet Template from the drop-down menu.
Note
Field Service Worksheets are reports that detail the work completed during an on-site task. When work is completed, worksheets are signed by the customer to confirm the job is done and the customer is satisfied.
If the Field Service project assigned to the Helpdesk team has worksheets enabled, and has a default template assigned, that template automatically appears in the Worksheet Template drop-down field. Even so, the field can be edited, and another template can be selected.
If the Field Service project does not have worksheets enabled, the Worksheet Template field does not appear on the Create a Field Service task pop-up window.
Click Create Task or Create & View Task.
After the task is created, a Tasks smart button is added to the ticket, linking the Field Service task to the ticket.

See also