Recruitment flow
When a prospective employee applies for a job in Odoo, there is a preconfigured process from the initial inquiry to the creating of a new employee once hired. The following outlines the default recruitment process for Odoo's Recruitment application.
Important
The following is based on Odoo's default recruitment pipeline. Be advised that if modifications are made to the pipeline, the process differs.
ใหม่
At the start of the process, all applicants appear in the New stage on the Applications page, whether submitted online or if the applicant is manually entered by a recruiter.
The Candidate, Email, and Phone number on the applicant's card are filled as soon as it is created. By default, these details are required for every job position.
Note
If the website application form is modified, different fields may be populated, based on what information is required on the website.
Anything typed in the Short Introduction section appears in the applicant's chatter as an Other Information note from OdooBot.
ประวัติย่อ
If a resumé was attached to the online application, it appears in the Files section of the chatter, and is also stored in the Documents application.
To find the recruitment documents, navigate to the main dashboard, and click the Recruitment folder on the left-hand side. All recruitment documents are stored within that folder.
If the CV Display option was enabled in the Settings of the Recruitment app, the resumé appears on the applicant's card.
Note
Depending on the browser zoom level, or size of the browser screen, the resumé may appear below the main applicant card information as a PDF link, or on the right side as an image.
Send interview
At any point in the hiring process, an interview can be sent to the applicant to obtain more information. These interviews are custom-made, and can be formatted in a variety of ways.
The Surveys application is required to send interviews to an applicant, so it must be installed.
Odoo uses the term interview, but these can be thought of as questionnaires, surveys, tests, certifications, etc. Custom interviews can be formatted to suit each individual job position's needs. For more information on creating and editing interviews, refer to the ตำแหน่งงาน documentation.
Example
ตำแหน่งงานโปรแกรมเมอร์คอมพิวเตอร์อาจมีการสัมภาษณ์ในรูปแบบของแบบทดสอบการเขียนโปรแกรมเพื่อประเมินระดับทักษะของผู้สมัคร ตำแหน่งงานพนักงานเสิร์ฟในร้านอาหารอาจมีแบบสอบถามเพื่อสอบถามความพร้อมของผู้สมัคร หากผู้สมัครที่ต้องการต้องพร้อมในช่วงเย็นวันหยุดสุดสัปดาห์
To send an interview to an applicant, first click the applicant's card from the Applications page, to view the detailed applicant information. At the top-left of the applicant's card, click the Send Interview button.
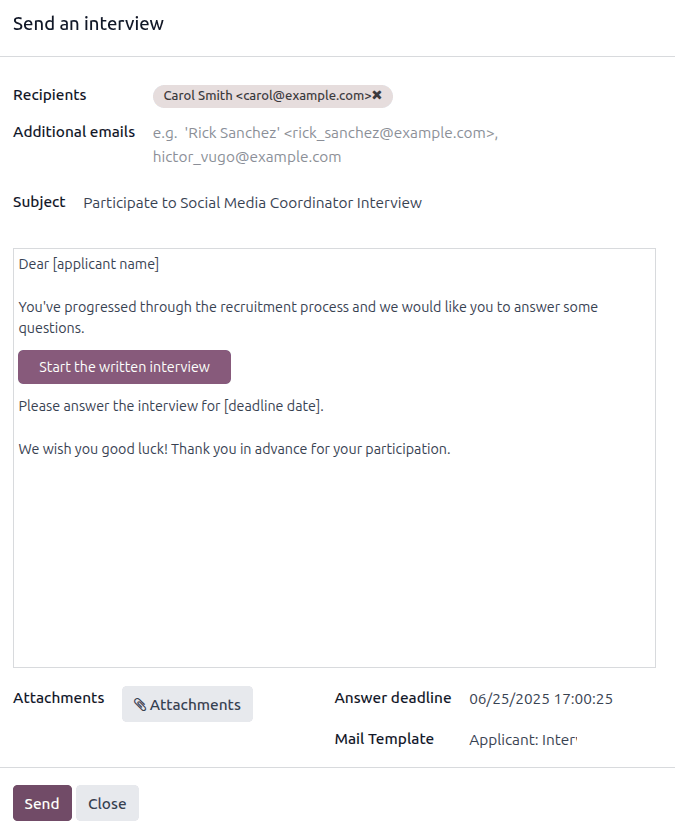
If the applicant's card has an email address on file, a Send an interview pop-up window appears, with the Recipients, Subject, and email body populated.
Note
To send an email to an applicant, there must be an Email address on the applicant's card.
If an email address is not entered on the applicant's card, when the Send Interview button is clicked, an Edit: (Applicant's Name) pop-up window appears, on top of the Send an interview pop-up window.
Enter the email address in the Email field, then click Save & Close.
Once the applicant's information is saved, the Edit: (Applicant's Name) pop-up window closes, and the Send an interview pop-up window remains.
บางครั้งเทมเพลตอีเมลที่กำหนดค่าไว้ล่วงหน้าใน Odoo จะใช้ตัวแทนแบบไดนามิก ซึ่งจะถูกกรอกด้วยข้อมูลเฉพาะโดยอัตโนมัติเมื่อส่งอีเมล ตัวอย่างเช่น หากใช้ตัวแทนสำหรับชื่อผู้สมัคร ตัวแทนนั้นจะถูกแทนที่ด้วยชื่อจริงของผู้สมัครในอีเมล หากต้องการดูข้อมูลโดยละเอียดเพิ่มเติมเกี่ยวกับเทมเพลตอีเมล โปรดดูเอกสาร เทมเพลตอีเมล
เพิ่มที่อยู่อีเมลของผู้รับเพิ่มเติมสำหรับการสำรวจในช่อง อีเมลเพิ่มเติม หากควรมีผู้รับอีเมลมากกว่านี้ หากที่อยู่อีเมลอยู่ในฐานข้อมูลในฐานะผู้ติดต่อ ให้เพิ่มผู้ติดต่อนั้นในช่อง ผู้รับ หากควรส่งอีเมลถึงบุคคลที่ไม่อยู่ในฐานข้อมูลในฐานะผู้ติดต่อ และบุคคลดังกล่าว ไม่ควร ถูกเพิ่มเป็นผู้ติดต่อ ให้เพิ่มที่อยู่อีเมลของบุคคลดังกล่าวในช่อง อีเมลเพิ่มเติม
If any attachments need to be added, click the Attachments button, and a file explorer window appears. Navigate to the desired file, and click Open to attach it to the email. The attachment loads, and is listed above the Attachments button.
If the emailed interview must be completed by a specific date, enter that date in the Answer deadline field, located in the lower-right area of the pop-up window.
To do so, click the empty field next to Answer deadline, and a calendar selector appears. Use the (left) and (right) arrows, on either side of the month, to navigate to the desired month. Then, click on the desired day to select the date. Next, select the time the interview is due, in the two fields at the bottom of the calendar selector.
The Mail Template field is pre-populated, based on the configuration for the interview. A different template can be chosen from the drop-down menu, if desired. If a new template is selected, the new email template loads in the email body.
To send the email with the interview link to the applicant, click Send at the bottom of the email pop-up window.
Initial qualification
If an applicant seems to be a good potential candidate, they are moved to the Initial Qualification stage.
This stage exists to sort candidates that have potential, from those that do not meet the requirements. No automatic actions, such as emails, are set for this stage. This stage informs the recruitment team to potentially set up a phone call or an interview with the candidate.
Note
In order to move an applicant's card from one stage to another, the applicant's card can either be dragged and dropped in the Kanban view of the Applications page to the desired stage, or the stage can be modified on the applicant's card.
To change the stage on the applicant's card, first click the desired applicant's card from the Applications page. The current stage for the card is highlighted at the top on a status bar, above the card.
คลิกเลือกขั้นตอนที่ต้องการสำหรับการ์ด แล้วขั้นตอนก็จะเปลี่ยนไป บันทึกการเปลี่ยนแปลงขั้นตอนจะปรากฏในช่องแชทด้วยเช่นกัน

First interview
After an applicant has passed the Initial Qualification stage, they can be manually moved to the First Interview stage on the Applications page, while in Kanban view.
To move the applicant to the next stage, drag-and-drop the applicant's card to the First Interview stage.
Alternatively, open the desired applicant's card from the Applications page, and click the First Interview stage on the status bar at the top of the individual applicant's card.
Tip
The First Interview stage can be modified, so when the applicant's card moves to the First Interview stage, an email can be automatically sent to the applicant, stating an interview is requested. In this preconfigured email template, a link to the recruiting team's calendar appears, allowing the applicant to schedule their interview.
Edit the First Interview stage, and select the Recruitment: Schedule Interview option in the Email Template field, to automate this action.
Second interview
หลังจากผู้สมัครผ่านขั้นตอน การสัมภาษณ์ครั้งแรก แล้ว ก็สามารถย้ายไปยังขั้นตอน การสัมภาษณ์ครั้งที่สอง ได้ หากต้องการย้ายผู้สมัครไปยังขั้นตอนถัดไป ให้ลากและวางบัตรของผู้สมัครไปยังขั้นตอน การสัมภาษณ์ครั้งที่สอง จากมุมมองคัมบัง ของหน้า การสมัคร หรือคลิกที่ขั้นตอน การสัมภาษณ์ครั้งที่สอง ที่ด้านบนของบัตรผู้สมัครแต่ละคน
When the applicant's card moves to the Second Interview stage, there are no automatic activities or emails configured for this stage, by default. The recruiter can now schedule a second interview with the applicant, following the same process as the first interview.
ข้อเสนอสัญญา
After the applicant has completed the various interview processes, the next step is to send the job offer.
Once the offer has been sent, drag-and-drop the applicant's card to the Contract Proposal stage from the Kanban view of the Applications page, or click on the Contract Proposal stage at the top of the individual applicant's card.
เซ็นสัญญา
Once the contract has been signed, and the applicant has been hired, the applicant's card moves to the Contract Signed stage.
Drag-and-drop the applicant's card to the Contract Signed stage from the Kanban view of the Applications page, or click the (ellipsis) icon at the top of the individual applicant's card, then click Contract Signed on the status bar.
Refuse applicant
At any point in the recruitment process, a candidate can be refused.