
สร้างอีเวนต์
With the Events application, event organizers can create and configure in-person or online-only events in Odoo. Each new event contains a number of customizable options that are geared around specific event logistics, as needed per event, such as ticket sales and registration desk, booths, tracks, sponsors, rooms, and more.
คุณสามารถสร้างกิจกรรมด้วยตนเองตั้งแต่ต้นหรือสร้างจากเทมเพลตสำเร็จรูปก็ได้ เมื่อเปิดใช้งานแล้ว แอปพลิเคชัน กิจกรรม จะบูรณาการกับแอปพลิเคชัน เว็บไซต์ สำหรับการโปรโมตแบบฟรอนต์เอนด์และการลงทะเบียนกิจกรรมสำหรับผู้เข้าร่วม แอปพลิเคชัน การขาย สำหรับความสามารถในการซื้อบัตรที่ชำระเงินแล้ว รวมถึงแอปพลิเคชัน CRM ผ่านกฎการสร้างโอกาสในการขายที่ปรับแต่งได้
New event
ในการสร้างกิจกรรมใหม่ ให้เริ่มต้นโดยไปที่ เพื่อไปที่แดชบอร์ด กิจกรรม เริ่มต้น ในมุมมอง คัมบัง จากนั้น หรืออีกทางหนึ่งคือจากมุมมอง รายการ หรือ แกนต์ ให้คลิกปุ่ม สร้าง ที่มุมบนซ้ายของแดชบอร์ดเพื่อเปิดแบบฟอร์มกิจกรรมใหม่

Note
If certain fields do not readily appear on the event form, that means an additional application needs to be installed, or the database is not operating in a multi-company environment.
For example, the Twitter Wall field only appears if the Social Marketing app is installed, and the Company field only appears if the database is working in a multi-company environment.
These are just additional elements that can be used for an event. They are not required to create, host, and manage an event with Odoo Events.
Event form
At the top of the event form are a series of smart buttons related to various event metrics, which will autopopulate with pertinent data once attendees begin to register, booths and sponsors sign on for the event, the event takes place, and so on.
Primarily, these smart buttons are used as logistical portals to perform specific actions for the event. The numeric displays are primarily for quick reference points.
While those visual metrics are useful, they can still be clicked, and used to navigate to specific event-related pages to modify and/or perform any desired actions.
Beneath the smart buttons is the event form, which contains various fields and clickable tabs that serve to configure the initial, necessary details of the event.
The following are fields found on an event form:
Event Name: the title of the event. This field is required.
Note
To the right of the entered Event Name, there is a language tooltip, represented by an abbreviated language indicator (e.g.
EN). When clicked, a Translate: name pop-up window appears, displaying various pre-configured language translation options available in the database.Date: when the event is scheduled to take place (expressed in your local timezone). This field is auto-populated, but modifiable, and is required.
Display Timezone: the timezone in which the event dates/times will be displayed on the website. This field is auto-populated, but modifiable, and is required.
Language: designate a specific language for all event communications to be translated into, if necessary. This field is blank, by default, so if event-related communications are being sent to recipients who speak a different language, be sure to configure this field properly.
Twitter Wall: creates a separate page on the event website to feature specific social posts on X (formerly Twitter) that contain pre-determined desired elements.
Tip
To create and customize a Twitter Wall, type the name of the desired wall into the field, and select Create and edit... from the resulting drop-down menu.
Doing so reveals Create Twitter Wall pop-up window.

From this window, enter a Wall Name. Then, select a certain word or hashtag for Odoo to search for on X, like
#WoodWorkingExpo24, for example.Next, determine the Type of tweets Odoo should showcase with that predetermined criteria. The choices in this field are: Recent, Popular, or Mixed.
Users also have the option to add a brief Description to the wall, as well.
Lastly, the greyed-out, non-modifiable Website URL field will autopopulate with the full URL needed to access the document through the event website.
An image can also be added to the wall by clicking the (pencil) icon that appears when the cursor hovers over the (camera) placeholder image in the upper-right corner of the pop-up window.
Then, from the resulting file explorer window, select the desired image to be added to the wall.
This Twitter Wall field only appears on the event form if the Social Marketing app is installed, and an X account has been added as a stream on the application. To learn more, check out the Social Marketing documentation.
Template: choose a pre-configured event template from the resulting drop-down menu.
Or, create a new one directly from this field, by typing in the name of the new template, and selecting either:
Create (which creates the template, and can be edited later) or
Create and edit... (which creates the template, and reveals a separate template page to configure the template in greater detail).
Tags: add any corresponding tags to briefly describe the event (e.g.
Online,Conference, etc.). Multiple tags can be added per event.Tip
Tags can be displayed on events that are listed on the website by enabling the Show on Website checkbox from .
Organizer: designate the organizer of the event (a company, contact, or employee).
Responsible: designate a user in the database to be responsible for this event.
Company: designate which company in the database to which this event is related. This field only appears if working in a multi-company environment. This field is auto-populated, but modifiable, and is required.
Website: choose to restrict the publishing of this event to a specific website created in Odoo. If this field is left blank, the event can be published on all websites in the database. To learn more, refer to the Multiple websites documentation.
Venue: enter event venue details. This field pulls pertinent information from the Contacts application. Alternatively, Venue information can be manually added in this field, as well. At the very least, there must be a venue name, address, city, zip code/region, and country entered.
Exhibition Map: if desired, click the Upload your file button to upload an image of the event venue map.
Limit Registrations: if this checkbox is ticked, a limit to the amount of registrations is added to the event, and that desired limit amount must be entered in the blank field before Attendees.
ขนาดบัตร: เลือกขนาดรูปแบบกระดาษที่ต้องการสำหรับบัตรงานกิจกรรม ตัวเลือกได้แก่ A4 แบบพับได้, A6 หรือ 4 แผ่นต่อแผ่น
พื้นหลังบัตร: หากต้องการ คลิกปุ่ม อัปโหลดไฟล์ของคุณ เพื่ออัปโหลดรูปภาพพื้นหลังแบบกำหนดเองสำหรับบัตรกิจกรรม
When the above fields in the event form have been adequately filled in, move on to the four tabs at the bottom of the event form for further customization.
Those tabs are: Tickets, Communication, Questions, and Notes.
แท็บตั๋ว
Create custom tickets (and ticket tiers) for events in the Tickets tab of an event form.

To create a ticket, click Add a line in the Tickets tab. Then, enter a name
for the ticket (e.g. Basic Ticket or VIP) in the Name field.
In the Product field, either select the pre-configured Event Registration product, or create a new one by typing in the name of the new event registration product, and then select either Create or Create and edit... from the resulting drop-down menu.
Important
Upon installing Odoo Events, a new product type, Event Ticket, becomes available on product forms (). In order for an event registration product to be selectable in the Tickets tab, the event registration Product Type must be set to Event Ticket.
Tip
Existing event registration products can be modified directly from this field, as well, by clicking the (right arrow) icon, located beside the event registration product. Doing so reveals that product's form. If the Inventory application is installed, additional choices are available to customize for the product.
ถัดไป กำหนดค่าใช้จ่ายในการลงทะเบียนของตั๋วในฟิลด์ ราคา
Note
The Sales Price defined on the event registration product's product form sets the default cost of a ticket. Modifying the Price of a ticket in the Tickets tab, sets a new registration cost of the ticket for that event.
Next, determine a Sales Start and Sales End date in their respective fields. To do that, click into the blank field to reveal a calendar popover. From there, select the desired date and time, then click Apply.
จากนั้น หากต้องการ ให้กำหนดจำนวน สูงสุด ของตั๋วประเภทนั้นที่สามารถขายได้
The Taken column populates with the number of tickets that are sold.
นอกจากนี้ ในคอลัมน์ สี คุณสามารถเพิ่มสีที่กำหนดเองเพื่อแยกความแตกต่างของบัตรทิกเก็ตได้ สีที่เลือกจะแสดงบนบัตรทิกเก็ตเมื่อพิมพ์ออกมา
To delete any tickets from the Tickets tab, click the (trash can) icon on the corresponding line for the ticket that should be deleted.
Tip
หากต้องการเพิ่มคอลัมน์ คำอธิบาย แบบเลือกได้ลงในแท็บ ตั๋ว ให้คลิกเมนูดรอปดาวน์ (ตัวเลือกเพิ่มเติม) ที่อยู่ทางขวาสุดของชื่อคอลัมน์
จากนั้น ทำเครื่องหมายในช่องถัดจาก คำอธิบาย จากเมนูดรอปดาวน์ที่ปรากฏขึ้น
เมื่อเพิ่มแล้ว ตัวเลือกในการเพิ่มคำอธิบายสั้นๆ สำหรับตั๋วอีเวนต์แต่ละใบจะปรากฏขึ้น ซึ่งสามารถใช้เพื่อแจ้งผู้เข้าร่วมเกี่ยวกับสิทธิพิเศษหรือสิ่งอำนวยความสะดวกใดๆ ที่อาจมาพร้อมกับการซื้อตั๋วเฉพาะ
แท็บการสื่อสาร
In the Communication tab of an event form, create various marketing communications that can be scheduled to be sent at specific intervals leading up to, and following, the event.

Note
ตามค่าเริ่มต้น Odoo จะให้การสื่อสารที่กำหนดค่าไว้ล่วงหน้าสามแบบแยกกันสำหรับแบบฟอร์มกิจกรรมใหม่ทุกแบบ แบบหนึ่งคืออีเมลที่ส่งหลังจากการลงทะเบียนแต่ละครั้งเพื่อยืนยันการซื้อกับผู้เข้าร่วม อีกสองแบบคือการแจ้งเตือนกิจกรรมทางอีเมลที่กำหนดให้ส่งในช่วงเวลาต่างกันก่อนถึงกิจกรรมเพื่อเตือนผู้รับเกี่ยวกับกิจกรรมที่จะเกิดขึ้น
To add a communication in the Communication tab, click Add a line. Then, select the desired type of communication in the Send field. The options are: Mail, SMS, Social Post, or WhatsApp.
There is no limit to the number of communications that can be added in the Communication tab of an event form.
To delete a communication from the Communication tab, click the (trash can) icon on the corresponding communication line. Doing so removes the communication from the event entirely.
Important
The Social Post option only appears if the Social Marketing application is installed. The WhatsApp option only appears if the WhatsApp Integration module is installed.
WhatsApp templates cannot be edited during active configuration. A separate approval from Meta is required.
เมล
Select an existing email template from the Template drop-down menu.
Next, define the Interval, Unit, and Trigger from their respective drop-down fields, letting Odoo know when the communication should be sent.
The Unit options are: Immediately, Hours, Days, Weeks, and Months.
จากนั้น เลือกตัวเลือกจากเมนูดรอปดาวน์ ทริกเกอร์ ตัวเลือกได้แก่ หลังการลงทะเบียนแต่ละครั้ง, ก่อนอีเวนต์ และ หลังอีเวนต์
The Sent column populates with the number of sent communications. And, beside the number are different icons that appear, depending on the status of that particular communication.
The status of Running is represented by a (three gears) icon. The status of Sent is represented by a (checkmark) icon. And, the status of Scheduled is represented by an (hourglass) icon.
Example
เพื่อส่งอีเมลยืนยันหนึ่งชั่วโมงหลังจากผู้เข้าร่วมลงทะเบียนอีเวนต์ ให้กำหนดค่าการสื่อสารดังนี้:
ช่วงเวลา:
1หน่วย: ชั่วโมง
ทริกเกอร์: หลังจากการลงทะเบียนแต่ละครั้ง
Note
Existing email templates can be modified directly from the Template drop-down menu, if necessary, by clicking the (right arrow) icon next to the template name. Doing so reveals a separate page where users can edit the Content, Email Configuration, and Settings of that particular email template.
เพื่อดูและจัดการเทมเพลตอีเมลทั้งหมด ให้เปิดใช้งาน โหมดนักพัฒนา (โหมดแก้ไขข้อบกพร่อง) และไปที่ แก้ไขด้วยความระมัดระวังเนื่องจากเทมเพลตอีเมลส่งผลต่อการสื่อสารทั้งหมดที่ใช้เทมเพลตนั้น
แท็บคำถาม
ในแท็บ คำถาม ของฟอร์มอีเวนต์ ผู้ใช้สามารถสร้างแบบสอบถามสั้นๆ สำหรับผู้ลงทะเบียนเพื่อโต้ตอบและตอบกลับหลังจากลงทะเบียนเข้าร่วมอีเวนต์
คำถามเหล่านี้สามารถมุ่งเน้นไปที่การรวบรวมข้อมูลพื้นฐานเกี่ยวกับผู้เข้าร่วม เรียนรู้เกี่ยวกับความชอบ ความคาดหวัง และสิ่งอื่นๆ ในลักษณะนั้น ข้อมูลนี้ยังสามารถใช้เพื่อสร้างเมตริกการรายงานที่มีรายละเอียดมากขึ้น นอกจากนี้ยังสามารถใช้เพื่อสร้างกฎการสร้างลีดที่เฉพาะเจาะจง

Note
By default, Odoo provides three questions in the Questions tab for every event form. The default questions require the registrant(s) to provide their Name and Email, and make it optional to include their Phone number, as well.
The information gathered from the Questions tab can be found on the Attendees dashboard, accessible via the Attendees smart button. Odoo populates individual records that contain basic information about the registrant(s), as well as their preferences.
เพื่อเพิ่มคำถามในแท็บ คำถาม คลิก เพิ่มบรรทัด การทำเช่นนี้จะแสดงหน้าต่างป๊อปอัป สร้างคำถาม จากที่นี่ ผู้ใช้สามารถสร้างและกำหนดค่าคำถามได้

ขั้นแรก ป้อนคำถามในช่องที่ด้านบนของฟอร์ม จากนั้นตัดสินใจว่าคำถามควรต้องการ คำตอบที่บังคับ และ/หรือ Odoo ควร ถามครั้งเดียวต่อคำสั่งซื้อ หรือไม่ โดยทำเครื่องหมายในช่องที่เกี่ยวข้อง หากต้องการ
หากทำเครื่องหมายที่ช่องทำเครื่องหมาย ถามครั้งเดียวต่อคำสั่งซื้อ คำถามจะถูกถามเพียงครั้งเดียว และค่าของคำถามจะถูกส่งต่อไปยังผู้เข้าร่วมทุกคนตามลำดับ (หากซื้อตั๋วหลายใบพร้อมกัน) หาก ไม่ได้ ทำเครื่องหมายที่ช่องทำเครื่องหมายสำหรับการตั้งค่านี้ Odoo จะแสดงคำถามสำหรับผู้เข้าร่วมทุกคนที่เชื่อมต่อกับการลงทะเบียนนั้น
ถัดไป เลือกตัวเลือก ประเภทคำถาม:
Selection: provide answer options to the question for registrants to choose from. Selectable answer options can be managed in the Answers column at the bottom of the pop-up window.
Text Input: lets the users enter a custom response to the question in a text field.
Name: provides registrants with a field for them to enter their name.
Email: provides registrants with a field for them to enter their email address.
Phone: provides registrants with a field for them to enter their phone number.
Company: provides registrants with a field for them to enter a company they are associated with.
เมื่อป้อนการกำหนดค่าที่ต้องการทั้งหมดแล้ว ให้คลิก บันทึกและปิด เพื่อบันทึกคำถามและกลับไปที่แท็บ คำถาม ในฟอร์มอีเวนต์ หรือคลิก บันทึกและสร้างใหม่ เพื่อบันทึกคำถามและสร้างคำถามใหม่ทันทีในหน้าต่างป๊อปอัป สร้างคำถาม ใหม่
เมื่อเพิ่มคำถามลงในแท็บ คำถาม คอลัมน์ข้อมูลจะแสดงการกำหนดค่าของแต่ละคำถาม
คอลัมน์ข้อมูลมีดังต่อไปนี้:
ชื่อ
บังคับ
ครั้งเดียวต่อคำสั่งซื้อ
ประเภท
คำตอบ (ถ้ามี)
สำหรับประเภท การเลือก และ การป้อนข้อความ ปุ่ม สถิติ จะปรากฏทางด้านขวาของบรรทัดคำถาม เมื่อคลิก Odoo จะแสดงหน้าแยกต่างหาก แสดงเมตริกการตอบกลับสำหรับคำถามที่เฉพาะเจาะจงนั้น
เพื่อลบคำถามใดๆ จากแท็บ คำถาม ให้คลิกไอคอน (ถังขยะ) ที่บรรทัดคำถามที่เกี่ยวข้อง
There is no limit to the number of questions that can be added in the Questions tab of an event form.
แท็บบันทึกภายใน
ในแท็บ บันทึกย่อ ของฟอร์มอีเวนต์ ผู้ใช้สามารถเขียนบันทึกภายในที่มีรายละเอียดและ/หรือคำแนะนำ/ข้อมูลที่เกี่ยวข้องกับอีเวนต์สำหรับผู้เข้าร่วม
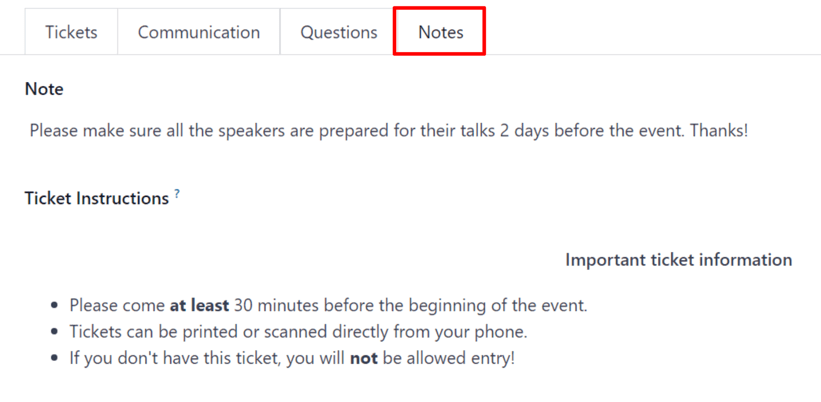
ในช่อง บันทึกย่อ ของแท็บ บันทึกย่อ ผู้ใช้สามารถเขียนบันทึกภายในสำหรับพนักงานอีเวนต์คนอื่นๆ เช่น รายการ "To-do" ข้อมูลการติดต่อ คำแนะนำ และอื่นๆ
ในฟิลด์ Ticket Instructions ของแท็บ Notes ผู้ใช้สามารถเพิ่มคำแนะนำเฉพาะสำหรับผู้เข้าร่วมอีเว้นต์ ซึ่งจะปรากฏบนตั๋วของผู้เข้าร่วม
เผยแพร่อีเว้นต์
เมื่อกำหนดค่าและปรับเปลี่ยนทั้งหมดในฟอร์มอีเว้นต์เสร็จสมบูรณ์แล้ว ก็ถึงเวลาเผยแพร่อีเว้นต์บนเว็บไซต์ การทำเช่นนี้จะทำให้อีเว้นต์สามารถมองเห็นได้สำหรับผู้เยี่ยมชมเว็บไซต์ และทำให้ผู้คนสามารถลงทะเบียนเข้าร่วมอีเว้นต์ได้
เมื่อต้องการเผยแพร่อีเว้นต์หลังจากปรับแต่งทั้งหมดเสร็จสมบูรณ์แล้ว ให้คลิกปุ่มอัจฉริยะ Go to Website ที่ด้านบนของฟอร์มอีเว้นต์ การทำเช่นนี้จะแสดงหน้าเว็บของอีเว้นต์ ซึ่งสามารถปรับแต่งได้เหมือนกับหน้าเว็บอื่นๆ บนไซต์ผ่านปุ่ม Edit
To learn more about website design functionality and options, consult the Building block documentation.
Once the event website is ready to be shared, click the red Unpublished toggle switch in the header menu, changing it to a green Published switch. At this point, the event web page is published, and viewable/accessible by all website visitors.
ส่งคำเชิญอีเว้นต์
เมื่อต้องการส่งคำเชิญอีเว้นต์ให้กับผู้เข้าร่วมที่มีศักยภาพ ให้ไปที่ฟอร์มอีเว้นต์ที่ต้องการผ่านทาง และคลิกเข้าไปในอีเว้นต์ที่ต้องการ จากนั้น ให้คลิกปุ่ม Invite ที่มุมบนซ้ายของฟอร์มอีเว้นต์
การทำเช่นนี้จะแสดงฟอร์มอีเมลเปล่าให้กรอกตามที่ต้องการ เมื่อต้องการเรียนรู้เพิ่มเติมเกี่ยวกับวิธีการสร้างและปรับแต่งอีเมลเช่นนี้ โปรดดูเอกสารประกอบ Create an email
Proceed to create and customize an email message to send as an invite to potential attendees. Remember to include a link to the registration page on the event website, allowing interested recipients to quickly register.
Tip
การส่งอีเมลจาก Odoo อยู่ภายใต้ข้อจำกัดรายวัน ซึ่งโดยค่าเริ่มต้นคือ 200 ฉบับ เมื่อต้องการเรียนรู้เพิ่มเติมเกี่ยวกับข้อจำกัดรายวัน โปรดดูเอกสารประกอบ ถึงขีดจำกัดสำหรับวันนี้แล้ว
ดูเพิ่มเติม