Event sponsors
In the Events app, users can add sponsors for the event and feature them online or in person as exhibitors.
Configuration
To allow users to create and manage event sponsors, the Events app must first be configured by navigating to .
Next, click on the Online Exhibitors checkbox. This setting enables the user to create and manage event sponsors. Finally, remember to click the Save button on the top-left to enable and load the setting.
View or manage sponsors
To view and manage sponsors for an event, navigate to then click the relevant event.
At the top of the event form, click on the Sponsors smart button. This opens a list of existing sponsors/exhibitors in the (Kanban) view. Optionally, to view the sponsors in a list, click the (List) view.

Any newly added sponsors appear on this page as cards with the sponsor logo, name, type of sponsor, and contact information. Additionally, a green Published banner appears in the corner when the sponsor is published on the webpage.
To delete a sponsor, click on the sponsor card. Next to the sponsor name at the top-left, click the (gear) icon and select Delete.
Create a new sponsor
On the sponsor dashboard page, click the New button at the top-left to open a new event sponsor form.

On the form are multiple fields to configure the sponsor’s contact details and type of sponsorship:
Sponsor Name: Name of the sponsor displayed on the website.
Slogan: Slogan of the sponsor.
Partner: Contact of the sponsorship partner. This field is required.
Email: Email of the sponsor.
Phone: Phone number of the sponsor.
Mobile: Mobile phone of the sponsor.
Website: Link to the sponsor’s website.
Event: Specific event to be sponsored.
Sponsorship Level: Tier or level of sponsorship.
Sponsor Type: Type of participation of the sponsor during the event.
To start, enter a name for the sponsor under the Sponsor Name field.
Note
Alternatively, selecting a contact under the Partner drop-down will auto-populate the Sponsor Name field with the partner name.
Optionally, enter the Slogan. This slogan is displayed on the sponsor’s page on the website.
Next, select or create a Partner for the sponsorship by selecting a contact from the drop-down.
Note
Selecting an existing partner contact will auto-populate the remaining Email, Phone, Mobile, and Website fields only if those fields are already configured on the partner’s contact form. To view this contact form, click the (right) arrow at the right of the Partner drop-down.
Otherwise, if the fields do not auto-populate, manually enter the contact’s details.
The Event field is already populated. However, it is possible to change the sponsor’s event by selecting the relevant option under the drop-down.
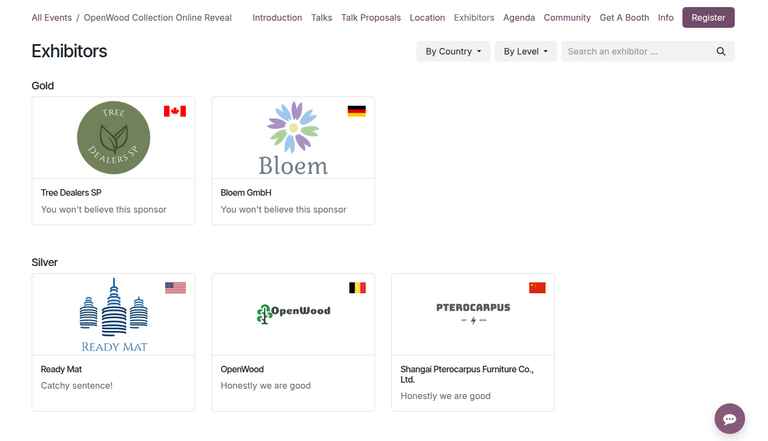
Then, select or create a sponsorship level/tier. By default Odoo Events creates three sponsorship levels: Gold, Silver, and Bronze. Each of these options displays the sponsor’s logo on the event webpage in gold, silver, and bronze colors, respectively.
In the Sponsor Type field, select how the sponsor should be featured during the event.
Odoo Events supports three sponsor types:
Footer Logo Only: Displays the sponsor’s logo in the footer of the event webpage. Selecting this option creates a Display in footer toggle button on the form. The footer logo is displayed only if this button is toggled.
Exhibitor: Features the sponsor as an exhibitor on the event webpage under the Exhibitors sub-menu.
Online Exhibitor: Features the sponsor as an online exhibitor on the event webpage under the Exhibitors sub-menu, similar to the Exhibitor option. However, this option also displays a Connect button when hovering over the sponsor’s thumbnail. When clicked, attendees can connect with the sponsor online through their contact details.
Note
Both the Exhibitor and the Online Exhibitor options display the sponsor logo in the footer of the event webpage.
If the Exhibitor or Online Exhibitor option is selected, an additional Description tab appears at the bottom of the sponsor form. Enter a description for the sponsor to be displayed on the sponsor’s webpage.
Additionally, for the Online Exhibitor option, a Online tab appears at the bottom for the user to configure their Jitsi integration.
Publish an event sponsor
To feature the sponsor as an exhibitor, the sponsor must be published first on the event webpage.
If the Footer Logo Only sponsor type is selected, toggling the Display in footer button publishes the sponsor and displays the sponsor logo in the footer of the event’s webpage.

For the Exhibitor or Online Exhibitor options, click on the Go to Website on the form. Then, click the Unpublished toggle button at the top-right to publish the sponsor page.
To see the published list of sponsors on the website, navigate to . Then, click on the relevant event. In the sub-menu, click on Exhibitors to see the list of published sponsors.
Note
If the sub-header menu is not showing up on the event website, click Edit at the top-right corner. Then, click into the Customize tab of the sidebar.
In the Customize tab, click the Sub-menu (Specific) toggle button and click Save.
The website then displays the event sub-header menu with various options.
See also