Códigos de barras de productos y ubicaciones
Las operaciones de inventario, como la configuración de productos, pueden simplificarse aprovechando las funciones de escaneo de código de barras. Asignar códigos de barras a productos, empaquetados de productos y ubicaciones es un paso clave para usar la aplicación Código de barras, y los usuarios pueden introducir valores convenientemente usando un escáner de código de barras. Esto reduce la entrada manual, minimiza errores y acelera tareas comunes como la selección de productos, asignación de ubicaciones y ajustes de inventario.
Configuración
Para habilitar la aplicación Código de barras, primero debes habilitarla en la configuración de Inventario.
Ve a . En la sección Código de barras, selecciona la opción Escáner de código de barras. Asegúrate de hacer clic en Guardar.
Nomenclatura de códigos de barras
La mayoría de los productos minoristas utilizan códigos de barras EAN-13, también conocidos como números globales de identificación comercial (GTIN). Para crear un GTIN nuevo para un producto, una empresa debe tener un prefijo de empresa GS1. Consulta Nomenclatura GS1 para obtener más información sobre el uso de este sistema.
Odoo admite el uso de cualquier cadena como código de barras, por lo que los usuarios también pueden crear referencias internas personalizadas para escáneres de código de barras. Consulta la Nomenclatura predeterminada para conocer las convenciones opcionales sobre códigos de barras y valores predeterminados en Odoo.
Para cambiar la nomenclatura de código de barras, ve a y desplázate hacia abajo hasta la sección Código de barras para seleccionar la nomenclatura bajo Escáner de código de barras.

Búsqueda de código de barras
Odoo puede añadir automáticamente información del producto usando la configuración Base de datos de códigos de barras de stock para cualquier código de barras UPC, EAN, o ISBN.
Para habilitar la búsqueda automática de código de barras, ve a y desplázate hacia abajo hasta la sección Código de barras para seleccionar la casilla Base de datos de código de barras de stock.
Ver también
Configurar códigos de barras de productos
Los códigos de barras pueden asignarse a productos existentes desde la página de configuración Códigos de barras de producto o desde cualquier formulario de producto en las aplicaciones Inventario, Fabricación o Compra. El campo de código de barras puede ser rellenado escribiendo o escaneando.
Al agregar un producto nuevo, la función de búsqueda de códigos de barras puede encontrar automáticamente información del producto por su código de barras, y los productos nuevos se pueden agregar a la base de datos directamente desde la aplicación Código de barras escaneando un código de barras.
Desde la aplicación Código de barras
Se pueden agregar nuevas definiciones de productos a las listas de productos de la base de datos, y su inventario disponible se puede rastrear desde la aplicación Código de barras si la función de búsqueda de códigos de barras está habilitada. Para crear un nuevo recibo para escanear productos nuevos, elige uno de dos métodos:
Desde la página principal de Código de barras, toca Operaciones, toca Recibos, y después toca el botón Nuevo.
Escanea un código de barras de comando de inventario Recibos (WHIN) impreso.

Escanear un producto que no está actualmente en el inventario muestra un mensaje indicando que el producto no existe, con un botón Crear producto nuevo. Al presionar este botón se buscará en la base de datos Barcode Lookup un producto que coincida con el código y formato, se creará una nueva definición de producto en la base de datos de Odoo usando la información disponible, y se agregará ese producto al recibo para rastrear su cantidad disponible.

Nota
Incluso si se cancela una orden de transferencia con un producto creado a través de Código de barras, el producto permanece disponible en la lista de productos en la aplicación Inventario a menos que se elimine.
Desde un formulario de producto
Se pueden agregar códigos de barras tanto a productos existentes como a productos nuevos a medida que se crean a través del formulario de configuración del producto. Para acceder al formulario de un producto, ve a y selecciona el producto al que deseas agregar un código de barras.
En la pestaña Información general, haz clic en el campo Código de barras para escribir el código de barras o usa un escáner para ingresar el valor del código de barras.

Nota
Si usas variantes de producto, configura los códigos de barras en las variantes individuales, no en la plantilla del producto, para permitir que el escaneo recupere las variantes.
Desde los ajustes de Inventario
Para acceder a la página de configuración Códigos de barras de productos, ve a . En la sección Código de barras, bajo la función Escáner de código de barras, haz clic en Configurar códigos de barras de productos. Desde esta vista de lista, haz clic en la columna Códigos de barras de cualquier producto para introducir su código de barras. Los escáneres de códigos de barras completarán este campo cuando se escanee el producto.

Truco
Para filtrar los productos que aún no tienen códigos de barras, haz clic en el icono (alternar panel de búsqueda) para agregar un filtro personalizado donde la propiedad Código de barras no esté establecida.

Establecer códigos de barras de embalaje de productos
Si Embalajes de producto está habilitado en la configuración de Inventario, se pueden establecer códigos de barras para los embalajes de productos. Para habilitar esta función, navega a . En la sección Productos, selecciona Embalajes de producto. Asegúrate de Guardar los cambios.
Los códigos de barras se pueden asignar a los embalajes de productos desde la página Embalajes de producto o desde cualquier formulario de producto en la aplicación Inventario. El campo de código de barras se puede completar escribiendo o escaneando.
Después de que el código de barras se asigna al embalaje, se puede usar para operaciones de almacén.
Desde la página Embalajes de producto
Navega a .
En esta página, asegúrate de que aparezca la columna Código de barras haciendo clic en el icono (opciones adicionales) y seleccionando Código de barras.
Selecciona un embalaje existente o crea uno nuevo haciendo clic en Nuevo. Asegúrate de especificar el producto, su embalaje y la Cantidad contenida. Especifica si está disponible para Ventas o Compra. Especifica un Código de barras.

Desde el formulario del producto
Navega a . Abre un producto existente o crea uno nuevo haciendo clic en Nuevo.
Después de especificar la información del producto en la pestaña Información general, abre la pestaña Inventario.
En la sección Embalaje, muestra el campo Código de barras haciendo clic en el icono (opciones adicionales) y seleccionando Código de barras.
Agrega un Código de barras a un empaque existente, o crea uno nuevo haciendo clic en Agregar una línea. Asegúrate de especificar un nombre de empaque y la Cantidad contenida. Especifica si el empaque está disponible para Ventas o Compra. Finalmente, especifica un Código de barras.

Ver también
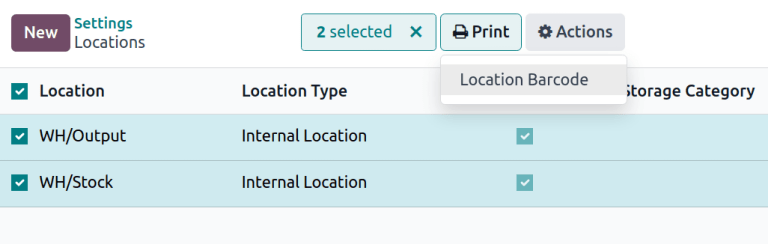
Imprimir códigos de barras de ubicaciones
Se pueden asignar códigos de barras a ubicaciones para rastrear dónde se almacenan los productos y gestionar transferencias, y están disponibles automáticamente si la función Ubicaciones de almacenamiento está habilitada.
Para imprimir códigos de barras para ubicaciones, ve a , desplázate hacia abajo hasta la sección Almacén y haz clic en Ubicaciones. Selecciona las casillas de las ubicaciones, y aparecerá el botón Imprimir, permitiendo la descarga de un PDF con códigos de barras para todas las ubicaciones seleccionadas.