Buscar, filtrar y agrupar registros
Odoo permite buscar, filtrar y agrupar registros en una vista para mostrar solo los registros más relevantes. La barra de búsqueda se encuentra en la parte superior de la vista, escriba en ella para buscar valores o haga clic en el icono (flecha hacia abajo) para acceder a los menús desplegables de Filtrar, Agrupar por y Favoritos.
Buscar valores
Use el filtro de búsqueda para buscar valores específicos y añadirlos como filtros. Escriba el valor que desea buscar (por ejemplo, el nombre de un comercial o de un producto) y seleccione la opción que quiere aplicar al filtro de búsqueda en el menú desplegable.
Example
En el informe de análisis de ventas (), en lugar de añadir un filtro personalizado para seleccionar los registros donde Mitchell Admin es el comercial, puede buscar Mitch, hacer clic en el icono (submenú) que se encuentra junto a Buscar comercial para: Mitch y seleccionar Mitchell Admin.

Nota
Usar el campo de búsqueda es equivalente a usar el operador contiene al añadir un filtro personalizado. Introducir un valor parcial y seleccionar el campo deseado directamente (sin seleccionar (submenú)) incluirá todos los registros que contengan los caracteres que escribió para el campo seleccionado.
Filtros
Los filtros se usa para seleccionar registros que cumplen con ciertos criterios. La selección predeterminada de registros es específica para cada vista, pero se puede modificar seleccionando uno (o varios) de los filtros preconfigurados, o agregando un filtro personalizado.
Filtros preconfigurados
Haga clic en el icono (flecha hacia abajo) en la barra de búsqueda para modificar la selección por defecto de registros. Seleccione uno (o varios) de los filtros preconfigurados en el menú desplegable Filtros.
Example
En el informe análisis de ventas (), solo se seleccionan en automático los registros que estén en la etapa orden de ventas y cuya fecha de orden sea dentro de los últimos 365 días.
Para también incluir los registros en etapa de cotización, seleccione Cotizaciones en los filtros.
Además, para solo incluir los registros de pedidos de venta o presupuestos de un año en específico, como 2024, primero haga clic en el icono (cancelar) para eliminar el filtro Fecha del pedido: Últimos 365 días y después seleccione .

Nota
Los Filtros preconfigurados se agrupan y cada grupo se separa con una línea horizontal. Seleccionar filtros preconfigurados del mismo grupo permite que los registros coincidan con cualquier condición aplicada. Sin embargo, seleccionar los filtros de diferentes grupos requiere que los registros cumplan con todas las condiciones aplicadas.
Filtros personalizados
Añada un filtro personalizado en caso de que los filtros preconfigurados no sean lo suficientemente específicos. Para ello, haga clic en el icono (flecha hacia abajo) en la barra de búsqueda y después seleccione .
La ventana emergente Agregar filtro personalizado muestra la opción que coincide, la regla de filtro y un activador para Incluir archivados.

La configuración de coincidencia predeterminada es coincidir con cualquiera de las siguientes reglas:, lo cual indica que cada regla de filtro se aplica de manera independiente. Para cambiar la configuración de coincidencia a coincidir con todas las siguientes reglas: debe agregar al menos dos reglas de filtro al filtro personalizado.
Coincidir todas las siguientes reglas: Todas las reglas del filtro se deben cumplir. Piense en esta regla como una operación AND (
&).Coincidir cualquiera de las siguientes reglas: Cualquiera de las reglas del filtro se puede cumplir. Piense en esta regla como una operación OR (
|).
De forma predeterminada, se agrega una sola regla de filtro al filtro personalizado. A continuación describimos la estructura de una regla de filtro:
El primer campo en línea es el nombre del campo por el que puede filtrar. Algunos campos tienen parámetros refinados que están alojados en otro campo. Estos campos tienen el icono (submenú) junto a ellos y al presionarlo aparecen todos los campos alojados.
El segundo campo en línea es el operador condicional que se usa para comparar el nombre del campo con el valor. Los operadores condicionales disponibles dependen del tipo de información del campo.
El tercer campo en línea es el valor variable del nombre del campo. El valor ingresado puede aparecer como un menú desplegable, una entrada de texto, una entrada numérica, una entrada de fecha y hora, un selector booleano, o puede estar en blanco, dependiendo del operador que se use y el tipo de información del campo.
También están disponibles tres botones en línea a la derecha de los criterios de las reglas del filtro:
(más): Añade una nueva regla abajo de la regla existente.
(nodo): Añade un nuevo grupo de reglas abajo de la regla existente, con las opciones de coincidencia Cualquiera y Todas disponibles para definir cómo se aplica cada regla dentro de esta rama al filtro. Si la opción de coincidencia es la misma que la del grupo principal, los campos se mueven para unirse a ese grupo.
Example
Si la opción de coincidencia está configurada en Coincidir todas las siguientes reglas y se añade una nueva rama con su opción de coincidencia cambiada de cualquiera de a todas de, la rama que acaba de añadir desaparece y su grupo de reglas se mueve al grupo principal.
(eliminar): Elimina el nodo. Si elimina un nodo de la rama, también eliminará todos sus nodos secundarios.
Si hace clic en el botón Nueva regla, se agregará una nueva regla de filtro al filtro personalizado.
Una vez que definió los criterios del filtro, haga clic en Agregar para agregar el filtro personalizado a la vista.
Example
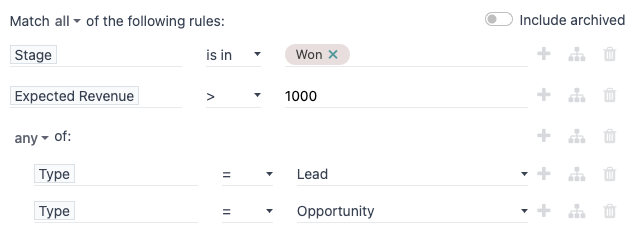
Si lo que quiere es buscar entre todos los leads y oportunidades de la aplicación que están en la etapa Ganado y tienen ganancias esperadas de más de $1,000, debe ingresar lo siguiente:
Coincidir todas las siguientes reglas:
Etapa está en Ganado
Ingreso esperado >
1,000cualquiera de:
Tipo = Lead
Tipo = Oportunidad
Truco
Active el modo de desarrollador para mostrar el nombre técnico de cada campo y el tipo de información, así como el la area de texto # Editor de código debajo de las reglas de filtro para ver y editar el dominio de forma manual.
Agrupar registros
Puede agrupar la vista de los registros con uno de los grupos preconfigurados. Para ello, haga clic en el icono (flecha hacia abajo) que se encuentra en la barra de búsqueda y seleccione una de las opciones de Agrupar por del menú desplegable.
Example
Para agrupar los registros por vendedor en el informe de análisis de ventas (), haga clic en la opción Vendedor que aparece en el menú desplegable Agrupar por. La vista cambia para mostrar los registros agrupados por vendedor sin filtrarlos.

Es posible personalizar grupos con un campo presente en el modelo. Para hacerlo, haga clic en y seleccione un campo del menú desplegable.
Nota
Puede usar varios grupos al mismo tiempo. El primer grupo que se seleccionó es el agrupamiento principal, el siguiente que se agrega divide aún más las categorías principales del grupo y así sucesivamente. Además, los filtros y los grupos se pueden usar juntos para definir la vista todavía más.
Comparación
Algunos tableros de informes incluyen una sección de Comparación en los menús desplegables de sus barras de búsqueda. Esta incluye el informe de Eficiencia general de los equipos de la aplicación Fabricación y el informe de compras de la aplicación Compra, entre otros.
Las opciones en la sección Comparación sirven para comparar datos de dos periodos distintos. Elija entre las opciones (Filtro de tiempo): Periodo anterior y (Filtro de tiempo): Año anterior.
Importante
- Para algunos informes, la sección Comparación solo aparece en el menú desplegable de la barra de búsqueda
al seleccionar uno (o más) periodos en la columna Filtros, pues no hay nada que comparar si no especifica ningún periodo.
Además, algunos informes solo permiten el uso de la función Comparación cuando selecciona el tipo de gráfico (circular) o la vista (tabla dinámica). Puede seleccionar la opción de Comparación incluso si está habilitada otra vista, pero hacerlo no cambiará la manera en que aparece la información en el informe.

Para ver los datos utilizando una de las dos comparaciones, primero seleccione un periodo en la columna Filtros del menú desplegable de la barra de búsqueda. Después, en la sección Comparación, seleccione (Filtro de tiempo): Periodo anterior o (Filtro de tiempo): Año anterior.
Una vez que haya habilitado una de las opciones de Comparación, el informe comparará los datos del periodo seleccionado con los datos del mismo intervalo (mes, trimestre, año) del periodo o año anterior. La forma de visualizar los datos depende de la vista seleccionada:
La Gráfica de barras muestra dos barras, una al lado de la otra, para cada unidad seleccionada. La barra de la izquierda representa el periodo seleccionado, mientras que la barra de la derecha representa el periodo anterior.
La Gráfica de líneas muestra dos líneas. Una representa el periodo seleccionado y la otra representa el periodo anterior.
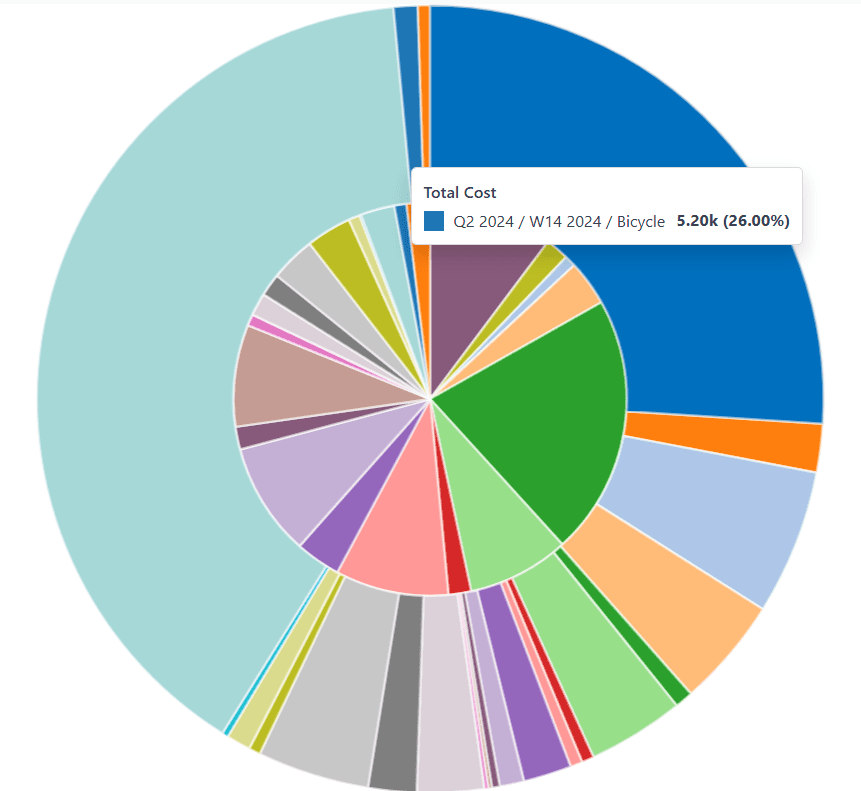
La gráfica circular es un círculo grande que tiene un círculo más pequeño en su interior. El círculo más grande representa el periodo seleccionado, mientras que el círculo más pequeño representa el periodo anterior.
La tabla dinámica muestra cada columna dividida en dos columnas más pequeñas. La columna derecha representa el periodo seleccionado, mientras que la columna izquierda representa el periodo anterior.
Example
Los datos del segundo trimestre de 2024 se comparan con los datos del segundo trimestre de 2023 en el informe de Análisis de producción de la aplicación . En la sección de filtros del menú desplegable de la barra de búsqueda está seleccionado el Q2 como Fecha de finalización y la sección de Comparación incluye Fecha de finalización: Año anterior.
El año actual es 2024, por lo que el círculo más grande muestra los datos del segundo trimestre (Q2) de 2024 y el círculo más pequeño muestra los datos del segundo trimestre (Q2) de 2023, que es el mismo periodo, pero un año antes.
Si selecciona Fecha de finalización: Periodo anterior, el círculo más pequeño mostrará los datos del primer trimestre (Q1) de 2024, que es el mismo periodo, pero anterior.
Favoritos
Los favoritos son una forma de guardar una búsqueda específica para usarla más tarde, o como un nuevo filtro predeterminado para una vista.
Para guardar la vista actual como favorita, haga clic en el icono (flecha hacia abajo) en la barra de búsqueda, después seleccione el menú desplegable Guardar búsqueda actual para que aparezcan las siguientes opciones:
Nombre del filtro: nombre de la búsqueda favorita.
Filtro por defecto: define la búsqueda favorita como el filtro por defecto para la vista.
Compartido: hace que la búsqueda favorita esté disponible para todos los usuarios. De lo contrario, por defecto, esta búsqueda de favoritos solo está disponible para el usuario que la creó.
Una vez que las opciones estén configuradas, haga clic en Guardar para guardar la búsqueda en favoritos.

A las búsquedas favoritas se accede haciendo clic en el icono (desplegable) en la barra de búsqueda y se muestran en Favoritos. Las búsquedas que solo son visibles para el usuario actual, es decir, que no están compartidas, se muestran primero, mientras que los favoritos compartidos, ya sean creados por el usuario actual u otro usuario, se muestran en una segunda sección.
Para eliminar una búsqueda favorita, haz clic en el icono (eliminar) junto a la búsqueda guardada.
Truco
Para ver todas las búsquedas favoritas, activa el modo desarrollador y navega a . Desde aquí se pueden ver, editar, archivar o eliminar todas las búsquedas favoritas.