Entradas de trabajo
Una entrada de trabajo es un registro individual en la hoja de horas de un empleado. Las entradas de trabajo se pueden configurar para tener en cuenta todos los tipos de trabajo y permisos como asistencias, permisos por enfermedad, capacitaciones o días feriados.
The Payroll app automatically creates work entries based on the employee’s salary structure type, and from the Planning, Attendances, and Time Off applications. When needed, work entries can also be created manually.
Work entries provide the Payroll app with the worked hours used to compute employee paychecks, if the employee’s salary is based on work entries, as opposed to a salaried position.
Nota
Odoo configures several work entry types by default, but additional work entry types can be created, when necessary.
Work entry dashboard
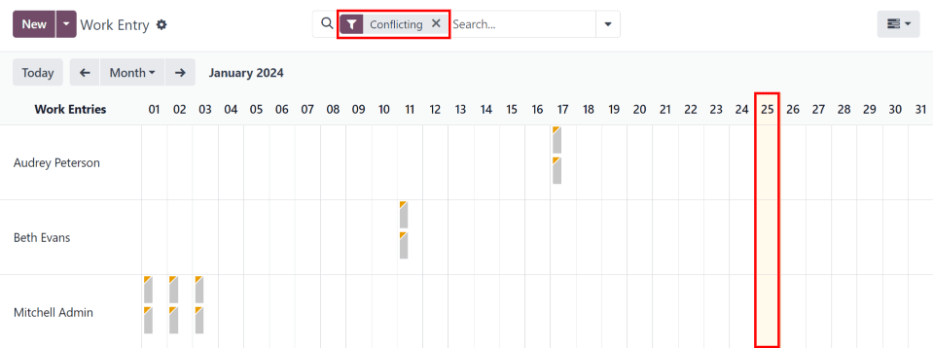
The Work Entries dashboard of the Payroll app provides a visual overview of the individual work entries for every employee.
Vaya a para abrir el tablero.
En el tablero Entradas de trabajo estas aparecen en orden alfabético, según el nombre de los empleados. Aparece todo el mes y el día actual tiene un color amarillo pálido.
The Work Entry dashboard has a default Conflicting filter, which displays only work entries with conflicts to be resolved.
Truco
Remove the default Conflicting filter from the search bar to view all work entries.
Agregar una nueva entrada de trabajo
If a work entry is missing, such as sick time, or if an employee forgot to clock in and out for a shift, a new work entry must be created for the missing shift.
Click New on the work entry dashboard, and a blank Create work entry pop-up form appears. Enter the following information on the form:
Description: Enter a short description for the work entry, such as
Sick Time. The default entry isAttendance: (Employee).Employee: Select the employee the work entry is for, using the drop-down menu.
Work Entry Type: Select the Work Entry Type using the drop-down menu.
From and To: Enter the start (From) and end (To) dates and times for the work entry.
First, click on either the From or To line to reveal a calendar pop-up window. Select the date by navigating to the correct month, then click on the specific day to select it.
Next, select the time, by clicking on either the hour or minute fields at the bottom of the calendar, and set the desired time.
When the date and time for the entry are correct, click the Apply button.
Duration: This field displays the hours based on the To and From entries. Modifying this field modifies the To field (the From field does not change).
Después de que haya ingresado la información deseada, haga clic en Guardar y cerrar para guardar la entrada y cerrar el formulario emergente.

Conflictos
A conflict occurs when a request has not been approved, such as sick time or vacation, or if there are any errors on the work entry. Conflicts that span the current pay period being processed must be resolved before payslips can be generated.
Cualquier entrada de trabajo que tenga un conflicto por resolver aparece en el tablero principal de Entradas de trabajo al que puede acceder desde . De forma predeterminada, solo aparecen los conflictos que necesitan resolverse.
Los conflictos están señalados con un triángulo naranja situado en la esquina superior izquierda de cada entrada de trabajo. Haga clic en una para ver la fecha y hora específica, después haga clic en Editar para ver los detalles del conflicto en una ventana emergente.

El conflicto se explica brevemente en un recuadro de texto de color naranja en la ventana emergente Abrir que aparece.
La descripción, el empleado y el tipo de entrada de trabajo aparecen del lado izquierdo de la ventana emergente. La fecha y hora de inicio (Desde) y finalización (Hasta), así como el tiempo total (en horas) en el campo Duración aparecen del lado derecho.
Conflictos en tiempo personal
The most common work entry conflicts are for time off requests. Odoo automatically generates work entries for specific time periods. When time off is requested after these work entries are generated, it results in duplicate work entries for that employee (one for time off and another for regular work).
If there is a conflict because a time off request is in the system for the same time that a regular work entry already exists, the time off request is entered in a Time Off field.
Conflicts can be resolved either directly on the work entry or in the detailed time off request form.
Resolver desde la entrada de trabajo
If no additional details are needed to determine if a time off request should be approved or refused, the time off conflict can be resolved directly from the work entry pop-up window.
Click either the Refuse Time Off or Approve Time Off buttons to refuse or approve the time off request, then the two buttons disappear. Click the Save & Close button to close the pop-up window.
The conflict disappears from the Work Entry dashboard, since the conflict is now resolved.

Nota
If the time off is approved, the status of the work entry conflict changes to Cancelled. If the time off is refused, the status changes to Draft.
Resolver desde la solicitud de tiempo personal
If more details are needed to make a decision about the time off request, hover over the entry in the Time Off field, and click the (Internal Link) icon that appears at the end of the line. This causes an Open: Time Off pop-up window to load, with all the time off request details. Click either the Approve or Refuse buttons to approve or refuse the request.
Para resolver el conflicto de tiempo personal desde la ventana emergente de la solicitud detallada, haga clic en el botón Enlace interno que se encuentra al final de la línea de la entrada de tiempo personal. Los detalles de la solicitud aparecerán en una nueva ventana emergente y puede modificarla en caso de que sea necesario.
Haga clic en el botón Aprobar para aprobar la solicitud, después haga clic en el botón Guardar y cerrar para guardar los cambios y regresar a la ventana emergente con los conflictos de las entradas de trabajo.

Ahora el botón Aprobar tiempo personal está oculto y solo es visible el botón Rechazar tiempo personal.
Si aprobó la solicitud por error podrá rechazarla aquí al hacer clic en el botón Rechazar tiempo personal .
Como el tiempo personal fue aprobado desde la ventana de tiempo libre, haga clic en la X que se encuentra en la esquina superior derecha para cerrar la ventana. El conflicto desaparece del tablero de entradas de trabajo una vez resuelto.
Volver a generar entradas de trabajo
After conflicts are resolved, the affected work entries must be regenerated. This recreates the specified work entries, and overwrites the previously conflicting work entries.
While conflicts can be resolved individually, if the conflicts are caused by another application, such as Planning or Attendances, it is best practice to correct the record in the application causing the conflict. The reason this method is recommended is because, if the issue in the related application is not resolved, when work entries are regenerated, the conflicts reappear.
First, ensure the issues are resolved in the specific applications that caused the work entry conflicts. Once the conflicts have been resolved in the corresponding apps, open the work entry dashboard by navigating to .
Click the Regenerate Work Entries button at the top of the Work Entries dashboard, and a Work Entry Regeneration pop-up window appears.
Select the Employees to regenerate work entries for, using the drop-down menu. Adjust the From and To fields, so the correct date range is displayed.
Haga clic en el botón Volver a generar entradas de trabajo para que esto ocurra, la ventana emergente se cierra al terminar.

Example
An employee has incorrect work entries generated from the Planning app because they were incorrectly assigned to two work stations simultaneously. This should be fixed in the Planning app, instead of the Payroll app.
To correct this issue, modify the employee’s schedule in the Planning app, so they are correctly assigned to only one work station. Then, in the Payroll app, regenerate work entries for that employee, for that specific time period.
The Payroll app then pulls the new, corrected data form the Planning app, and recreates the correct work entries for that employee. All conflicts for that employee are now resolved.
Tipos de entradas de trabajo
When creating a work entry in the Payroll application, or when a new time off type is created in the Time Off application, a work entry type needs to be selected.
The Payroll app comes with nine preconfigured work entry types, and depending on the installed payroll localization, additional country-specific work entries may be configured. If there is a need for additional work entry types, they can be created.
To view the current work entry types available, navigate to .
Cada tipo de entrada de trabajo tiene un código que ayuda a crear los recibos de nómina y garantizar que todos los impuestos y tarifas se introducen de forma correcta.
Nota
Depending on the installed localization, other sections and fields may appear on the form.

Nuevo tipo de entrada de trabajo
To create a new work entry type, go to and click New. Then, enter the information for the following sections on the form.
Sección de información general
Work Entry Type Name: Enter a name for the work entry type. It should be short and descriptive, such as
Sick TimeorTraining.Payroll Code: Enter a code for the work entry type. This code appears with the work entry type on timesheets and payslips. Since the code is used in conjunction with the Accounting application, it is advised to check with the accounting department for a code to use.
External Code: Enter a code to use for exporting data to a third-party payroll service. Check with the third-party being used to determine the External Code to enter for the new work entry type.
Color: Select a color for the particular work entry type. This color appears on the work entry dashboard to aid in identifying work entry types.
Nota
The only required fields for a work entry type is the Work Entry Type Name and the Payroll Code.
Sección a mostrar en el recibo de nómina
Rounding: Select how the time entered for the work entry should be rounded. The rounding method selected determines how the worked time on timesheet entries are calculated. The options are:
No Rounding: Work entries are not modified.
Half Day: Work entries are rounded to the closest half day amount.
Day: Work entries are rounded to the closest full day amount.
Rounding Type: If either Half Day or Day is selected in the Rounding field, this field appears. Select either Up or Down to determine how the rounding is handled.
Example
The working time is set to an 8-hour work day (a 40-hour work week). An employee enters a time of 5.5 hours on a work entry.
If the Rounding is set to No Rounding, the work entry remains at 5.5 hours.
If the Rounding is set to Half Day, and the Rounding Type is set to Down, the work entry is changed to 4 hours. If the Rounding Type is set to Up, the work entry is changed to 8 hours.
If the Rounding is set to Day, and the Rounding Type is set to Down, the work entry is changed to zero hours. If the Rounding Type is set to Up, the work entry is changed to 8 hours.
Sección sin pago
Unpaid in Structures Types: If the work entry type is for work that is not paid, specify which pay structure the unpaid work entry type applies to, using the drop-down menu. Some situations where work is logged on a payslip, but no compensation is given, such as unpaid internships, unpaid training, or volunteer work.
Sección de opciones de tiempo personal
Time Off: Tick this box if the work entry type can be selected for a time off request or time off entry, in the Time Off application.
If Time Off is active, a Time Off Type field appears. This field has a drop-down menu to select the specific types of time off, such as
Paid Time Off,Sick Time Off, orExtra Hours. Select the Time Off Type associated with the work entry type.Keep Time Off Right: Tick this checkbox if the work entry type associated with the selected time off type allows for rolling over unused time off to the following year.
Sección de informes
Unforeseen Absence: Tick this box if the work entry type should be visible on the unforeseen absences report.
