Informes de gastos
When expenses are ready to submit (such as at the end of a business trip, or once a month), an expense report needs to be created. Open the main Expenses app dashboard, which displays the My Expenses dashboard, by default. Alternatively, navigate to .
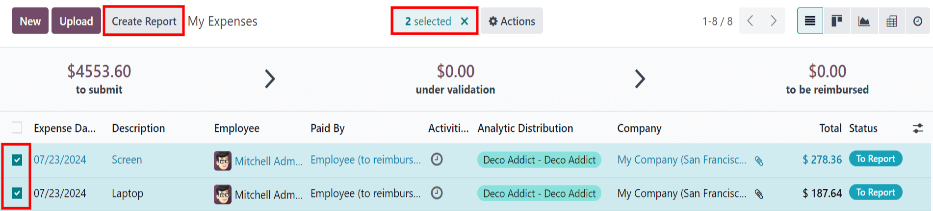
All expenses are color-coded by status. Any expense with a status of To Report (expenses that still need to be added to an expense report) appears in blue text. For all other statuses (To Submit, Submitted, and Approved) the text appears in black.
Crear informes de gastos
First, select the desired expense to be added to the report on the My Expenses dashboard by ticking the checkbox next to each entry.
Nota
Es posible seleccionar cualquier gasto de la lista Mis gastos a excepción de los que están en estado Aprobado.
El botón Crear informe aparecerá siempre y cuando haya al menos un gasto en la lista con el estado Por reportar o Por enviar.
When the Create Report button is clicked, all expenses with a status of To Submit that are not currently on another expense report appear in the newly-created expense report.
Si todos los gastos del informe Mis gastos ya están asociados con otro, entonces aparecerá la ventana emergente Operación no válida indicando que no tiene gastos por reportar.
Once the expenses have been selected, click the Create Report button.
Truco
Another way to add all expenses that are not currently on an expense report is to click the Create Report button, without selecting any expenses, and Odoo automatically selects all expenses with a status of To Submit that are not already on a report.
The new report loads with all the expenses listed in the Expense tab. If there is a receipt attached to an individual expense, a (paperclip) icon appears on the expense line.
When the report is created, the date range for the expenses appears as the Expense Report
Summary, by default. It is recommended to edit this field with a brief summary for each report to
help keep expenses organized. Enter a description for the expense report, such as Client Trip NYC,
or Office Supplies for Presentation, in the Expense Report Summary field.
The Employee, Paid By, and Company fields are populated with the information listed on the individual expenses.
Nota
The Company field only appears in a multi-company database.
Next, select a Manager from the drop-down menu to assign a manager to review the report. If needed, update the Journal field using the drop-down menu.

Si faltan algunos gastos en el informe podrá agregarlos desde este formulario. Para ello, haga clic en Agregar una línea en la parte inferior de la pestaña Gastos.
An Add: Expense Lines pop-up window appears, displaying all the available expenses (with a To Submit status) that can be added to the report. If a new expense needs to be added that does not appear on the list, click New to create a new expense and add it to the report.
Tick the checkbox next to each expense being added, then click Select. Doing so closes the pop-up window, and the items now appear on the report.
Truco
Expense reports can be created in one of two ways:
Navigate to the main dashboard (also accessible, via ) and click Create Report.
Navigate to and click New.
Enviar informes de gastos
Una vez que el informe de gastos está completo, el siguiente paso es enviárselo a un gerente para que lo apruebe. Vaya a para ver todos los informes y abra el informe correspondiente desde la lista que aparece.
Nota
Es necesario que envíe los informes de forma individual, no es posible hacerlo por lotes.
If the list is large, grouping the results by status may be helpful, since only reports with a To Submit status need to be submitted; reports with an Approved or Submitted status do not. The To Submit expenses are identifiable by the To Submit status, and by the blue text, while all other expense text appears in black.

Click on a report to open it, then click Submit To Manager. After submitting a report, the next step is for management to review and approve it.
Nota
El estado de cada informe aparece en la columna Estado. Si esta columna está oculta, haga clic en el icono (opciones adicionales) que se ubica al final de la fila y seleccione la casilla junto a Estado en el menú desplegable.
Importante
Approving expenses, posting expenses, and reimbursing expenses are only for users with the appropriate access rights.