予約
Odooの アポイントメント アプリは、ミーティング、相談、サービスの予約プロセスを簡素化するセルフサービス型のスケジュール管理アプリです。Odoo のビジネスアプリスイートと統合されており、企業は予約のスケジュールを自動化し、手作業による調整を削減し、顧客にシームレスな体験を提供することができます。予約は、カレンダー、CRM 案件、従業員のスケジュールなどにリンクすることができるため、効率と組織化を求めるサービス業に最適なツールです。
設定
アポイントメント アプリでは、ユーザの空き状況、または会議室や座席エリアなどの リソース の空き状況に基づいて、新しいアポイントメントをスケジュールすることができます。新しいリソースを作成したり、既存のリソースを管理したりするには、 に移動してください。これにより、データベースに登録されている利用可能なリソースの一覧と、それぞれの空き状況が表示されます。
リソース
新規 をクリックして、新しいリソースを作成します。空白のレコードに、新しいリソースの 名前 を入力します。容量 フィールドに、リソースが収容できる最大人数を入力します。次に、このリソースの タイムゾーン を確定します。
必要に応じて、ドロップダウンから 1 つ以上の :guilabel:リンク済リソース` を選択します。このオプションは、より大きな需要に対応するために、組み合わせて使用できるリソースを指定します。
重要
リンク済リソース は、自動割当 割当方法 を使用する場合にのみ使用されます。
最後に、このリソースに説明を追加します。説明タブの内容は、オンラインで予約する際に顧客に表示されます。
リソース容量
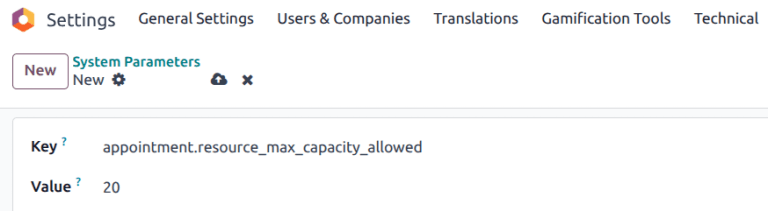
リソースの利用可能性に基づいて予約を行う場合、ウェブサイトには最大`12`までの容量しか表示されません。これは、リソースがより高い容量を持っている場合でも発生します。これを回避するには、データベースに新しい*システムパラメータ*を追加する必要があります。
まず、開発者モードが有効になっていることを確認します。次に、に移動します。新規をクリックして新しいパラメータを追加します。
キーフィールドに`appointment.resource_max_capacity_allowed`と入力します。値フィールドに、許可される最大容量を入力します。完了したら 手動で保存をクリックします。
アポイントメントタイプ設定
アポイントメントをスケジュールまたは予約する前に、アポイントメントタイプを作成する必要があります。 アプリダッシュボードに移動し、 をクリックします。新しい空白のレコードに、 を入力し、このアポイントメントタイプに を設定します。
次に、事前予約時間 を設定します。これは、アポイントメントを予約できる時間からアポイントメントの開始までの最短時間です。事前予約時間 が 1 時間の設定の場合、アポイントメントは 少なくとも 1 時間前に予約する必要があります。
Example
テニスコート に、アポイントメントタイプが作成され、所要時間 は 1 時間、事前予約時間 は 1 時間に設定されています。午後2時、顧客が同日の午後2時45分にアポイントメントの予約を試みる場合、最初に利用可能な時間は午後4時です。

スケジューリングウィンドウ を選択します:
顧客がすぐにアポイントメントを予約できるようにするには、今すぐ利用可能 を選択します。:guilabel:` X 日後まで` フィールドを使用して、顧客がアポイントメントを予約できる期限を設定します。たとえば、
14と入力した場合、顧客は現在の日から14日以降のアポイントメントは予約できません。特定の期間に予約を制限するには、日付範囲内 を選択します。このオプションを選択したら、開始日 および 終了日 フィールドをクリックし、カレンダーのポップアップウィンドウを使用して日付と時間の範囲をカスタマイズします。
予約をキャンセルできる時間を制限するには、キャンセル許可フィールドを更新してください。この設定を有効にすると、指定された時間枠内では顧客がキャンセルできなくなります。
注釈
顧客が時間枠内にキャンセルしようとすると、連絡先情報を含むエラーメッセージが表示されます。予約がリソースに対するものである場合、連絡先の詳細は予約タイプを作成したユーザのものになります。予約がユーザに対するものである場合、連絡先の詳細は予約相手のユーザのものになります。

次に、適切なラジオボタンを選択して、この予約タイプがユーザに基づくかリソースに基づくかを指定します。ユーザに基づく場合は、ドロップダウンで1つ以上のユーザを選択します。リソースに基づく場合は、ドロップダウンで1つ以上のリソースを選択します。
ちなみに
ユーザベースの予約タイプは、販売ミーティングやデモ、採用面接のスケジュール設定に使用できます。
リソースベースの予約タイプは、特定の部屋や場所での時間のスケジュール設定に使用できます。
利用可能条件フィールドでリソースを選択すると、定員管理オプションが表示されます。選択した場合、予約は選択したリソースの定員に基づいて参加者数を制限します。
適切なラジオボタンを選択して割り当て方法を選択してください:
ユーザ/リソースを選択してから時間を選択:顧客は利用可能なユーザ/リソースのリストから選択し、次に空いている時間枠を選択します。
時間を選択してからユーザ/リソースを選択:顧客は日付と時間を選択し、次に利用可能なユーザ/リソースのリストから選択します。
時間を選択して自動割り当て:顧客は時間枠を選択し、ユーザ/リソースが自動的に割り当てられます。
スケジュールタブ
スケジュールタブは、この予約タイプをいつ利用可能にするかを定義するために使用されます。この設定により、予約ページに表示される時間枠が定義されます。
行を追加をクリックして新しい時間枠を作成します。毎ドロップダウンメニューから曜日を選択し、移動元および移動先フィールドで時間を更新します。(ごみ箱)アイコンをクリックしてエントリを削除します。1日に複数のエントリを含めることができます。
ちなみに
ユーザがランチを取っているときなど、予約を特定の時間に利用できないようにする場合は、その前後の時間枠を含めてください。

オプションタブ
オプションタブは、この予約の表示設定と、顧客とユーザの通知設定をカスタマイズするために使用されます。
フロントエンド表示フィールドは、予約がウェブサイト上で顧客にどのように表示されるかを決定します。写真を表示ラジオボタンを選択すると、この予約のユーザまたはリソースのデフォルトの写真がウェブサイトに公開されます。
タイムゾーンおよび場所フィールドは、リソースの予約の場合、リソースが配置されている場所に基づいて自動的に入力されます。ユーザベースの予約の場合、場所フィールドはデフォルトで`オンラインミーティング`となり、ビデオ会議リンクが自動的に生成されます。これをオンラインミーティングにしない場合は、場所フィールドで別のオプションを選択してください。
手動確認チェックボックスをオンにすると、ミーティングが承認される前に承認が必要になります。この機能を有効にすると、確認または拒否されるまで予約の時間枠は引当済として扱われます。この予約から作成されたミーティングを自動的に承認する場合は、このチェックボックスをオフのままにしてください。
案件を作成機能は、スケジュール済の予約ごとにCRMアプリに案件を追加し、担当ユーザに割り当てます。このオプションを有効にするには、案件を作成チェックボックスにチェックを入れてください。
重要
このフィールドは、データベースにCRMアプリがインストールされている場合のみ表示されます。
リマインダーフィールドは、予約時刻の前に顧客へ連絡する方法を設定するために使用します。連絡方法と時間枠に基づいて、ドロップダウンから1つ以上のオプションを選択してください。
顧客が予約登録時に追加のゲストを追加できるようにするには、ゲストを許可チェックボックスにチェックを入れてください。
質問タブ
質問タブは、顧客が予約を予約している間に追加情報を求めるために使用できます。行を追加をクリックして新しい質問を追加してください。
質問を作成ポップアップウィンドウで、質問を入力し、回答タイプを選択してください。
顧客が予約を予約する前にこの質問への回答を必須にするには、必須回答チェックボックスにチェックを入れてください。別の質問を追加するには保存新規をクリックし、完了したら保存閉じるをクリックしてください。
メッセージタブ
メッセージタブは、この予約タイプに関する追加情報を顧客に提供するために使用します。
重要
メッセージタブの内容は、顧客やウェブサイト訪問者に表示されます。
紹介メッセージフィールドに、予約タイプの簡単な説明を追加してください。これには、予約のトピック、ミーティングの議題、またはミーティングの担当ユーザの紹介を含めることができます。
確認時の追加メッセージは、顧客がミーティングを予約した後に表示されます。顧客が知っておくべき追加情報をここに追加してください。これには、駐車場情報、直前のルール、または追加の指示を含めることができます。
予約を公開する
予約を公開する準備ができたら、レコードの上部にあるウェブサイトへ移動スマートボタンをクリックしてください。次に、未公開アイコンを公開済にスライドしてください。