Activate barcodes in Odoo
The barcode scanning features can save a lot of time usually lost switching between mouse and keyboard and the scanner. Properly attributing barcodes to products, product packagings, pickings, and locations helps ensure efficient workflows by controlling software almost exclusively with the barcode scanner.
설정
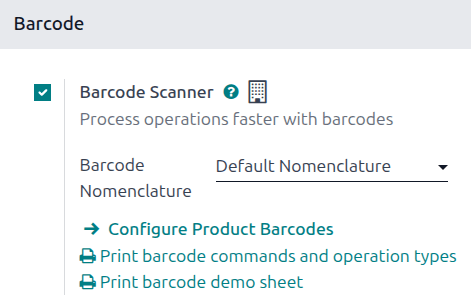
To use this feature, navigate to . In the Barcode section, select Barcode Scanner. Be sure to click Save.
바코드 형식
It is possible to use default nomenclature for the barcodes in the database. Default nomenclature supports barcode actions using product universal product codes (UPCs) and European Article Number (EAN) barcodes.
또한 기본 GS1 분류법 도 적용할 수 있습니다. GS1 분류법을 사용하면 다양한 품목 및 공급망 데이터를 하나의 바코드로 통합할 수 있습니다. 대부분의 소매품에는 EAN-13 바코드(GTIN(Global Trade Identification Numbers) 방식이 적용됩니다. GTIN은 기업이 자사 품목 및 서비스를 고유하게 식별하기 위해 사용합니다. GTIN과 UPC는 종종 같은 의미로 통용되지만, GTIN은 바코드에 있는 숫자를 의미하는 반면, UPC는 바코드 자체를 의미합니다. GTIN에 대한 자세한 정보는 GS1 웹사이트 에서 확인할 수 있습니다.
In order to create GTINs for items, a company must have a GS1 company prefix. This prefix is the number that appears at the beginning of each GTIN, and identifies the company as the owner of the barcode. To learn more about GS1 company prefixes, or purchase a license for a prefix, visit the GS1 Company Prefix page.
Odoo supports GTIN barcodes to identify products. However, since Odoo supports any numeric string as a barcode, it is also possible to define a custom barcode for internal use.
더 보기:
제품 바코드 설정
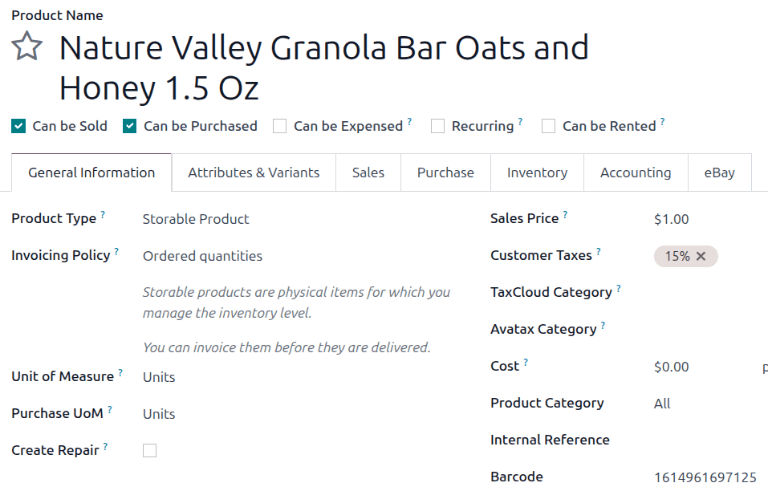
Assign barcodes to products via the Inventory app. Navigate to . Open the product to which a barcode should be added, or create a new product by clicking New.
On the product form, make sure the General Information tab is open. Enter a barcode in the Barcode field.
참고
Be sure to add barcodes directly on the product variants and not on the product. To set a barcode for a product variant, create the variant in the Attributes & Variants tab. Then, navigate to . Select the variant. On its product variant form, in the General Information tab, enter a barcode in the Barcode field.

제품 패키징 바코드 설정
Assign barcodes for product packagings to ensure that they can be used for receipts, deliveries, and more. Product packagings must be enabled before you can create packagings or assign barcodes to those packagings. Navigate to . In the Products section, select Product Packagings. Be sure to click Save.
Add barcodes for packagings in the Inventory app. Navigate to . Open the product to which a packaging barcode must be added, or create a new product by clicking New.
On the product form, after you have specified a product name and other information in the General Information tab, open the Inventory tab. In the Packaging section, click the (additional options) icon, then select Barcode. Then, add a barcode to existing packagings, or click Add a line to create a new packaging and add a barcode to it.

더 보기:
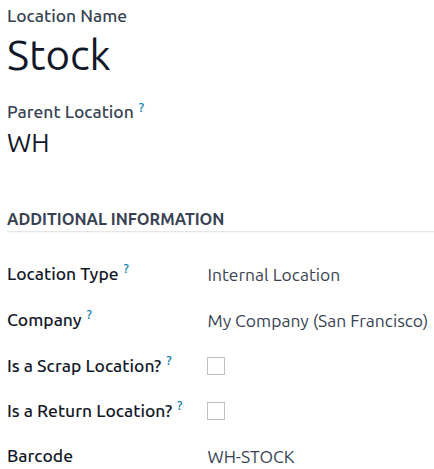
Set location barcodes
If you manage multiple locations, attribute a barcode to each location and print it to display on the physical location in the warehouse. You can configure the locations barcodes in .
참고
Print the barcode for the location by clicking the (Actions) icon and selecting Location Barcode. The barcode saves to the computer, and it can be opened to print from the computer.