Axivox에서 사용자 관리하기
Axivox VoIP 사용자 관리는 Odoo 데이터베이스에서 :abbr:`VoIP (Voice over Internet Protocol)`를 설정하는 데 있어서 중요한 부분입니다. 각각의 Axivox 사용자에게는 고유한 이름과 전화번호 및/또는 내선 번호, 음성 사서함이 있습니다. 이렇게 하면 다양하고 편리한 방법으로 연락을 할 수 있습니다.
Axivox 콘솔에서 Axivox 사용자를 간단하고 직관적인 방식으로 구성하므로 관리자가 빠르고 쉽게 사용자를 관리할 수 있습니다.
참고
이 문서에서는 Axivox라는 공급업체를 통해 모든 내용을 설정하는 방법을 다룹니다. 선택한 VoIP 제공업체에 따라 사용자 관리 프로세스가 달라질 수 있습니다.
입출고 현황
`https://manage.axivox.com <https://manage.axivox.com>`_으로 이동하여 Axivox 관리 콘솔에서부터 시작합니다. 적절한 관리자 자격 증명으로 로그인합니다.
참고
변경 사항을 적용하려면 Axivox 관리 콘솔의 작업을 반드시 중복하여 저장해야 합니다. 변경 사항을 저장하려면 개별 변경 사항 화면에서 저장`을 클릭합니다. 그런 다음 변경 사항을 구현하려면 콘솔 오른쪽 상단에 있는 :guilabel:`변경 사항 적용 버튼을 클릭합니다.
수신 번호
수신 번호는 회사가 전화 수신용으로 비용을 지불하는 번호를 통칭합니다.
Axivox 관리 콘솔의 왼쪽 메뉴에서 및 SMS 정보와 함께 수신 번호 페이지에 표시됩니다.
guilabel:`대상`에 따라 수행되는 작업이나 발신자가 해당 번호로 전화를 걸 때 따르게 되는 경로가 결정됩니다.
대상`을 편집하려면 수정하려는 수신 번호 줄의 맨 오른쪽에 있는 :guilabel:`편집 버튼을 클릭합니다. 그러면 표시되는:guilabel:번호 편집 페이지에서 :guilabel:`음성 통화 대상 유형`을 변경할 수 있습니다.
음성 통화에 대한 대상 유형 드롭다운 메뉴에서 사용할 수 있는 옵션은 다음과 같습니다.
미설정
확장팩
다이얼 요금제
음성 사서함
끊기
컨퍼런스
음성 통화 대상 유형 드롭다운 메뉴에서 선택한 대로 두 번째 선택형 드롭다운 메뉴가 추가 설정 옵션으로 입력됩니다. 또한 음성 통화 대상 유형 드롭다운 메뉴에서 선택한 항목에 따라 더 많은 필드가 표시됩니다.
Once the desired configurations are complete, click Save, then click Apply changes in the upper-right corner to implement them.
신규 사용자
Every employee using VoIP at the company needs an Axivox user account associated with them.
Axivox 관리 콘솔에서 기존 사용자를 보려면 콘솔 왼쪽 메뉴에서 사용자 를 클릭합니다. 모든 사용자에게는 번호, 이름, 음성 사서함 및 발신 번호 가 지정되어 있습니다.
Axivox 콘솔에서 새로운 사용자를 생성하려면, 사용자 추가 를 클릭하면 새 사용자 양식이 표시됩니다. 다음 탭에서 새 사용자를 설정합니다.
일반: 사용자의 내선 번호 외 기본 정보를 설정할 수 있습니다.
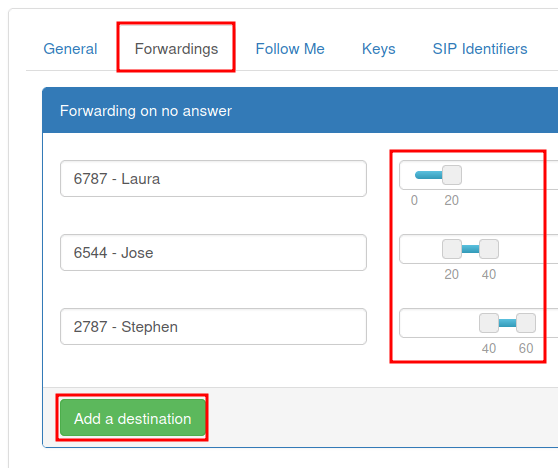
착신 전환: ‘응답 없음’ 또는 통화 중 신호가 있는 경우 내부로 전달합니다.
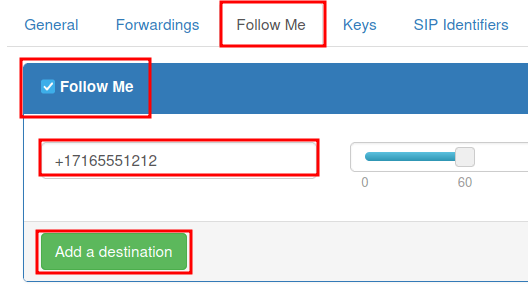
팔로우하기: 외부 전달 환경설정입니다.
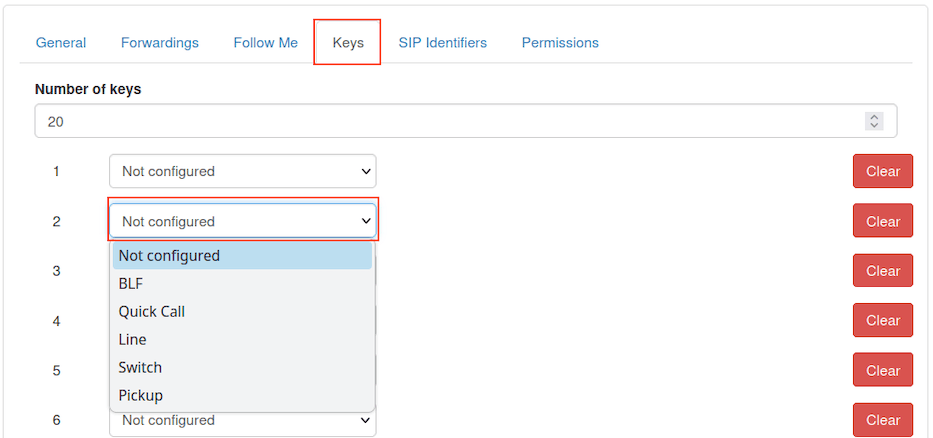
키: VoIP 시스템 내에서 단축키를 설정합니다.
SIP 식별자: 외부 환경설정용 SIP 사용자 이름과 비밀번호입니다.
권한: Axivox 관리 콘솔에서 사용자의 액세스 권한을 설정합니다.
일반 탭
새 사용자 양식의 일반 탭 아래에 있는 확장 필드에 사용자의 고유 확장 번호를 입력합니다. 내부 사용자가 특정 직원에게 연락하기 위해 사용하는 전화번호입니다.
이름 필드에 직원 이름을 입력합니다.
다음으로 사용자의 이메일 주소 필드를 입력합니다. 직원이 사용 중인 이메일을 여기에 추가하며, 업무용 이메일을 수신하는 주소입니다.
In the GSM number field, enter an alternative number at which the user can be reached. Be sure to include the country code.
참고
국가 코드는 원하는 국가의 전화 시스템에 액세스할 수 있는 위치 코드입니다. 국가 코드를 대상 번호보다 먼저 누르게 됩니다. 전 세계 각 국가마다 고유한 국가 코드가 있습니다.
국가 코드에 대한 전체 목록은 https://countrycode.org 에서 확인하세요.
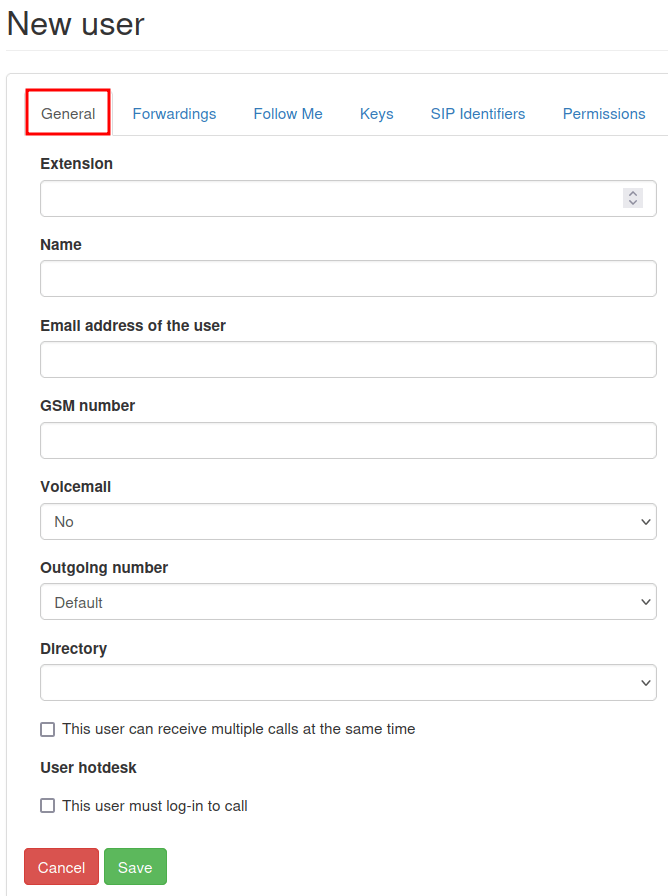
음성 사서함 필드에 있는 드롭다운 메뉴에서 예 또는 아니요 를 선택합니다.
관리자가 디렉토리 필드에서 아무것도 변경하지 않고 비워두거나 드롭다운 메뉴에서 기본값 을 선택할 수 있습니다. 디렉토리 는 다이얼 플랜의 디지털 안내 센터 기능 요소에 사용됩니다.
일반 탭 하단에는 두 개의 별도 옵션으로 선택란이 나타나 있습니다.
첫 번째로 선택할 수 있는 내용은 이 사용자는 여러 회선을 동시에 수신할 수 있습니다 입니다. 이 항목을 선택하면 다른 통화 중일 때 전화를 받을 수 있습니다.
The second option, This user must log-in to call, provides the option to make it mandatory for the user to log in.
참고
실제 VoIP 전화를 책상에 두고 사용하는 회사에서 직원이 사무실에 있는 모든 전화나 책상에서 로그인할 수 있게 하려면 경우 이 사용자는 반드시 로그인해야 통화할 수 있습니다 를 선택합니다. .
원하는 대로 설정을 완료한 후에는 저장 을 클릭하고 오른쪽 상단에 있는 변경 사항 적용 을 클릭합니다.
포워딩 탭
Under the Forwardings tab of the New user form, a company can decide what happens if someone calls a user, and the call is not answered.
중요
팔로우하기 옵션이 활성화되면 착신 전환 기능이 비활성화됩니다.
예를 들어 무응답 시 전달 필드 아래에 대상 추가 버튼을 선택하면 사용자나 전화번호를 추가하는 옵션이 표시됩니다. 대상 을 입력한 후 초 표시 막대 를 벨소리 시간으로 밀면 사긴대를 선택할 수 있습니다.
별도로 대상 을 다른 벨소리 시간으로 추가할 수 있습니다.
참고
벨소리 시간이 시차를 두도록 설정하여 첫 번째 사용자가 전화를 받지 않으면 통화가 다른 사용자에게 전환되도록 할 수 있습니다. 대상자 가 전화를 받지 않을 경우 관리자는 마지막 방법으로 음성 사서함 남기기 옵션을 사용할 수 있습니다.
관리자는 통화 중 착신 전환 필드에서 대상 추가 를 할 수 있습니다. 클릭하면 대상 (사용자) 및 시간대를 설정할 수 있습니다. 원래 사용자의 VoIP 내선 번호 또는 수신 번호가 통화 중인 경우 통화가 대상자에게 착신 전환됩니다.
When the desired configurations are complete, click Save, then click Apply changes in the upper-right corner of the page.
팔로우하기 탭
When the Follow Me option is selected, under the Follow Me tab of the New user form, no can be made.
또한 팔로우하기 옵션을 선택한 경우 대상 추가 버튼을 선택하여 사용자 또는 대상 전화번호를 원래 사용자의 계정에 추가할 수 있습니다. 이렇게 하면 전화가 수신될 때 추가된 번호로 벨이 울리게 됩니다.
대상 을 입력한 후 초 표시 막대 를 벨소리가 울리게 하려는 시간으로 밀어서 시간대를 선택할 수 있습니다. 벨소리가 울리는 시간이 다르게 대상 을 추가할 수도 있습니다.
참고
이 옵션을 선택하면 원래 사용자의 VoIP 번호가 울리지 않습니다. 벨소리 시간에 시차를 둘 수도 있으므로 첫 번째 사용자가 전화를 받지 않으면 다른 사용자에게 통화가 전달됩니다.
중요
Odoo 모바일 앱 또는 다른 SIP 모바일 클라이언트에서 내선 번호 또는 수신 번호 전화벨이 동시에 울리도록 설정할 수 있습니다. 자세한 내용은 VoIP 모바일 통합 문서를 참조하세요.
원하는 대로 설정을 완료한 후에는 저장 을 클릭하고 오른쪽 상단에 있는 변경 사항 적용 을 클릭합니다.
키 탭
Under the Keys tab of the New user form, speed dial actions for the user can be configured. Some more advanced options are available, as well.
다음을 통해 숫자 값 `1-20`으로 설정할 수 있습니다.
다음 작업은 각 번호에 설정할 수 있습니다.
설정되지 않음: 기본값인 작업으로, 설정되어 있는 내용이 없습니다.
BLF (Busy lamp fields): this action shows the status of other users’ phones connected to the Axivox phone system. This is primarily used on a desk-phone.
빠른 통화: 이 작업을 통해 외부 번호로 단축 다이얼 기능을 사용할 수 있습니다.
회선: 이 작업을 통해 다른 사용자에게 전화를 걸 수 있습니다.
전환: 이 작업을 실행하면 데스크폰에서 통화를 전환할 수 있습니다.
전화 받기: 이 작업을 통해 데스크폰에서 걸려온 전화를 받을 수 있습니다.
Once all the desired configurations are complete, click Save, then click Apply changes in the upper-right corner.
중요
이전에 있던 대다수 선택 항목에는 사용자나 외부 전화번호를 연결할 수 있는 보조 선택 항목도 있습니다. 이 항목은 반드시 최초에 작업을 할 때 함께 입력해야 합니다.
참고
guilabel:키 숫자 는 새 사용자 양식의 키 탭 상단에 있는 키 숫자 필드에 숫자를 입력하면 변경할 수 있습니다.
SIP 식별자 탭
SIP 는 세션 시작 프로토콜 전화 (Session Initiation Protocol Telephony)의 약어로, 인터넷 연결을 통해 전화를 걸거나 받을 수 있습니다. 새 사용자 양식의 SIP 식별자 탭에 Odoo 및/또는 다른 SIP 모바일 클라이언트에서 Axivox 사용자를 설정하는 데 필요한 자격 증명이 있습니다.
더 보기
SIP 식별자를 통해 Axivox 환경설정에 대한 문서를 참조하세요.
VoIP 서비스를 Odoo에서 Axivox와 함께 사용 <axivox_config>
Under the SIP Identifiers tab, the SIP username field represents the user’s information that was entered in the Extension field, under the General tab.
도메인 필드를 회사에 할당하는 작업은 Axivox 담당자가 진행합니다.
모든 Axivox 사용자는 각자 고유한 SIP 비밀번호 값이 있습니다. 이 값은 Odoo의 Axivox 및 모든 모바일 SIP 클라이언트에 로그인할 때 사용합니다.
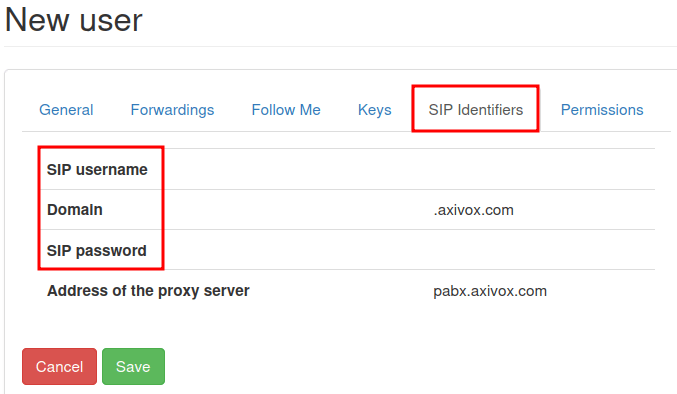
프록시 서버 주소 에 표시되어 있는 값은 일반적으로 pabx.axivox.com`이지만 Axivox에서 변경될 수 있으므로 가장 정확한 값은 :guilabel:`SIP 식별자 탭에서 확인하세요.
Once all desired configurations have been made, click Save, then click Apply changes in the upper-right corner.
허가 탭
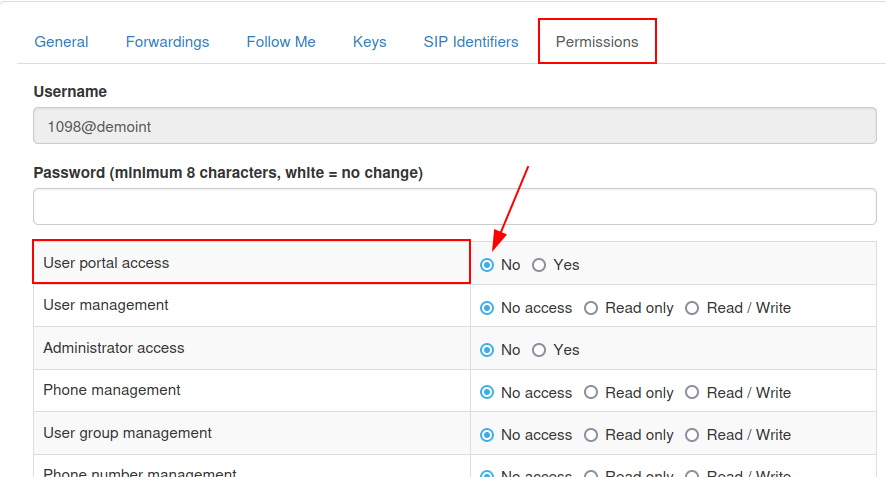
Under the Permissions tab of a New user form, a Username and Password can be entered for the user.
해당 필드 아래에서 Axivox 사용자가 포털애 액세스할 수 있도록 다음과 같이 권한을 부여할 수 있습니다.
사용자 포털 액세스
사용자 관리
관리자 액세스
전화 관리
사용자 그룹 관리
전화 번호 관리
다이얼 요금제 관리
픽업 그룹 관리
착신 관리
회의 관리
대기열 관리
음성 메시지 관리
오디오 메시지 관리
통화 대기 음악 관리
디렉토리 관리
통화 목록
연결된 사용자 목록
전체 설정
변경 사항 적용 버튼
청구서 다운로드
청구서 세부 정보
수신 거부 관리
회의 참가자 관리
Axivox 사용자 포털의 자격 증명에 액세스하려면 탭의 상단으로 이동합니다. 그런 다음 사용자 이름 을 복사한 후 개별 사용자에 대해 비밀번호 를 정확히 입력합니다. 사용자 비밀번호는 최소 8자 이상입니다.
참고
이는 Axivox 관리자에게 부여된 권한과 동일한 것으로 Axivox 관리 콘솔의 왼쪽 메뉴에 표시되어 있습니다. 아니요 또는 :guilabel:`접근 불가`로 선택된 경우에는 메뉴 옵션이 사용자에게 표시되지 않습니다.
Once all the desired configurations are complete, click Save, then click Apply changes in the upper-right corner.
신규 사용자에 대한 설정이 완료되면 수신 번호 를 연결할 수 있습니다.
사용자 그룹
A user group is a grouping of Axivox users that can be linked to a queue for call center capability.
사용자 그룹에 대한 사용을 시작하려면 https://manage.axivox.com 으로 이동하세요.
Then, log in with the appropriate administrator credentials. From the menu on the left of the Axivox administrative panel, click into User Groups.
사용자 그룹 페이지에 있는 사용자 그룹을 추가하려면 그룹 추가 를 클릭합니다.
다음으로 이름 에 텍스트를 입력하여 그룹명을 지정합니다. 그 다음 구성원 에 사용자 이름에 있는 처음 몇 글자를 입력하여 그룹에 구성원을 추가합니다. 필드 아래의 드롭다운 메뉴에 사용자가 입력됩니다. 그런 다음 원하는 사용자를 클릭하면 사용자 그룹에 추가됩니다.
그룹에 사용자를 추가하려면 이 과정을 반복합니다.
원하는 대로 설정을 완료한 후에는 저장 을 클릭하고 오른쪽 상단에 있는 변경 사항 적용 을 클릭합니다.