インド
インストール
以下のモジュールを :ref:`インストール <general/install>して、インドローカライゼーションの全ての機能を手に入れて下さい:
名称 |
技術名 |
説明 |
|---|---|---|
インド - 会計 |
|
デフォルト 会計ローカライゼーションパッケージ |
インド電子請求 |
|
|
インド E-waybill |
|
|
Indian E-waybill Stock |
|
|
Indian - Check GST Number Status |
|
|
インド - GSTR インド 電子申告 |
|
|
インド - 会計レポート |
|

GSP configuration
To use the e-Invoicing, E-Way bill, and GST return filing services in Odoo, configure BVM IT Consulting Services India Private Limited as the GSP. To do so, follow these steps :
Upgrade the Indian - Accounting (
l10n_in) module.Go to .
Scroll down to the Select GSP Provider section, and set the GSP field to BVM IT Consulting.
Log into the NIC e-invoice portal and NIC E-Way bill portal and create a new API user for each.
Go to , scroll down to the Indian Integration section, and enter the new Username and Password for the e-Invoicing and E-Way bill features.
Indian Configuration
In , add your PAN and GSTIN. The PAN is essential for determining the type of taxpayer, while GSTIN is required for generating e-Invoices and E-waybills.
電子請求書システム
Odooは**インド物品サービス税 (GST)電子請求システム**の要件に準拠しています。
セットアップ
NIC電子請求登録
**API認証情報**を取得するために :abbr:`NIC (National Informatics Centre)`電子請求ポータルに登録する必要があります。これらの認証情報は :ref:`Odoo会計アプリ<india/e-invoicing-configuration>`の設定に必要です。
:guilabel:`ログイン`をクリックし、:guilabel:`ユーザ名`と:guilabel:`パスワード`を入力して、`NIC電子請求ポータル<https://einvoice1.gst.gov.in/>`_にログインします;
注釈
すでにNICポータルに登録されている場合は、同じログイン情報を使用できます。

ダッシュボードから に進みます;
その後、登録した携帯電話番号に OTP コードが届きます。OTPコードを入力し、:guilabel:`OTPを検証`をクリックして下さい;
Select Through GSP for the API interface, set BVM IT Consulting Services India Private Limited as GSP, and type in a Username and Password for your API. Once it is done, click Submit.

Odooでの設定
Odooで電子請求書サービスを有効にするには、 に進み、APIに設定した ユーザ名 と パスワード を入力します。

Additionally, make sure the GSP field is configured in the Accounting settings.
仕訳帳
NIC電子請求書ポータルに電子請求書を自動的に送信するには、まず*販売*仕訳帳を設定する必要があります。 にアクセスして*販売*仕訳帳を開き、 詳細設定 タブの 電子データ交換 の下にある 電子請求(IN) を有効にして保存します。
ワークフロー
請求書検証
顧客請求書が検証済になると、上部に確認メッセージが表示されます。検証済の請求書のJSON署名ファイルは、しばらくするとOdooが自動的にNIC電子請求ポータルにアップロードします。顧客請求書をすぐに処理したい場合は、:guilabel:`今すぐ処理`をクリックして下さい。

注釈
JSON署名ファイルはチャターの添付ファイルにあります。
ドキュメントの EDI ステータスは EDIドキュメント タブまたは顧客請求書の 電子請求 フィールドで確認できます。
請求書PDFレポート
検証済の請求書が送信されると、請求書PDFレポートを印刷することができます。レポートには IRN、Ack. No (確認番号)、 :guilabel:`Ack. Date`(確認日)、QRコード。これらは顧客請求書が検証済のドキュメントであることを証明するものです。

電子請求取消
顧客請求書を取消したい場合は、請求書の その他情報 タブに行き、 取消理由 と 取消コメント フィールドを入力して下さい。そして EDI 取消要求 をクリックします。guilabel:電子請求`フィールドのステータスが :guilabel:`取消 に変わります。
重要
これにより、 電子請求書 と E-Way bill の両方が取消されます。

Management of negative lines in e-Invoices
Negative lines are typically used to represent discounts or adjustments associated with specific products or global discounts. The government portal prohibits the submission of data with negative lines, which means they need to be converted based on the HSN code and GST rate. This is done automatically by Odoo.
Example
Consider the following example:
Product Details |
|||||
|---|---|---|---|---|---|
Product Name |
HSN Code |
Tax Excluded |
Quantity |
GST Rate |
Total |
プロダクトA |
123456 |
1,000 |
1 |
18% |
1,180 |
プロダクトB |
239345 |
1,500 |
2 |
5% |
3,150 |
Discount on Product A |
123456 |
-100 |
1 |
18% |
-118 |
Here's the transformed representation:
Product Details |
||||||
|---|---|---|---|---|---|---|
Product Name |
HSN Code |
Tax Excluded |
Quantity |
Discount |
GST Rate |
Total |
プロダクトA |
123456 |
1,000 |
1 |
100 |
18% |
1,062 |
プロダクトB |
239345 |
1,500 |
2 |
0 |
5% |
3,150 |
In this conversion, negative lines have been transformed into positive discounts, maintaining accurate calculations based on the HSN Code and GST rate. This ensures a more straightforward and standardized representation in the E-invoice records.
GST電子請求検証
顧客請求書を提出した後、GST電子請求システムのウェブサイトから顧客請求書に署名されているかどうかを確認することができます。
添付ファイルからJSONファイルをダウンロードして下さい。関連する顧客請求書のチャターにあります;
NIC電子請求ポータル を開き、 に移動します;
JSONファイルを選択し、送信します;

ファイルが署名されると、確認メッセージが表示されます。

E-Way bill
セットアップ
Odooは**インド商品およびサービス税 (GST) E-waybillシステム**の要件に準拠しています。
NIC E-Way billでのAPI登録
**API認証情報**を作成するには、 NIC 電子請求書ポータルに登録する必要があります。これらの認証情報は :ref:`Odoo会計アプリ<india/e-waybill-configuration>`の設定に必要です。
:guilabel:`ログイン`をクリックし、:guilabel:`ユーザ名`と:guilabel:`パスワード`を入力して`NIC E-Way仕入先請求書ポータル<https://ewaybillgst.gov.in/>`_にログインします;
ダッシュボードから に進みます;
OTPを送信`をクリックします。登録した携帯電話番号にコードが届いたら、それを入力して :guilabel:`OTPを検証 をクリックします;
Check if BVM IT Consulting Services India Private Limited is already on the registered GSP/ERP list. If so, use the username and password used to log in to the NIC portal. Otherwise, follow the next step.

Select Add/New, select BVM IT Consulting Services India Private Limited as your GSP Name, create a Username and a Password for your API, and click Add.

Odooでの設定
E-Way billサービスを設定するには、 と パスワード を入力して下さい。

Additionally, make sure the GSP field is configured in the Accounting settings.
ワークフロー
E-Way billを送信
To send an E-Way bill, confirm the customer invoice/vendor bill and click Send E-Way bill.

請求書検証
Once an invoice/bill has been issued and sent via Send E-Way bill, a confirmation message is displayed.

注釈
JSON署名ファイルはチャターの添付ファイルにあります。
Odoo automatically uploads the JSON-signed file to the government portal after some time. Click Process now if you want to process the invoice/bill immediately.
請求書PDFレポート
E-Way billを提出すると、顧客請求書PDFレポートを印刷することができます。レポートには**E-Way bill番号**と**E-Way bill 有効期限日付**が含まれます。

E-Way bill取消
If you want to cancel an E-Way bill, go to the E-Way bill tab of the related invoice/bill and fill out the Cancel reason and Cancel remarks fields. Then, click Request EDI Cancellation.
重要
これにより、電子顧客請求書 (該当する場合)と E-Way bill の両方が取消されます。

E-waybill creation from receipts and delivery orders
注釈
Make sure the E-Way bill Stock module is installed and the E-Way bill setup is complete.
To create E-Way bills from receipts and deliveries in the Inventory app, follow these steps:
Go to or and select an existing delivery order/receipt or create a new one.
Click Create E-waybill/Challan.
注釈
To create an E-way bill:
A delivery order must be in the Done state (i.e., validated)
A receipt must have the Ready or Done state.
Click Generate e-Waybill to validate the E-Way bill and send it to the NIC E-Way bill portal.
ちなみに
To use the E-Way bill as a challan for goods deliveries without sending it to the NIC E-Waybill portal, click Use as Challan.
To print the E-waybill or the challan, click the (gear) icon and select Ewaybill / Delivery Challan.
Indian Check GSTIN Status
The Indian - Check GST Number Status module allows you to verify the status of a GSTIN directly from Odoo.
To verify the status of a contact's GST number, access the customer's/vendor's form and click Check GSTIN Status next to the GSTIN field.
To verify the status of a GST number entered on an invoice/bill, access the invoice/bill and click the (refresh) button next to the GST Status field.

A notification is displayed to confirm the status update and the GSTIN status and verification date are logged in the contact's chatter.
インドGST申告
APIアクセスを有効にする
OdooでGST申告を行うには、まずGSTポータルでAPIアクセスを有効にする必要があります。
ユーザ名 と:guilabel:
パスワードを入力して `GSTポータル<https://services.gst.gov.in/services/login>`_ にログインし、プロフィールメニュー の:guilabel:`マイプロフィール`にアクセスして下さい;
APIアクセス管理 を選択し、APIアクセスを有効にするために はい をクリックします;

注釈
It is recommended to set the Duration to 30 days to avoid the need for frequent token reauthentication.
そうすると 期間 ドロップダウンメニューが表示されます。お好みの 期間 を選択し、確認 をクリックします。
OdooでのインドGSTサービス
GSTポータルで APIアクセス を有効にすると、Odooで インドGSTサービス を設定することができます。
:menuselection:`会計 --> 設定 --> 管理設定 --> インドGSTサービス`に進み、 :guilabel:`GST ユーザ名`を入力します。guilabel:`OTPを送信`をクリックしてコードを入力し、最後に:guilabel:`検証`をクリックします。

Additionally, make sure the GSP field is configured in the Accounting settings.
GST申告記入
:guilabel:`インドGSTサービス`が設定されると、GST申告を行うことができます。:menuselection:`会計 --> レポーティング --> インド --> GST申告期間`に移動し、**GST 申告期間**が存在しない場合は新規作成します。GST申告はOdooでは**3つのステップ**で行います:
注釈
**税務申告期間**はユーザのニーズに応じて<../accounting/reporting/tax_returns>`に設定することができます。
GSTR-1を送信する
Click GSTR-1 Report to verify the GSTR-1 report before uploading it to the GST portal.

注釈
The system performs basic validations to ensure compliance with the GST portal's requirements. Possible issues include:
Incorrect Tax Application: The tax type does not match the Fiscal Position (CGST/SGST applied instead of IGST for interstate transactions, or IGST applied instead of CGST/SGST for intrastate transactions).
Missing HSN Code: No HSN Code is defined for the product.
Invalid HSN Code for Services: The HSN Code for a service does not start with "99" or is incorrect.
Non-compliant UQC: The Unit Quantity Code (UQC) does not meet Indian GST standards.
If any validation fails, the system alerts users with a warning, highlighting the discrepancies and providing a direct link to the affected lines.

Click Generate to view the report in Spreadsheet view.


If the GSTR-1 report is correct, then click Push to GSTN to send it to the GST portal. The status of the GSTR-1 report changes to Sending.

数秒後、**GSTR-1**レポートのステータスが ステータス待機 に変わります。これは、**GSTR-1**レポートが GSTポータル に送信され、 GSTポータル で検証中であることを意味します;

さらに数秒後、ステータスが 送信 または 顧客請求書エラー に変わります。ステータスが 顧客請求書エラー の場合は、**GSTポータル**で検証済の請求書の一部が正しく記入されていないことを示しています;
**GSTポータル**で**GSTR-1**レポートを提出した後、提出済としてマーク`をクリックして下さい。報告書のステータスが**Odoo**の :guilabel:`提出済 に変わります。


GSTR-2B受信
ユーザは**GSTポータル**から**GSTR-2Bレポート**を取得することができます。これにより、**GSTR-2B**レポートとOdooの仕入先請求書が自動的に消込されます;
GSTR-2B概要を取得`をクリックすると、**GSTR-2B**概要が取得されます。数秒後、レポートのステータスが :guilabel:`受信待ち に変わります。これはOdooが**GSTポータル**から**GSTR-2B**レポートを受信しようとしていることを意味します;

さらに、数秒後、**GSTR-2B**のステータスが 処理中 に変わります。これはOdooが**GSTR-2B**レポートと仕入先請求書を消込していることを意味します;

それが完了すると、**GSTR-2B**レポートのステータスは 一致 または 部分一致 のいずれかに変わります;
ステータスが 照合済 の場合:

If the status is Partially Matched, you can review and modify the bills by clicking View Reconciled Bills. This will display categorized discrepancies, such as bills missing in Odoo or GSTR-2. After making the necessary corrections, click re-match to update the reconciliation and ensure accuracy before finalizing the report.

GSTR-3レポート
GSTR-3 レポートは、**販売**と**購買**の月次概要です。このレポートは**GSTR-1**と**GSTR-2**から情報を抽出して自動生成されます。
ユーザは、:guilabel:`GSTR-3レポート`をクリックすることで、**GSTR-3**レポートを**GSTポータル**で利用可能な**GSTR-3**レポートと比較し、一致するかどうかを確認することができます;
ユーザが GSTR-3 レポートを検証した後、GSTポータル で税額納付を完了します。税額納付が完了したら、:guilabel:`締め仕訳`をクリックしてレポートを 終了 することができます。

guilabel:
締め仕訳に、GSTポータル でChallanを使用して支払った税額を追加し、 記帳 をクリックして 締め仕訳 を記帳します;
記帳済になると、**GSTR-3**レポートのステータスは 提出済 に変わります。

税レポート
GSTR-1レポート
GSTR-1`レポートはセクションに分かれています。各セクションの :guilabel:`基本 金額、 CGST、 SGST、 IGST、 CESS が表示されます。

GSTR-3レポート
The GSTR-3 report contains different sections:

Profit and Loss (IN) report
This is a Profit and Loss report that displays the balances for Opening Stock and Closing Stock. It helps users using Continental accounting to accurately determine the cost of goods (i.e Opening Stock + purchases during the period - Closing Stock).

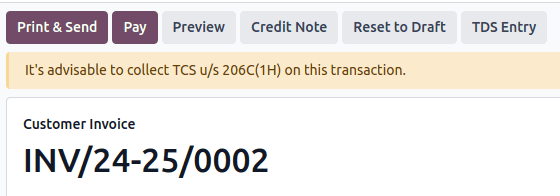
TDS/TCS threshold alert
TDS and TCS are tax provisions under Indian law, triggered when transaction amounts exceed specified thresholds. This alert notifies users when the value of invoices or bills surpasses these limits, prompting the application of the appropriate TDS/TCS.
To configure Odoo to advise you on when to apply TDS/TCS, set the TDS/TCS section field on the corresponding account in the chart of accounts. Odoo will display a banner suggesting the TDS/TCS section under which tax might be applicable when recording an invoice or bill.
設定
Navigate to .
In the Indian Integration section, enable the TDS and TCS feature.
Navigate to .
Click View on the desired account, and set the TDS/TCS Section field.
注釈
The TDS/TCS sections are pre-configured with threshold limits. If you need to modify these limits, go to . In the Advanced Options tab, click on the (internal link) icon of the Section field.

Applying TCS/TDS on invoices and bills
Based on the account used on the customer invoice or vendor bill, Odoo checks the TCS/TDS threshold limit. If the limit specified in the TCS/TDS Section of the account is exceeded, Odoo displays an alert that suggests applying the appropriate TCS/TDS. The alert will disappear once the TCS/TDS is applied.
TCS is directly applicable in the tax on the invoice lines. To apply TDS, click the TDS Entry smart button on the vendor bill/payment. The popup window allows specifying the TDS details. Confirm the entry to apply the TDS.

In Odoo, the aggregate total is calculated for partners sharing the same PAN number, across all company branches.
Example
Branch |
Customer |
Invoice |
Transaction Amount (₹) |
PAN Number |
|---|---|---|---|---|
IN - MH |
XYZ Enterprise - GJ |
請求書 1 |
₹50,000 |
ABCPX1234E |
IN - MH |
XYZ Enterprise - GJ |
請求書 2 |
₹30,000 |
ABCPX1234E |
IN - MH |
XYZ Enterprise - MH |
請求書 3 |
₹40,000 |
ABCPX1234E |
IN - DL |
XYZ Enterprise - GJ |
Invoice 4 |
₹20,000 |
ABCPX1234E |
IN - GJ |
XYZ Enterprise - MH |
Invoice 5 |
₹60,000 |
ABCPX1234E |
Aggregate total = 50,000 + 30,000 + 40,000 + 20,000 + 60,000 = ₹200,000
The aggregate total for all customers (XYZ Enterprise - GJ, MH, DL) sharing the PAN number ABCPX1234E across all branches is ₹200,000.