Trasee de eveniment
Odoo Events oferă posibilitatea de a crea, programa și gestiona prezentări, conferințe, demonstrații, ateliere etc., denumite Tracks în Odoo.
Aplicația Odoo Events oferă și opțiunea ca participanții la eveniment să poată propune prezentări (tracks) pentru un eveniment, care pot fi apoi aprobate sau respinse.
Configurare
Mai întâi, trebuie activate câteva setări pentru a beneficia la maximum de funcționalitatea de tracks pentru evenimente.
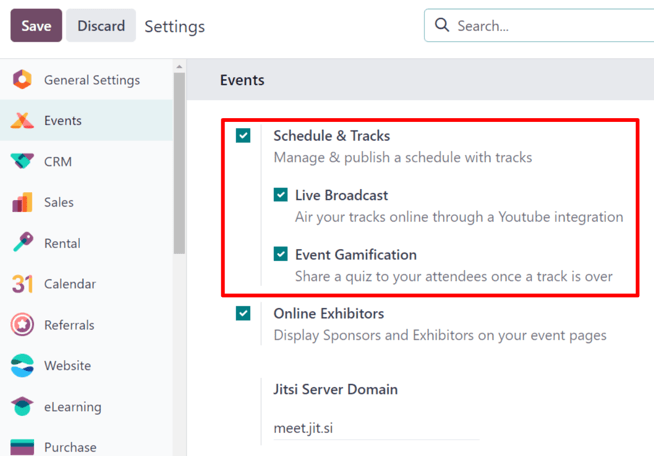
Pentru aceasta, accesează și bifează opțiunea Schedule & Tracks. Astfel vei putea gestiona și publica un program de eveniment cu diverse tracks.
De asemenea, când această opțiune este bifată, apar două setări suplimentare: Live Broadcast și Event Gamification.

Opțiunea Live Broadcast permite transmiterea online a prezentărilor (tracks) prin integrare cu YouTube.
Opțiunea Event Gamification permite partajarea unui chestionar cu participanții la track după finalizarea acestuia, pentru a testa cât de mult au învățat.
Notă
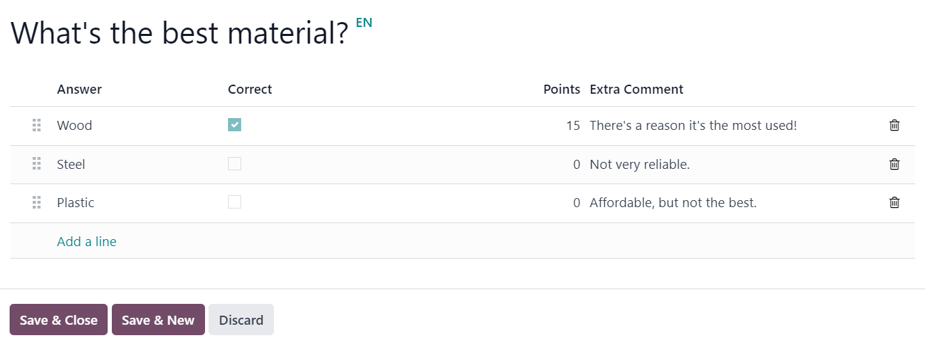
Când setarea Event Gamification este activată, pe formularele de track apare butonul Add Quiz, care permite crearea rapidă a unui chestionar specific subiectului acelui track.
După ce ai activat toate setările dorite, nu uita să apeși butonul Save din colțul stânga sus al paginii Settings.
Pagina Event Tracks
Pentru a accesa, modifica sau crea tracks pentru un eveniment, navighează mai întâi la un eveniment preconfigurat sau creează unul nou din aplicația Events.
Pentru aceasta, accesează și selectează un eveniment existent din tabloul de bord Events sau creează unul nou apăsând pe New.
Odată ajuns pe formularul evenimentului dorit, apasă pe butonul inteligent Tracks din partea de sus a formularului.
Sfat
Dacă butonul inteligent Tracks nu este vizibil, apasă pe meniul derulant More pentru a afișa butoanele ascunse. Apoi selectează Tracks din meniul rezultat.
Apăsând pe butonul inteligent Tracks se deschide pagina Event Tracks pentru acel eveniment, unde sunt afișate toate tracks-urile (programate și propuse), dacă există.

Tracks-urile sunt afișate implicit în vizualizarea (Kanban), dar există și opțiunea de a le vizualiza ca (List), (Gantt), (Calendar), (Graph) sau (Activity). Toate aceste opțiuni sunt accesibile în colțul din dreapta sus al paginii Tracks.
În vizualizarea implicită (Kanban), tracks-urile sunt împărțite pe etape. Etapele implicite sunt: Proposal, Confirmed, Announced, Published, Refused (etapă restrânsă) și Cancelled (etapă restrânsă). Toate pot fi editate, dacă este nevoie.
Sfat
Pentru a edita o etapă, poziționează cursorul peste numele etapei, apasă pe pictograma (Settings) și selectează Edit din meniul derulant.
Dacă accesezi un track din pagina Event Tracks, se va deschide formularul acelui track.
Creează track de eveniment
Din pagina Event Tracks, apasă pe New în colțul stânga sus pentru a deschide un formular gol de track de eveniment.

Începe prin a da acestui track un Title. Acest câmp este obligatoriu în Odoo.
Apoi, dacă dorești, adaugă o imagine pentru track folosind pictograma (pencil) care apare când cursorul este deasupra pictogramei (camera) din colțul dreapta sus al formularului. După ce faci clic, poți încărca imaginea dorită pentru track. Aceasta va apărea pe site-ul evenimentului, pe pagina dedicată acestui track.
În continuare, introdu o Track Date și ora pentru track și stabilește o Location unde va avea loc prezentarea.
Sfat
Pentru a accesa lista completă de locații pentru tracks, care poate fi modificată sau completată oricând, mergi la .
Apoi, adaugă o Duration pentru track (în minute).
Dacă setarea Live Broadcast este activată în setările aplicației Events, va fi disponibilă opțiunea de a adăuga un link corespunzător în câmpul YouTube Video Link.
Dacă bifezi opțiunea Always Wishlisted, prezentarea va fi setată automat ca favorită pentru fiecare participant înregistrat la eveniment.
Atribuie o persoană responsabilă de gestionarea acestui track în câmpul Responsible. Implicit, este selectată persoana care a creat track-ul.
Apoi, asigură-te că track-ul este asociat cu evenimentul corect în câmpul Event. Implicit, acest câmp este completat automat cu evenimentul de pe pagina Event Tracks de unde a fost creat track-ul.
Apoi, poți adăuga taguri existente sau crea unele noi pentru a organiza mai bine track-ul. Aceste taguri și categoriile lor sunt folosite pe site-ul evenimentului, în special pe pagina Talks, prin meniurile derulante de filtrare.
Sub secțiunea de informații generale există trei taburi: Speaker, Description și Interactivity.
Tabul Speaker
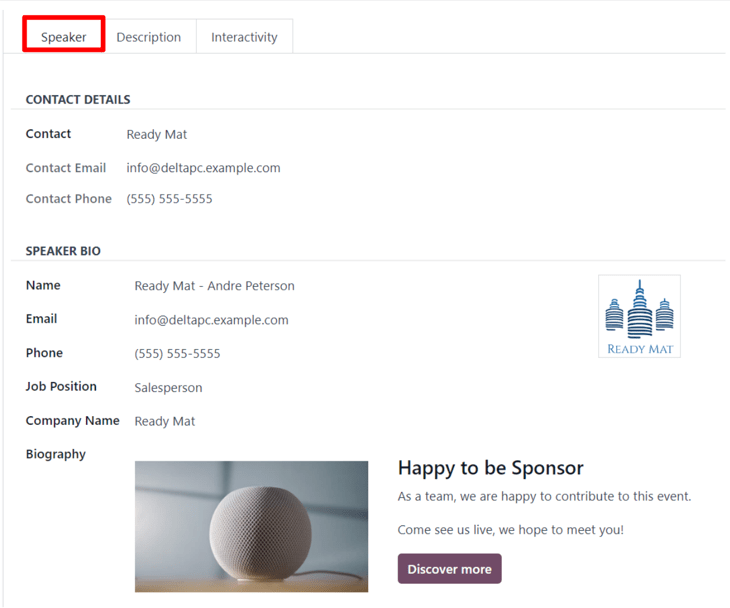
Tabul Speaker din formularul unui track de eveniment conține diverse câmpuri legate de speakerul care va susține track-ul.

Secțiunea Contact Details
În secțiunea Contact Details, folosește câmpul derulant Contact pentru a selecta un contact existent din baza de date ca punct principal de contact pentru prezentare.
Dacă acest contact nu există încă în baza de date, introdu numele contactului și apasă pe Create pentru a crea și edita ulterior formularul de contact sau pe Create and edit… pentru a fi direcționat direct către formularul noului contact, unde poți completa restul informațiilor relevante.
Câmpurile Contact Email și Contact Phone sunt inactive și completate automat cu informațiile din formularul de contact selectat. Aceste câmpuri nu pot fi modificate după selectarea contactului.
Secțiunea Speaker Bio
În secțiunea Speaker Bio, introdu informații despre speakerul programat să susțină track-ul. Această secțiune se poate completa automat pe baza contactului selectat la Contact Details. Dacă nu, completează manual câmpurile necesare.
Notă
Această informație va apărea pe site-ul evenimentului, pe pagina track-ului, oferind participanților detalii suplimentare despre speaker.
Începe prin a introduce Name, Email și numărul de Phone pentru speaker.
Apoi, dacă dorești, adaugă o imagine care să apară lângă biografia speakerului pe site-ul evenimentului, folosind pictograma (pencil) care apare când cursorul este deasupra pictogramei (camera). După ce faci clic, poți încărca imaginea dorită pentru speaker.
Apoi, introdu Job Position pentru speakerul desemnat, urmat de Company Name asociat acestuia.
În câmpul Biography, introdu o biografie personalizată cu orice informații relevante despre speaker.
Fila descriere
Tabul Description din formularul unui track de eveniment este un câmp text gol, unde poți introduce o descriere a track-ului. Informațiile introduse aici vor apărea pe pagina dedicată track-ului de pe site-ul evenimentului.
Tabul Interactivity
Tabul Interactivity din formularul unui track de eveniment conține inițial o singură opțiune: Magic Button.

Când bifezi opțiunea Magic Button, Odoo afișează un buton call to action pentru participanți în bara laterală a track-ului, pe durata desfășurării acestuia.
Odată bifată această opțiune, apar încă trei setări, toate legate de Magic Button:
Button Title: introdu un titlu care va apărea pe buton pentru participanți.
Button Target URL: introdu un URL care va duce participanții, atunci când apasă butonul, către o anumită pagină.
Show Button: introdu o valoare numerică, iar butonul va apărea la acel număr de minute după începerea track-ului.
Notă
Butonul magic apare doar dacă există mai mult de un track publicat.
Publică track-ul de eveniment
După ce ai finalizat toate configurările dorite pe formularul track-ului, selectează etapa dorită din bara de stare din colțul dreapta sus (de exemplu Confirmed, Announced etc.).
Notă
Etapa unui track poate fi schimbată și din pagina Event Tracks, unde cardul track-ului dorit poate fi tras și plasat în etapa Kanban corespunzătoare.
Dacă un track de eveniment nu a fost încă publicat și este mutat în etapa Published, Odoo îl publică automat pe site-ul evenimentului.
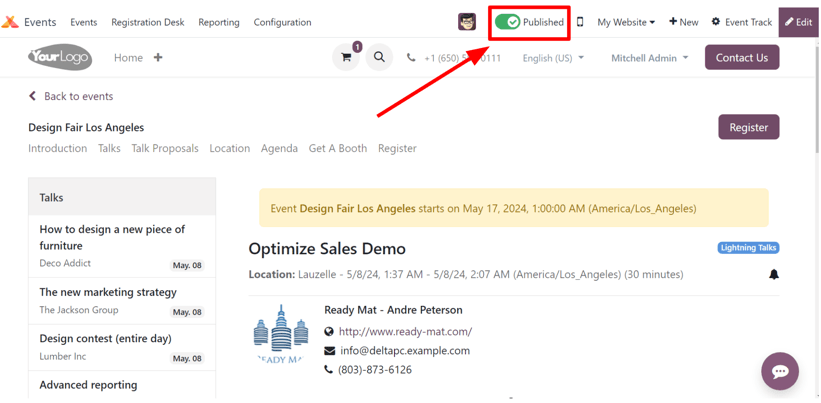
Un track de eveniment poate fi publicat și prin deschiderea formularului track-ului dorit și apăsarea butonului inteligent Go to Website. Pentru ca pagina track-ului să fie vizibilă și accesibilă participanților, comută butonul Unpublished din partea de sus a paginii pe Published, astfel încât să devină verde și să fie accesibilă participanților.


