Product management
Odoo allows you to create, import, and manage your products” pages all within the Website app.
Add products to the catalog
To add a product to your catalog, you can either do it in:
From anywhere on your website, click . Enter the name of your product, and Save;
;
or by importing data using XLSX or CSV files. To do so, go to . Click on Favorites and Import records.
Pubblicata
Upon creation, products are defaulted as Unpublished in your eCommerce catalog. To make a product visible to visitors, go to , click on your main shop page, select the product, and enable it as Published in the top-right corner.
Suggerimento
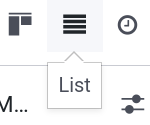
To publish large batches of products, the most convenient fashion is to go to . Here, remove the Published filter by clicking on the x right to it, and then select the List view. Next, click the dropdown toggle button (located right below the List button) and enable Is published. Click the Is Published column to re-order it either by published or unpublished products. Finally, select the products to publish by ticking their box on the extreme-right, and tick any box of the selected products in the Is Published column to publish them all.
Product page design
Once a product is created, you can access its product page through the Shop page by clicking on the product, and then clicking Edit. Here, you can change the page’s additional functions, layout, add content, etc. Note that enabled functions apply to all product pages.
Additional functions
In the website builder window, click Customize to enable additional functions:
Customers: Rating allows customers to submit product reviews; Share adds social media and email icon buttons to share the product via those channels;
Select Quantity: if enabled, allows to choose the quantity added to cart;
Tax Indication: notifies if the price is VAT included or excluded;
Variants: shows all possible variants of the product as a Products List; Options as selectable options to compose the variant yourself;
Cart: Buy Now adds a checkout button taking the customer directly to the checkout page; Wishlist allows to add the product to a wishlist;
Specification: allows you to select where the Specifications section is displayed. This option displays a list of all variant attributes and values of a product, but only works for products with variants.
Nota
To allow wishlists, the option must be enabled in ;
To access the Variants options, the Product Variants option must first be enabled under .
Struttura
Within the same Customize tab as the functions, the layout configuration can be changed according to your needs.
Images Width: changes the width of the product images displayed on the page;
Layout: the Carousel layout displays a large, main image with smaller ones underneath; whereas the Grid displays four images in a square layout (see pictures below);
Image Zoom: choose which image zooms are available, either Pop-up on Click, when hovering over the image (Magnifier on hover), on Both, or None;
Thumbnails: decide how the thumbnails should be aligned, either vertically (Left), or horizontally (Right);
Main Image: click Replace to change the product’s main image;
Extra Images: click Add or Remove all to add or remove extra product images. You can also add images and videos via URL.
Nota
Images must either be in PNG or JPG format. To trigger the zoom, the image has to be bigger than 1024x1024.

Add content
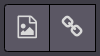
You can use building blocks () to add content to your product page. These blocks can be used to add extra text and picture galleries, features such as Call to Actions, Comparisons, etc.
Depending on where you drop the building block, it may be available either on the product page only, or on the whole website. Building blocks dropped at the very top or very bottom of the page are available on the whole website, where building blocks put underneath the product description are only displayed on the product page (see image below).
Download link
To add a downloadable file (ex.: user’s manual, notice of use, etc.) on the product page, drag and drop a Text block from on the page. Once placed, click within the Text block, and under the Inline Text section, select either or Insert or edit link and enter the URL in the Your URL field.
Nota
The difference with digital files is that digital files can only be downloaded after checkout.
Digital files
Should your product be sold with a certificate, manual user, or any other relevant document, it is possible to add a download link for customers at the end of the checkout. To do that, first enable Digital Content under . Then, on the product’s template, click on and Create a new file.
For the configuration:
Name: the name of your file;
Type: select if it is either a file or a URL. Accordingly, you either have a File Content (base64) field to upload your file, or a URL field to enter your URL.
Website: the website on which that file is available. If you want it available for all websites, leave it empty.
The file is then available after checkout in the purchase order section found on the customer’s portal.
Configurazione prodotto
Multiple languages
If multiple languages are available on your website and you wish to have the product’s information translated, it is necessary to encode this translated information in the product’s template. Fields with multiple languages available are identifiable by their abbreviation language (ex. EN) next to their field.

The eCommerce-related fields to translate are:
Product name;
Out-of-Stock Message (under the Sales tab);
Sales Description (under the Sales tab);
Nota
Having untranslated content on a web page may be detrimental to the user experience and SEO.
Nota
To check the language(s) of your website, go to .
Vedi anche
Website availability
A product can be set available on either one or all websites, but it is not possible to select some websites and not others. To define a product’s availability, go to , select your product, and in the Sales tab, click the Website you wish the product to be available on. Leave the field empty for the products to be available on all websites.
Stock management
Under the , you can enable and configure inventory management options.
Importante
To display the stock level on the product page, the Product Type on the product’s form must be set to Storable (only available when the Inventory app is installed).
Magazzino
In the Inventory Defaults sub-section, you can select the eCommerce selling strategy of products:
Warehouse: if you have multiple warehouses, you can define the warehouse associated to your website. If you have multiple websites, you can select a different one per website;
Out-of-Stock (Continue Selling): enabling it allows customers to continue placing orders even when the product is out-of-stock. Leave it unchecked to prevent orders;
Show Available Qty: enabling it displays the available quantity left under a specified threshold on the product page. The available quantity is calculated based on the “On hand” quantity minus the quantity already reserved for outgoing transfers.
Vedi anche
Selling as kit
If you are selling non-prepackaged kits (i.e., the kits are made of individual products), we recommend you read the related documentation to keep track of your stock.
Vedi anche
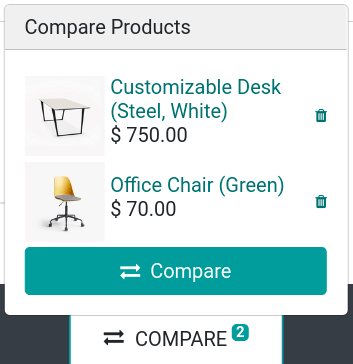
Product comparison
You can enable a product comparison tool for your eCommerce by going to , and ticking Product Comparison Tool. This tool allows to save products” specifications and compare them against each other on a single page.
On the product page, scroll down to the Specifications section and click Compare. Repeat the same process for all products you wish to compare. Then, click the Compare button of the pop-up window at the bottom of the page to reach the comparison summary.
Nota
The Product Comparison Tool can only be used if attributes are set on the product’s template.