การรับสมัคร
Odoo จัดระเบียบผู้สมัครงานทั้งหมดด้วยชุดขั้นตอนและระยะที่กำหนดไว้ล่วงหน้าที่ผู้สมัครแต่ละคนผ่าน แต่ละระยะมีขั้นตอนเฉพาะที่ควรดำเนินการ เช่น การกำหนดเวลาโทรศัพท์ การสัมภาษณ์ หรือการส่งข้อเสนองาน กระบวนการนี้เรียกว่า กระบวนการผู้สมัคร
เมื่อผู้สมัครสมัครงานในตำแหน่งงาน บัตรผู้สมัคร จะถูกสร้างขึ้นโดยอัตโนมัติในแอป**การรับสมัคร**ของ Odoo สำหรับตำแหน่งงานนั้นโดยเฉพาะ เมื่อผู้สมัครดำเนินไปตามขั้นตอนการรับสมัคร ทีมรับสมัครจะย้ายบัตรของพวกเขาจากระยะหนึ่งไปยังระยะถัดไป
ขั้นตอนสามารถกำหนดค่าได้ เพื่อให้ส่งอีเมลออกโดยอัตโนมัติโดยใช้เทมเพลตที่ตั้งค่าไว้ล่วงหน้าทันทีที่การ์ดของผู้สมัครเข้าสู่ขั้นตอน อีเมลอัตโนมัติเหล่านี้จะถูกกำหนดไว้ในแต่ละขั้นตอนของขั้นตอนผู้สมัคร
ขั้นตอนที่อธิบายในเอกสารนี้เป็นการกำหนดค่าเริ่มต้นของ Odoo แต่สามารถปรับแต่งให้เหมาะสมกับกระบวนการรับสมัครใดๆ ก็ได้
Note
ขั้นตอนจะใช้กับตำแหน่งงานทั้งหมดเว้นแต่จะ ทำเครื่องหมายว่าเฉพาะงาน การเปลี่ยนแปลงขั้นตอน (เช่น การเพิ่ม การลบ) จะส่งผลต่อตำแหน่งทั้งหมดเว้นแต่จะกำหนดขอบเขตไว้อย่างชัดเจน
การตั้งค่า
ก่อนสร้างตำแหน่งงานใน Odoo ให้กำหนดค่าที่จำเป็นสำหรับแอป การรับสมัคร เพื่อดูและแก้ไขการตั้งค่า ให้ไปที่ หลังจากทำการเปลี่ยนแปลงใดๆ ให้คลิกปุ่ม บันทึก ที่มุมบนซ้ายเพื่อบันทึกการเปลี่ยนแปลงทั้งหมด
กระบวนการ
ส่วน กระบวนการ ของหน้าการตั้งค่าจะระบุว่าฐานข้อมูลสามารถและไม่สามารถทำอะไรได้ในระหว่างกระบวนการรับสมัคร
ส่งแบบสอบถามการสัมภาษณ์
Odoo สามารถส่งแบบสอบถามไปยังผู้สมัครเพื่อรวบรวมข้อมูลเพิ่มเติมเกี่ยวกับพวกเขาได้ แบบสอบถามสามารถคิดว่าเป็นการสอบหรือแบบสอบถาม และสามารถปรับแต่งได้หลายวิธีเพื่อให้ทีมรับสมัครได้รับข้อมูลเชิงลึกที่มีค่าเกี่ยวกับผู้สมัคร
เปิดใช้งานตัวเลือก ส่งแบบสอบถามการสัมภาษณ์ เพื่อส่งแบบสอบถามไปยังผู้สมัคร เมื่อเปิดใช้งานแล้ว ลิงก์ภายใน แบบสอบถามการสัมภาษณ์ จะปรากฏขึ้น คลิกลิงก์ แบบสอบถามการสัมภาษณ์ เพื่อไปยังรายการแบบสอบถามทั้งหมดที่สร้างขึ้น
รายการนี้รวมแบบสอบถามทั้งหมดที่สร้างในฐานข้อมูล ไม่ใช่เฉพาะแบบสอบถามที่ใช้ในแอป การรับสมัคร เท่านั้น หากยังไม่มีการสร้างแบบสอบถาม รายการแบบสอบถามจะแสดงข้อความ ไม่พบแบบสอบถาม และนำเสนอตัวเลือกในการสร้างแบบสอบถามจากเทมเพลตแบบสอบถามที่กำหนดค่าไว้ล่วงหน้าหลายรายการ
ดูเพิ่มเติม
Note
การเปิดใช้งานตัวเลือก ส่งแบบสอบถามการสัมภาษณ์ จะติดตั้งแอปพลิเคชัน แบบสอบถาม เมื่อบันทึกการตั้งค่าแล้ว หากยังไม่ได้ติดตั้งไว้
ตัวกำหนดค่าแพ็กเกจเงินเดือน
เมื่อส่งข้อเสนอไปยังผู้สมัคร สามารถกำหนดวันหมดอายุของข้อเสนอได้ ป้อนจำนวนวันที่ข้อเสนอจะมีผลในช่อง วัน หากผู้สมัครไม่ยอมรับข้อเสนอ ข้อเสนอนั้นก็จะใช้ไม่ได้อีกต่อไป
แสดงเรซูเม่
เมื่อผู้สมัครส่งใบสมัคร หนึ่งในฟิลด์ที่จำเป็นเริ่มต้นคือเรซูเม่หรือ CV เรซูเม่ทั้งหมดจะถูกจัดเก็บในแอปพลิเคชัน เอกสาร และสามารถเข้าถึงได้บนการ์ดของผู้สมัคร
เรซูเม่มีตัวเลือกให้ปรากฏบนฟอร์มของผู้สมัคร ซึ่งสามารถดูได้โดยคลิกที่การ์ดของผู้สมัคร เรซูเม่จะปรากฏทางด้านขวาของหน้าจอ หากไม่ได้เปิดใช้งาน เรซูเม่จะเข้าถึงผ่านลิงก์ในแชตเตอร์ ซึ่งจำเป็นต้องคลิกเพื่อขยายและดู หรือดาวน์โหลด
เปิดใช้งานตัวเลือก แสดงเรซูเม่ เพื่อแสดงเรซูเม่บนการ์ดของผู้สมัครโดยค่าเริ่มต้น และนอกเหนือจากลิงก์เอกสาร เมื่อเปิดใช้งานแล้ว เรซูเม่จะปรากฏทางด้านขวาของการ์ดของผู้สมัคร
Note
เพื่อให้เรซูเม่ปรากฏทางด้านขวา หน้าต่างเบราว์เซอร์ต้องอยู่ในโหมดเต็มหน้าจอ (โดยที่เบราว์เซอร์ขยายเต็มหน้าจอทั้งหมด)
หากหน้าต่างเบราว์เซอร์ถูกตั้งค่าให้มีขนาดเล็กกว่าความกว้างทั้งหมดของหน้าจอ (ไม่เต็มหน้าจอ) เรซูเม่จะไม่ปรากฏทางด้านขวา แต่จะปรากฏในส่วน ไฟล์ ของแชตเตอร์ ด้านล่างการ์ดของผู้สมัคร

การซื้อ
ส่วน การซื้อในแอป ของเมนู การตั้งค่า เกี่ยวข้องกับรายการที่ต้องใช้เครดิต เช่น ข้อความ SMS และการแปลงเรซูเม่เป็นดิจิทัล
ดูเพิ่มเติม
ส่ง SMS
สามารถส่งข้อความไปยังผู้สมัครได้โดยตรงผ่านแอป การรับสมัคร ฟีเจอร์นี้ต้องใช้บัตรเครดิตในการใช้งาน คลิกลิงก์ภายใน จัดการบริการและซื้อบัตรเครดิต และทำตามขั้นตอนเพื่อ:doc:ซื้อบัตรเครดิต <../marketing/sms_marketing/pricing_and_faq>
การแปลงเรซูเม่เป็นดิจิทัล (OCR)
เมื่อมีการส่งใบสมัครโดยใช้วิธีใดก็ตามที่มีอยู่ เช่น การส่งใบสมัครออนไลน์ การส่งอีเมลเรซูเม่ไปยังนามแฝงตำแหน่งงาน หรือการสร้างบันทึกผู้สมัครโดยตรงจากฐานข้อมูล สามารถให้ Odoo ดึงชื่อผู้สมัคร หมายเลขโทรศัพท์ และที่อยู่อีเมลจากเรซูเม่และกรอกข้อมูลลงในฟอร์มผู้สมัครได้ หากต้องการทำเช่นนี้ ให้เปิดใช้งานตัวเลือก การแปลงเรซูเม่เป็นดิจิทัล (OCR)
เมื่อเปิดใช้งานแล้ว จะมีตัวเลือกเพิ่มเติมปรากฏขึ้น คลิกที่ปุ่มตัวเลือกที่เกี่ยวข้องเพื่อเลือกหนึ่งในตัวเลือกต่อไปนี้:
ไม่ต้องแปลงเป็นดิจิทัล: ตัวเลือกนี้จะปิดการแปลงเรซูเม่เป็นดิจิทัล
แปลงเป็นดิจิทัลตามคำขอเท่านั้น: ตัวเลือกนี้จะแปลงเรซูเม่เป็นดิจิทัลเฉพาะเมื่อมีการร้องขอเท่านั้น ปุ่ม แปลงเอกสารเป็นดิจิทัล จะปรากฏบนการ์ดผู้สมัคร เมื่อคลิก เรซูเม่จะถูกสแกนและการ์ดผู้สมัครจะได้รับการอัปเดต
แปลงเป็นดิจิทัลโดยอัตโนมัติ: ตัวเลือกนี้จะแปลงเรซูเม่ทั้งหมดเป็นดิจิทัลโดยอัตโนมัติเมื่อมีการส่ง
ใต้ตัวเลือกเหล่านี้มีลิงก์เพิ่มเติมสองลิงก์ คลิกลิงก์ภายใน จัดการบริการและซื้อบัตรเครดิต เพื่อซื้อบัตรเครดิตสำหรับการแปลงเรซูเม่เป็นดิจิทัล คลิกลิงก์ภายใน ดูบริการของฉัน เพื่อดูรายการบริการปัจจุบันทั้งหมดและยอดคงเหลือของบัตรเครดิต
สำหรับข้อมูลเพิ่มเติมเกี่ยวกับการแปลงเอกสารเป็นดิจิทัลและ IAP โปรดดูเอกสารประกอบ การซื้อในแอป (IAP)
Note
ตัวเลือก ไม่ต้องแปลงเป็นดิจิทัล อาจดูซ้ำซ้อน แต่มีวัตถุประสงค์ที่แตกต่าง การปิดใช้งานตัวเลือก การแปลงเรซูเม่เป็นดิจิทัล (OCR) จะถอนการติดตั้งโมดูล ในขณะที่ ไม่ต้องแปลงเป็นดิจิทัล จะเก็บโมดูลไว้แต่ไม่ทำงาน ทำให้ผู้ใช้สามารถเปิดใช้งานการแปลงเป็นดิจิทัลอีกครั้งได้โดยไม่ต้องติดตั้งโมดูลใหม่
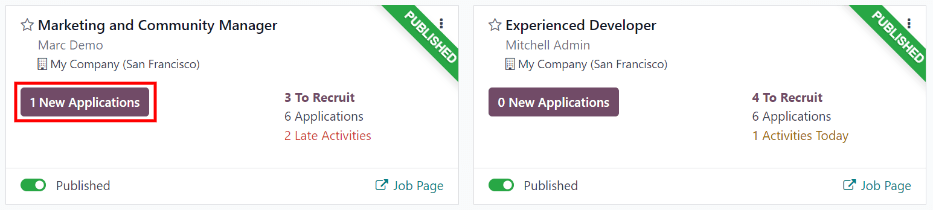
มุมมองคัมบัง
หากต้องการเข้าถึงมุมมอง Kanban สำหรับตำแหน่งงาน ให้ไปที่แดชบอร์ดหลักของแอป ซึ่งเป็นมุมมองเริ่มต้นเมื่อเปิดแอปพลิเคชัน ตำแหน่งงานทั้งหมดจะปรากฏบนแดชบอร์ดหลัก คลิกปุ่มอัจฉริยะ (#) ใบสมัครใหม่ บนการ์ดตำแหน่งงานเพื่อไปยังมุมมอง Kanban สำหรับผู้สมัครทั้งหมดสำหรับตำแหน่งงานนั้นโดยเฉพาะ
ภายในใบสมัครงาน ขั้นตอน Kanban จะปรากฏขึ้น โดยผู้สมัครทั้งหมดจะถูกจัดเรียงในคอลัมน์ที่เกี่ยวข้อง แสดงว่าพวกเขาอยู่ในขั้นตอนใดในปัจจุบัน ใน Odoo มีการกำหนดค่าขั้นตอนเริ่มต้นหกขั้นตอน:
คอลัมน์สุดท้าย เซ็นสัญญาแล้ว จะถูกพับตามค่าเริ่มต้น คอลัมน์ที่พับจะแสดงเป็นสีเทา และผู้สมัครในคอลัมน์นั้นจะถูกซ่อนจากมุมมอง หากต้องการขยายระยะที่พับและดูบัตรผู้สมัครสำหรับคอลัมน์นั้น ให้คลิกที่ใดก็ได้บนคอลัมน์สีเทาบางๆ ที่เขียนชื่อระยะ จากนั้นคอลัมน์จะขยายออกเพื่อเผยให้เห็นผู้สมัคร

แต่ละขั้นตอนจะมีแถบสีอยู่ใต้ชื่อขั้นตอน ซึ่งแสดงข้อมูลสถานะสำหรับผู้สมัครในขั้นตอนนั้นๆ สีของสถานะมีดังนี้:
เขียว: ผู้สมัครพร้อมที่จะย้ายไปยังขั้นตอนถัดไป
แดง: ผู้สมัครถูกบล็อกไม่ให้ย้ายไปยังขั้นตอนถัดไป
เทา: ผู้สมัครยังอยู่ระหว่างดำเนินการในขั้นตอนปัจจุบัน และยังไม่พร้อมหรือไม่ถูกบล็อกจากขั้นตอนถัดไป
สถานะของแต่ละการ์ดจะถูกตั้งค่าด้วยตนเอง ในการตั้งค่าสถานะ ให้คลิกที่วงกลมเล็กๆ ที่มุมล่างซ้ายของการ์ดผู้สมัคร หน้าต่างป๊อปอัปสถานะจะปรากฏขึ้น คลิกที่สถานะที่ต้องการสำหรับผู้สมัคร จุดสถานะบนการ์ดผู้สมัครและแถบสถานะจะอัปเดต

Tip
ชื่อของสีสถานะทั้งสาม (กำลังดำเนินการ, พร้อมสำหรับขั้นตอนถัดไป และ ถูกบล็อก) สามารถแก้ไขได้ หากต้องการ
ปรับแต่งขั้นตอน
ขั้นตอนต่างๆ สามารถแก้ไข เพิ่ม หรือลบได้เพื่อให้ตรงกับขั้นตอนการจ้างงานเฉพาะของธุรกิจ
ขั้นตอนใหม่
ในการสร้างขั้นตอนใหม่ ให้คลิกที่ ขั้นตอน แล้วคอลัมน์ใหม่จะปรากฏขึ้น ป้อนชื่อขั้นตอนใหม่ในช่อง ชื่อขั้นตอน จากนั้นคลิก เพิ่ม คอลัมน์ใหม่จะปรากฏขึ้น และขั้นตอนใหม่ก็พร้อมให้สร้าง หากไม่ต้องการขั้นตอนใหม่ ให้คลิกที่ใดก็ได้บนหน้าจอเพื่อออกจากการสร้างขั้นตอนใหม่

แก้ไขขั้นตอน
ในการแก้ไขการตั้งค่าของขั้นตอน ให้เลื่อนเมาส์ไปที่ชื่อขั้นตอน และไอคอน (การตั้งค่า) จะปรากฏที่มุมขวาบนของขั้นตอน คลิกที่ไอคอน (การตั้งค่า) และเมนูจะปรากฏขึ้น จากนั้นคลิกที่ตัวเลือก แก้ไข ฟอร์ม แก้ไข: (ขั้นตอน) จะปรากฏขึ้น ทำการแก้ไขที่ต้องการในฟอร์ม จากนั้นคลิก บันทึกและปิด เมื่อเสร็จสิ้น

ฟอร์มแก้ไขขั้นตอน
ฟอร์ม แก้ไข: (ขั้นตอน) คือที่ที่กำหนดค่าการตั้งค่าของขั้นตอน ฟิลด์ที่จำเป็นเพียงอย่างเดียวคือ ชื่อขั้นตอน
ฟิลด์ที่ต้องกรอกหรือแก้ไข ได้แก่:
ชื่อขั้นตอน: พิมพ์ชื่อสำหรับขั้นตอน
เทมเพลตอีเมล: เลือกเทมเพลตอีเมลที่จะใช้จากเมนูแบบเลื่อนลง หากเลือกเทมเพลต เมื่อการ์ดผู้สมัครเข้าสู่ขั้นตอน อีเมลจะถูกส่งไปยังผู้สมัครโดยอัตโนมัติโดยใช้เทมเพลตที่เลือก
พับใน Kanban: ทำเครื่องหมายในช่องเพื่อให้ขั้นตอนปรากฏแบบพับ (ซ่อน) ตลอดเวลาในมุมมองเริ่มต้น
ขั้นตอนการจ้างงาน: ทำเครื่องหมายในช่องหากขั้นตอนนี้บ่งชี้ว่าผู้สมัครได้รับการจ้างงาน เมื่อการ์ดของผู้สมัครเข้าสู่ขั้นตอนนี้ การ์ดจะแสดงแบนเนอร์ ได้รับการจ้างงาน ที่มุมขวาบน หากทำเครื่องหมายในช่องนี้ ขั้นตอนนี้จะถูกใช้เพื่อกำหนดวันที่จ้างงานของผู้สมัคร
เฉพาะงาน: หากขั้นตอนนี้ใช้กับตำแหน่งงานเฉพาะเจาะจง ให้เลือกตำแหน่งงานจากเมนูดรอปดาวน์ สามารถเลือกได้หลายตำแหน่งงาน
แสดงในการแนะนำ: ทำเครื่องหมายในช่องนี้หากขั้นตอนนี้ควรแสดงในแอปพลิเคชัน การแนะนำ และอนุญาตให้ผู้แนะนำสะสมคะแนนเมื่อผู้ที่ถูกแนะนำของพวกเขาไปถึงขั้นตอนนี้ หากเปิดใช้งานตัวเลือกนี้ ฟิลด์ คะแนน จะปรากฏขึ้น ป้อนจำนวนคะแนนการแนะนำที่พนักงานได้รับเมื่อผู้สมัครเข้าสู่ขั้นตอนนี้ ต้องติดตั้งแอป การแนะนำ จึงจะใช้ตัวเลือกนี้ได้
คะแนน: หากเปิดใช้งาน แสดงในการแนะนำ ฟิลด์นี้จะปรากฏขึ้น ป้อนจำนวนคะแนนที่พนักงานได้รับเมื่อผู้สมัครย้ายไปยังขั้นตอนนี้
ส่วน คำแนะนำ: มีป้ายสถานะที่กำหนดค่าไว้ล่วงหน้าสามแบบ (วงกลมสี) สำหรับการ์ดของผู้สมัครแต่ละคน เพื่อระบุสถานะของผู้สมัคร สีเหล่านี้จะแสดงที่ด้านบนของแต่ละขั้นตอนเพื่อสะท้อนสถานะของผู้สมัครในขั้นตอนนั้น ชื่อ ของป้ายสามารถแก้ไขได้ แต่ป้ายเองไม่สามารถเปลี่ยนได้ (สี) ชื่อและป้ายเริ่มต้นคือ: กำลังดำเนินการ (สีเทา), ถูกบล็อก (สีแดง) และ พร้อมสำหรับขั้นตอนถัดไป (สีเขียว)
ข้อกำหนด: ป้อนบันทึกภายในใดๆ สำหรับขั้นตอนนี้เพื่ออธิบายข้อกำหนดของขั้นตอน
ลบขั้นตอน
หากไม่จำเป็นต้องใช้ขั้นตอนอีกต่อไป สามารถลบขั้นตอนนั้นได้ ในการลบขั้นตอน ให้เลื่อนเคอร์เซอร์ไปที่ชื่อของขั้นตอน และไอคอน (การตั้งค่า) จะปรากฏขึ้น ขั้นแรก คลิกที่ไอคอน (การตั้งค่า) เพื่อแสดงเมนูดรอปดาวน์ จากนั้นคลิก ลบ หน้าต่างแจ้งเตือน ยืนยัน จะปรากฏขึ้น ถามว่า คุณแน่ใจหรือไม่ว่าต้องการลบคอลัมน์นี้? คลิก ลบ เพื่อลบคอลัมน์
Important
หากมีผู้สมัครอยู่ในขั้นตอนที่กำลังจะถูกลบในขณะนี้ ข้อผิดพลาดจะปรากฏขึ้นเมื่อพยายามลบขั้นตอน ระเบียนที่อยู่ในขั้นตอนนี้จำเป็นต้องถูกลบ เก็บถาวร หรือย้ายไปยังขั้นตอนอื่นก่อนที่จะสามารถลบขั้นตอนได้
เทมเพลตอีเมล
ในการติดต่อกับผู้สมัคร Odoo มีเทมเพลตอีเมลที่กำหนดค่าไว้ล่วงหน้าหลายแบบที่สามารถใช้ได้ เทมเพลตอีเมลที่กำหนดค่าไว้ล่วงหน้าและเวลาที่ควรใช้มีดังนี้:
การรับสมัคร: การรับทราบผู้สมัคร: เทมเพลตนี้ใช้เพื่อแจ้งให้ผู้สมัครทราบว่าได้รับใบสมัครของพวกเขาแล้ว อีเมลนี้จะถูกส่งออกโดยอัตโนมัติเมื่อผู้สมัครอยู่ในขั้นตอน ใหม่
การรับสมัคร: สนใจ: เทมเพลตนี้ใช้เพื่อแจ้งให้ผู้สมัครทราบว่าใบสมัครของพวกเขาได้รับความสนใจจากผู้รับสมัคร และพวกเขาได้รับการคัดเลือกให้รับสายโทรศัพท์หรือการสัมภาษณ์
การรับสมัคร: ไม่สนใจอีกต่อไป: เทมเพลตนี้ใช้เมื่อผู้สมัครแจ้งว่าพวกเขาไม่สนใจตำแหน่งงานนี้อีกต่อไป และขอบคุณสำหรับเวลาและความเอื้อเฟื้อของพวกเขา
การรับสมัคร: ปฏิเสธ: เทมเพลตนี้ใช้เมื่อไม่พิจารณาผู้สมัครสำหรับตำแหน่งงานนี้อีกต่อไป
การรับสมัคร: กำหนดเวลาสัมภาษณ์: เทมเพลตนี้ใช้เพื่อแจ้งให้ผู้สมัครทราบว่าพวกเขาผ่านขั้นตอน คุณสมบัติเบื้องต้น และจะมีการติดต่อเร็วๆ นี้เพื่อนัดหมายการสัมภาษณ์กับผู้รับสมัคร อีเมลนี้จะถูกส่งออกโดยอัตโนมัติเมื่อผู้สมัครอยู่ในขั้นตอน คุณสมบัติเบื้องต้น
Note
เทมเพลตอีเมลสามารถสร้าง แก้ไข และลบได้เพื่อให้เหมาะสมกับความต้องการของธุรกิจ สำหรับข้อมูลเพิ่มเติมเกี่ยวกับเทมเพลตอีเมล โปรดดูเอกสาร เทมเพลตอีเมล
หากต้องการส่งอีเมลด้วยตนเอง ให้คลิก ส่งข้อความ ในช่องแชท กล่องข้อความจะปรากฏขึ้นพร้อมกับที่อยู่อีเมลของผู้สมัคร

คลิกไอคอน (ตัวเรียบเรียงแบบเต็ม) ที่มุมขวาล่างของแท็บ ส่งข้อความ ในกระดานแชท หน้าต่างป๊อปอัป เขียนอีเมล จะโหลดขึ้น โดยมีข้อมูล ถึง และ หัวเรื่อง ที่กรอกไว้ล่วงหน้า ที่อยู่อีเมลของผู้สมัครจะถูกป้อนในฟิลด์ ถึง และ หัวเรื่อง คือ (ตำแหน่งงาน) เนื้อหาอีเมลจะว่างเปล่าตามค่าเริ่มต้น
ในการใช้เทมเพลตอีเมลที่กำหนดค่าไว้ล่วงหน้า ให้คลิกปุ่ม (จุดไข่ปลาแนวตั้ง) ที่ด้านล่างของหน้าต่าง เลือกเทมเพลตอีเมลที่ต้องการใช้จากเมนูดรอปดาวน์
เทมเพลตอีเมลที่กำหนดค่าไว้ล่วงหน้าอาจมีตัวยึดตำแหน่งแบบไดนามิก เพื่อให้สามารถกรอกข้อมูลเฉพาะในอีเมลได้เพื่อให้ข้อความกับผู้สมัครเป็นส่วนตัวมากขึ้น มีเทมเพลตอีเมลที่กำหนดค่าไว้ล่วงหน้าหลายแบบให้เลือก ขึ้นอยู่กับเทมเพลตที่เลือก หัวเรื่องหรือเนื้อหาอีเมลอาจเปลี่ยนแปลง
Note
จะโหลดเฉพาะเทมเพลตอีเมลที่กำหนดค่าสำหรับโมเดลเท่านั้น เทมเพลตอีเมลอื่นๆ มีการกำหนดค่าไว้ล่วงหน้าใน Odoo แต่หากไม่ได้กำหนดค่าสำหรับแอปพลิเคชันการรับสมัคร เทมเพลตเหล่านั้นจะไม่ปรากฏในรายการเทมเพลตที่ใช้ได้
หากต้องการแนบไฟล์ใดๆ ให้คลิกปุ่ม (คลิปหนีบกระดาษ) ที่ด้านล่างของหน้าต่าง นำทางไปยังไฟล์ที่ต้องการแนบ จากนั้นคลิก เปิด เพื่อแนบไฟล์ ในการลบไฟล์แนบ ให้คลิกไอคอน (ลบ) ทางด้านขวาของไฟล์แนบ
หากต้องการเปลี่ยนแปลงอีเมล ให้แก้ไขเนื้อหาของอีเมล หากต้องการบันทึกการแก้ไขเพื่อใช้ในอนาคต สามารถบันทึกอีเมลเป็นเทมเพลตใหม่ได้ คลิกปุ่ม (จุดไข่ปลาแนวตั้ง) ที่ด้านล่างของหน้าต่าง และเลือก บันทึกเป็นเทมเพลต ระบบจะแสดงตัวเลือกให้เขียนทับเทมเพลตที่มีอยู่ หรือบันทึกเป็นเทมเพลตใหม่ คลิกชื่อเทมเพลตที่มีอยู่เพื่อเขียนทับเทมเพลตนั้น หรือคลิก บันทึกเป็นเทมเพลต เพื่อบันทึกเป็นเทมเพลตใหม่ หน้าต่างป๊อปอัป สร้างเทมเพลตอีเมล จะปรากฏขึ้น ป้อนชื่อสำหรับเทมเพลตในช่อง ชื่อเทมเพลต จากนั้นคลิก บันทึก
เมื่อต้องการส่งอีเมล ให้คลิก ส่ง แล้วอีเมลจะถูกส่งไปยังผู้สมัคร อีเมลจะปรากฏในแชท

ดูเพิ่มเติม