ลายเซ็น
Odoo การเซ็น ช่วยให้คุณสามารถส่ง เซ็น และอนุมัติเอกสารออนไลน์โดยใช้ลายเซ็นอิเล็กทรอนิกส์
ลายเซ็นอิเล็กทรอนิกส์ แสดงถึงความเห็นชอบของบุคคลต่อเนื้อหาของเอกสาร เช่นเดียวกับลายเซ็นที่เขียนด้วยมือ ลายเซ็นอิเล็กทรอนิกส์แสดงถึงข้อผูกพันทางกฎหมายตามข้อกำหนดของเอกสารที่เซ็น
ด้วยการเซ็น คุณสามารถอัปโหลดไฟล์ PDF ใดก็ได้และเพิ่มฟิลด์ลงไป ฟิลด์เหล่านี้สามารถกรอกข้อมูลโดยอัตโนมัติด้วยรายละเอียดของผู้ใช้ที่มีอยู่ในฐานข้อมูลของคุณ
ความถูกต้องของลายเซ็นอิเล็กทรอนิกส์
เอกสารที่ลงนามผ่านแอปการเซ็น ถือเป็นลายเซ็นอิเล็กทรอนิกส์ที่ถูกต้องในสหภาพยุโรปและสหรัฐอเมริกา นอกจากนี้ยังเป็นไปตามข้อกำหนดสำหรับลายเซ็นอิเล็กทรอนิกส์ในประเทศส่วนใหญ่ ความถูกต้องตามกฎหมายของลายเซ็นอิเล็กทรอนิกส์ที่สร้างโดย Odoo ขึ้นอยู่กับกฎหมายของประเทศของคุณ บริษัทที่ทำธุรกิจในต่างประเทศควรพิจารณากฎหมายลายเซ็นอิเล็กทรอนิกส์ของประเทศอื่นด้วย
Important
ข้อมูลด้านล่างนี้ไม่มีผลทางกฎหมาย จัดทำขึ้นเพื่อวัตถุประสงค์ในการให้ข้อมูลทั่วไปเท่านั้น เนื่องจากกฎหมายที่ควบคุมลายเซ็นอิเล็กทรอนิกส์มีการพัฒนาอย่างรวดเร็ว เราไม่สามารถรับประกันได้ว่าข้อมูลทั้งหมดเป็นข้อมูลล่าสุด เราแนะนำให้ติดต่อทนายความในพื้นที่เพื่อขอคำแนะนำทางกฎหมายเกี่ยวกับการปฏิบัติตามข้อกำหนดและความถูกต้องของลายเซ็นอิเล็กทรอนิกส์
สหภาพยุโรป
กฎระเบียบ eIDAS กำหนดกรอบสำหรับลายเซ็นอิเล็กทรอนิกส์ใน 27 ประเทศสมาชิกของสหภาพยุโรป โดยแบ่งลายเซ็นอิเล็กทรอนิกส์ออกเป็นสามประเภท:
ลายเซ็นอิเล็กทรอนิกส์แบบธรรมดา
ลายเซ็นอิเล็กทรอนิกส์ขั้นสูง
ลายเซ็นอิเล็กทรอนิกส์ที่ผ่านการรับรอง
Odoo สร้างประเภทแรก ลายเซ็นอิเล็กทรอนิกส์แบบธรรมดา ลายเซ็นเหล่านี้มีผลทางกฎหมายในสหภาพยุโรปตามที่ระบุไว้ในกฎระเบียบ eIDAS
ลายเซ็นอิเล็กทรอนิกส์อาจไม่ได้รับการยอมรับว่าถูกต้องโดยอัตโนมัติ คุณอาจต้องนำหลักฐานสนับสนุนความถูกต้องของลายเซ็น แม้ว่าแอปการเซ็นจะให้ลายเซ็นอิเล็กทรอนิกส์แบบธรรมดา แต่หลักฐานสนับสนุนบางอย่างจะถูกรวบรวมโดยอัตโนมัติในระหว่างกระบวนการเซ็นชื่อ เช่น:
การยืนยันทางอีเมลและ SMS (หากเปิดใช้งาน)
การพิสูจน์ตัวตนที่แข็งแกร่งผ่าน itsme® (มีให้บริการในเบลเยียมและเนเธอร์แลนด์)
บันทึกการเข้าถึงเอกสารและลายเซ็นที่เกี่ยวข้องที่มีการบันทึกเวลา IP และสามารถติดตามตำแหน่งทางภูมิศาสตร์ได้
การตรวจสอบย้อนกลับและความไม่สามารถเปลี่ยนแปลงได้ของเอกสาร (การเปลี่ยนแปลงใดๆ ที่ทำกับเอกสารที่เซ็นแล้วจะถูกตรวจพบโดย Odoo ด้วยการใช้หลักฐานการเข้ารหัส)
สหรัฐอเมริกา
พระราชบัญญัติ ESIGN (ลายเซ็นอิเล็กทรอนิกส์ในพระราชบัญญัติการค้าระดับโลกและระดับชาติ) ในระดับระหว่างรัฐและระหว่างประเทศ และ UETA (พระราชบัญญัติธุรกรรมทางอิเล็กทรอนิกส์ที่เหมือนกัน) ในระดับรัฐ จัดเตรียมกรอบทางกฎหมายสำหรับลายเซ็นอิเล็กทรอนิกส์ โปรดทราบว่า รัฐอิลลินอยส์ และ รัฐนิวยอร์ก ยังไม่ได้นำ UETA มาใช้ แต่มีการกระทำที่คล้ายกันแทน
โดยรวมแล้ว เพื่อให้ได้รับการยอมรับว่าถูกต้อง ลายเซ็นอิเล็กทรอนิกส์ต้องเป็นไปตามเกณฑ์ห้าข้อ:
ผู้เซ็นต้องแสดง**ความตั้งใจในการเซ็นชื่อ**อย่างชัดเจน ตัวอย่างเช่น การใช้เมาส์วาดลายเซ็นสามารถแสดงความตั้งใจได้ ผู้เซ็นต้องมีตัวเลือกในการเลือกไม่ใช้เอกสารอิเล็กทรอนิกส์ด้วย
ผู้เซ็นต้องแสดง**ความยินยอมในการดำเนินธุรกิจทางอิเล็กทรอนิกส์**ก่อน ไม่ว่าจะโดยชัดแจ้งหรือโดยนัย
ลายเซ็นต้องระบุได้ชัดเจน ใน Odoo ข้อมูลเมตา เช่น ที่อยู่ IP ของผู้เซ็น จะถูกเพิ่มเข้าไปในลายเซ็น ซึ่งสามารถใช้เป็นหลักฐานสนับสนุนได้
ลายเซ็นต้องเชื่อมโยงกับเอกสารที่เซ็น ตัวอย่างเช่น โดยการเก็บบันทึกรายละเอียดว่าลายเซ็นถูกบันทึกอย่างไร
เอกสารที่ลงนามด้วยอิเล็กทรอนิกส์จำเป็นต้อง**เก็บรักษาและจัดเก็บ**โดยทุกฝ่ายที่เกี่ยวข้อง เช่น โดยการมอบสำเนาที่ดำเนินการครบถ้วนให้กับผู้ลงนาม หรือให้ความสามารถในการดาวน์โหลดสำเนา
ประเทศอื่นๆ
ส่งเอกสารเพื่อการเซ็น
การเซ็นครั้งเดียว
คุณสามารถคลิก อัปโหลด PDF เพื่อการเซ็น จากแดชบอร์ดของคุณสำหรับการเซ็นครั้งเดียว เลือกเอกสารของคุณ เปิด และลากและวางช่อง:ref:`ที่ต้องการ <sign/fields>`ในเอกสารของคุณ คุณสามารถแก้ไข:ref:`บทบาท <sign/role>`ที่กำหนดให้กับช่องได้โดยคลิกและเลือกบทบาทที่คุณต้องการ
เมื่อพร้อมแล้ว ให้คลิก ส่ง และกรอกข้อมูลในช่องที่ต้องการ เมื่อส่งแล้ว เอกสารของคุณจะยังคงพร้อมใช้งาน ไปที่ เพื่อดูเอกสารของคุณและสถานะของการเซ็น

วันที่มีผลบังคับใช้และการแจ้งเตือน
คุณสามารถกำหนด วันที่มีผลบังคับใช้ ในเอกสารข้อตกลงระยะเวลาจำกัด หรือส่ง การแจ้งเตือนทางอีเมลอัตโนมัติ เพื่อรับลายเซ็นตรงเวลา จากแดชบอร์ดของคุณ คลิก ส่ง ในเอกสารของคุณ ในหน้าใหม่ ไปที่ส่วน ตัวเลือก กรอกข้อมูลในฟิลด์ มีผลใช้จนถึง สลับสวิตช์ เตือนความจำ แล้วคลิกค่าเพื่อแก้ไขจำนวนวันเริ่มต้นระหว่างการแจ้งเตือน

เทมเพลต
คุณสามารถสร้างเทมเพลตเอกสารได้เมื่อคุณต้องส่งเอกสารเดียวกันหลายครั้งง จากแดชบอร์ดของคุณ ให้คลิก อัปโหลดเทมเพลต PDF เลือกเอกสารและเพิ่มช่อง:ref:ที่ต้องการ <sign/fields> คุณสามารถแก้ไข:ref:`บทบาท <sign/role>`ของช่องได้โดยคลิกและเลือกบทบาทที่คุณต้องการ
คลิก คุณสมบัติเทมเพลต เพื่อเพิ่ม แท็ก ลงในเทมเพลตของคุณ กำหนด พื้นที่ทำงานเอกสารที่ลงนาม เพิ่ม แท็กเอกสารที่ลงนาม ตั้งค่า ลิงก์เปลี่ยนเส้นทาง ที่จะพร้อมใช้งานในข้อความยืนยันลายเซ็นที่ได้รับหลังลายเซ็น หรือกำหนด ผู้ใช้ที่ได้รับอนุญาต หากคุณต้องการจำกัดการใช้เทมเพลตของคุณให้เฉพาะกับผู้ใช้หรือกลุ่มที่ได้รับอนุญาตเฉพาะเท่านั้น
เทมเพลตของคุณจะแสดงในแดชบอร์ดของคุณตามค่าเริ่มต้น คุณสามารถคลิก ส่ง เพื่อส่งเทมเพลตเอกสารไปยังผู้เซ็นได้อย่างรวดเร็ว หรือ เซ็นทันที หากคุณพร้อมที่จะเซ็นเอกสารของคุณทันที
Tip
คุณสามารถสร้างเทมเพลตจากเอกสารที่ส่งไปก่อนหน้านี้ได้ โดยไปที่ ในเอกสารที่คุณต้องการเรียกค้น ให้คลิกที่จุดไข่ปลาแนวตั้ง (⋮) จากนั้นคลิก เทมเพลต จากนั้นคลิกบนจุดไข่ปลาแนวตั้ง (⋮) อีกครั้ง จากนั้นคลิก เรียกคืน ตอนนี้เอกสารของคุณจะปรากฏบนแดชบอร์ดของคุณถัดจากเทมเพลตอื่นๆ
บทบาท
แต่ละช่องในเอกสารการเซ็นจะเกี่ยวข้องกับบทบาทที่สอดคล้องกับบุคคลที่เฉพาะเจาะจง เมื่อเอกสารกำลังถูกเซ็น บุคคลที่ได้รับมอบหมายให้กับบทบาทนั้นจะต้องกรอกข้อมูลในช่องที่ได้รับมอบหมายและเซ็นเอกสาร
บทบาทสามารถเข้าถึงได้โดยไปที่
คุณสามารถอัปเดตบทบาทที่มีอยู่หรือสร้างบทบาทใหม่ได้โดยคลิกที่ สร้าง เลือก ชื่อหน้าที่ เพิ่ม ขั้นตอนการตรวจสอบสิทธิ์เพิ่มเติม เพื่อยืนยันตัวตนของผู้ลงนาม และหากสามารถกำหนดเอกสารใหม่ให้กับผู้ติดต่อรายอื่นได้ ให้เลือก เปลี่ยนผู้ได้รับอนุญาต สำหรับหน้าที่ สี สามารถเลือกได้สำหรับหน้าที่นี้ สีนี้ช่วยให้เข้าใจว่าบทบาทใดมีหน้าที่รับผิดชอบฟิลด์ใดเมื่อกำหนดค่าเทมเพลต
การระบุตัวตนที่ปลอดภัย
ในฐานะเจ้าของเอกสาร คุณอาจขอ ขั้นตอนการยืนยันตัวตนเพิ่มเติม ผ่าน:ref:การยืนยันทาง SMS <sign/sms> หรือผ่าน Itsme® (ใช้ได้ในเบลเยียมและเนเธอร์แลนด์) ตัวเลือกการยืนยันตัวตนทั้งสองต้องใช้:ref:เครดิต <iap/buying_credits> หากคุณไม่มีเครดิตเหลืออยู่ ขั้นตอนการยืนยันตัวตนจะถูกข้าม
ดูเพิ่มเติม
การยืนยันทาง SMS
ไปที่ คลิกในคอลัมน์ ขั้นตอนการยืนยันตัวตนเพิ่มเติม สำหรับบทบาท และเลือก รหัสเฉพาะผ่าน SMS
Note
ก่อนที่จะสามารถส่งข้อความ SMS ได้ คุณต้องลงทะเบียนหมายเลขโทรศัพท์ของคุณ ในการทำเช่นนั้น ไปที่ และคลิก ซื้อเครดิต ภายใต้ ยืนยันตัวตนด้วย SMS
ไปที่เอกสารที่จะเซ็น เพิ่มฟิลด์ที่ต้องการการยืนยัน SMS เช่น ฟิลด์ ลายเซ็น และคลิก ส่ง ในหน้าใหม่ เลือก ลูกค้า และคลิก ส่ง
ผู้ที่เซ็นเอกสารกรอกข้อมูลในฟิลด์ ลายเซ็น จากนั้น เซ็น และคลิก ตรวจสอบและส่งเอกสารที่เสร็จสมบูรณ์ หน้า การตรวจสอบขั้นสุดท้าย จะปรากฏขึ้นให้เพิ่มหมายเลขโทรศัพท์ รหัสใช้ครั้งเดียวจะถูกส่งผ่าน SMS

Note
คุณสมบัตินี้เปิดใช้งานโดยค่าเริ่มต้น
เมื่อ ขั้นตอนการยืนยันตัวตนเพิ่มเติม ใช้กับบทบาท ขั้นตอนการตรวจสอบนี้จะถูกร้องขอสำหรับฟิลด์ใดๆ ที่กำหนดให้กับบทบาทนี้
Itsme®
การยืนยันตัวตน itsme® สามารถใช้เพื่ออนุญาตให้ผู้ลงนามยืนยันตัวตนโดยใช้ itsme® คุณสมบัตินี้ใช้ได้เฉพาะใน**เบลเยียม**และ**เนเธอร์แลนด์**เท่านั้น
คุณสมบัตินี้สามารถเปิดใช้งานได้ใน การตั้งค่าการเซ็น และใช้โดยอัตโนมัติกับบทบาท ลูกค้า (ระบุตัวตนด้วย itsme®) ในการเปิดใช้งานสำหรับบทบาทอื่นๆ ไปที่ คลิกในคอลัมน์ ขั้นตอนการยืนยันตัวตนเพิ่มเติม สำหรับบทบาท และเลือก ผ่าน itsme®
ไปที่เอกสารที่ต้องการเซ็นและเพิ่มฟิลด์ ลายเซ็น สลับไปยังบทบาทใดๆ ที่กำหนดค่าให้ใช้คุณสมบัตินี้ และคลิก ตรวจสอบ และ ส่ง

เมื่อเซ็นเอกสาร ผู้ลงนามกรอกข้อมูลในฟิลด์ ลายเซ็น และดำเนินการโดยคลิก ตรวจสอบและส่งเอกสารที่เสร็จสมบูรณ์ ซึ่งจะเรียกหน้า การตรวจสอบขั้นสุดท้าย ที่ต้องการการยืนยันตัวตนผ่าน itsme®
แฮชผู้ลงนาม
ทุกครั้งที่มีคนเซ็นเอกสาร แฮช - ลายเซ็นดิจิทัลที่ไม่ซ้ำกันของการดำเนินการ - จะถูกสร้างขึ้นเพื่อให้แน่ใจว่ามีการติดตาม ความสมบูรณ์ และไม่สามารถเปลี่ยนแปลงได้ กระบวนการนี้รับประกันว่าการเปลี่ยนแปลงใดๆ ที่ทำหลังจากลายเซ็นถูกติดไว้สามารถตรวจพบได้ง่าย โดยรักษาความถูกต้องและความปลอดภัยของเอกสารตลอดวงจรชีวิต
กรอบความปลอดภัยแบบภาพที่แสดงจุดเริ่มต้นของแฮชจะถูกเพิ่มลงในลายเซ็น ผู้ใช้ภายในสามารถซ่อนหรือแสดงได้โดยเปิดหรือปิดตัวเลือก กรอบ เมื่อเซ็นเอกสาร

ลำดับการเซ็น
เมื่อเอกสารต้องการการเซ็นโดยหลายฝ่าย ลำดับการเซ็นช่วยให้คุณควบคุมลำดับที่ผู้รับของคุณได้รับเอกสารเพื่อลงนาม
หลังจากอัปโหลด PDF ที่มีช่องลายเซ็นอย่างน้อยสองช่องพร้อมบทบาทที่แตกต่างกันสองบทบาทและคลิก ส่ง ให้เปิดสวิตช์ ระบุลำดับการเซ็น และค้นหาชื่อหรือข้อมูลอีเมลของผู้เซ็นเพื่อเพิ่มพวกเขา คุณสามารถกำหนดลำดับการเซ็นได้โดยพิมพ์ 1 หรือ 2 ในคอลัมน์แรก
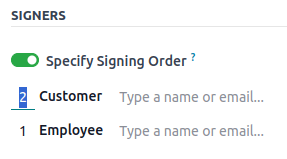
ผู้รับแต่ละคนจะได้รับการแจ้งเตือนคำขอลายเซ็นเพียงครั้งเดียวหลังจากผู้รับคนก่อนหน้าดำเนินการเสร็จสิ้นแล้ว
ประเภทของฟิลด์
ช่องข้อมูลใช้ในเอกสารเพื่อระบุข้อมูลที่ต้องกรอกโดยผู้เซ็น คุณสามารถเพิ่มช่องข้อมูลลงในเอกสารของคุณได้ง่ายๆ โดยการลากและวางจากคอลัมน์ด้านซ้ายลงในเอกสารของคุณ
ประเภทช่องข้อมูลต่างๆ สามารถใช้เพื่อเซ็นเอกสารได้ (ตัวยึดตำแหน่ง การกรอกอัตโนมัติ ฯลฯ) ด้วยการกำหนดค่าประเภทช่องข้อมูลของคุณเอง หรือที่เรียกว่าประเภทรายการลายเซ็น กระบวนการเซ็นสามารถรวดเร็วยิ่งขึ้นสำหรับลูกค้า พาร์ทเนอร์ และพนักงานของคุณ
หากต้องการสร้างและแก้ไขประเภทช่องข้อมูล ไปที่
คุณสามารถเลือกช่องข้อมูลที่มีอยู่ได้โดยคลิกที่ช่องนั้น หรือคุณสามารถ สร้าง ช่องใหม่ได้ ขั้นแรก แก้ไข ชื่อช่องข้อมูล จากนั้นเลือก ประเภทช่องข้อมูล:
ลายเซ็น: ผู้ใช้จะถูกขอให้ป้อนลายเซ็นของตนโดยการวาด สร้างแบบอัตโนมัติตามชื่อของตน หรืออัปโหลดไฟล์ในเครื่อง (โดยปกติจะเป็นรูปภาพ) ช่องข้อมูลประเภท ลายเซ็น แต่ละช่องถัดไปจะนำข้อมูลที่ป้อนในช่องแรกมาใช้ซ้ำ
ชื่อย่อ: ผู้ใช้จะถูกขอให้ป้อนชื่อย่อของตน ในลักษณะเดียวกับช่องข้อมูล ลายเซ็น
ข้อความ: ผู้ใช้ป้อนข้อความในบรรทัดเดียว
ข้อความหลายบรรทัด: ผู้ใช้ป้อนข้อความในหลายบรรทัด
ช่องทำเครื่องหมาย: ผู้ใช้สามารถทำเครื่องหมายในช่อง (เช่น เพื่อแสดงการอนุมัติหรือความยินยอม)
การเลือก: ผู้ใช้เลือกตัวเลือกเดียวจากตัวเลือกที่หลากหลาย
การตั้งค่า กรอกช่องข้อมูลพาร์ทเนอร์อัตโนมัติ ใช้เพื่อกรอกช่องข้อมูลโดยอัตโนมัติในระหว่างกระบวนการเซ็น โดยใช้ค่าของหนึ่งในช่องข้อมูลในโมเดลผู้ติดต่อ (res.partner) ของบุคคลที่เซ็นเอกสาร ในการทำเช่นนี้ ให้ป้อนชื่อทางเทคนิคของช่องข้อมูลโมเดลผู้ติดต่อ
Tip
หากต้องการทราบชื่อทางเทคนิคของช่องข้อมูล ให้เปิดใช้งานโหมดนักพัฒนาและเลื่อนเมาส์ไปที่เครื่องหมายคำถามถัดจากช่องข้อมูล
Note
ค่าที่กรอกอัตโนมัติเป็นข้อเสนอแนะและสามารถแก้ไขได้ตามที่บุคคลที่เซ็นเอกสารต้องการ
ขนาดของฟิลด์สามารถเปลี่ยนแปลงได้โดยการแก้ไข ความกว้างเริ่มต้น และ ความสูงเริ่มต้น ทั้งสองขนาดถูกกำหนดให้เป็นเปอร์เซ็นต์ของทั้งหน้าโดยแสดงเป็นทศนิยม โดย 1 เท่ากับความกว้างหรือความสูงของหน้าเต็ม ตามค่าเริ่มต้น ความกว้างของฟิลด์ใหม่ที่คุณสร้างจะถูกตั้งค่าเป็น 15% (0.150) ของความกว้างของทั้งหน้า ในขณะที่ความสูงของฟิลด์นั้นถูกตั้งค่าเป็น 1.5% (0.015) ของความสูงของทั้งหน้า
ขั้นตอนต่อไป ให้เขียน เคล็ดลับ เคล็ดลับจะแสดงอยู่ภายในลูกศรที่ด้านซ้ายของหน้าจอผู้ใช้ในระหว่างขั้นตอนการลงนาม เพื่อช่วยให้ผู้ใช้เข้าใจถึงสิ่งที่ขั้นตอนนี้ต้องทำ (เช่น "ลงนามที่นี่" หรือ "กรอกวันเกิดของคุณ") นอกจากนี้ คุณยังสามารถใช้ข้อความ ตัวแทน เพื่อแสดงภายในฟิลด์ก่อนที่จะกรอกข้อมูลให้ครบถ้วน
