
Kalender
Odoo Calendar adalah aplikasi penjadwalan yang memungkinkan user untuk mengintegrasikan alur bisnis perusahaan ke dalam satu platform manajemen. Dengan mengintegrasikan aplikasi lain dalam ekosistem Odoo, Calendar memungkinkan user untuk menjadwalkan dan mengatur meeting, menjadwalkan acara, merencanakan penilaian karyawan, mengoordinasikan proyek, dan lainnya – semuanya dari platform yang sama.
Saat membuka , user memiliki gambaran umum tentang pertemuan mereka saat ini. Opsi tampilan yang dipilih muncul sebagai menu drop-down Hari, Minggu, Bulan, atau Tahun. Di bawah menu drop-down opsi tampilan, user juga dapat mengaktifkan atau menonaktifkan Tampilkan akhir pekan.

Tip
Bergantung pada opsi tampilan yang dipilih, user dapat mengklik tombol (panah kiri atau kanan) untuk beralih antara hari, minggu, dll., dan beralih kembali ke hari saat ini dengan tombol Hari Ini.
Sinkronkan kalender pihak ketiga
User dapat menyinkronkan Odoo dengan kalender Outlook dan/atau Google yang ada, dengan menuju ke . Dari sini, masukkan ID Klien dan Rahasia Klien. Ada juga opsi untuk menjeda sinkronisasi dengan mencentang kotak centang, atau mengotomatiskan sinkronisasi dengan membiarkannya kosong.
Setelah konfigurasi yang diinginkan selesai, pastikan untuk klik Simpan sebelum melanjutkan.
Acara yang dibuat di kalender yang disinkronkan secara otomatis muncul di semua platform yang terintegrasi.
Buat aktivitas dari chatter
Buat meeting baru secara instan di mana saja di Odoo melalui chatter catatan individual, seperti di kartu peluang CRM atau tugas di aplikasi Projects.
Dari chatter, klik tombol Aktivitas. Di jendela pop-up Jadwalkan Aktivitas, pilih Jenis Aktivitas yang diinginkan, yang akan memunculkan sekumpulan tombol, tergantung pada aktivitasnya.
Aktivitas yang melibatkan jadwal lain, seperti Meeting atau Call for Demo, terhubung ke aplikasi Calendar. Pilih salah satu aktivitas ini untuk terhubung ke aplikasi Calendar, lalu tekan Buka Kalender untuk kembali ke aplikasi. Atau, juga dimungkinkan untuk Jadwalkan & Tandai sebagai Selesai untuk menutup aktivitas, atau pilih Selesai & Jadwalkan Berikutnya untuk membiarkan jendela Jadwalkan Aktivitas tetap terbuka untuk membuat aktivitas lainnya.
Lihat juga
Rencanakan acara
Untuk menempatkan acara di kalender, buka , dan klik tanggal target. Pada jendela pop-up Acara Baru yang muncul, mulai dengan menambahkan judul acara.

Tanggal target secara otomatis terisi di kolom Mulai. Ini dapat diubah dengan mengklik bagian tanggal, dan memilih tanggal dari kalender. Untuk acara multi-hari, pilih tanggal akhir di kolom kedua, kemudian klik Terapkan.
Centang kotak centang Sepanjang Hari jika tidak ada waktu mulai atau akhir tertentu.
Untuk acara dengan waktu mulai dan berhenti yang spesifik, pastikan kotak centang All Day tidak dicentang untuk mengaktifkan pemilihan waktu. Dengan kotak centang All Day tidak dicentang, pilihan waktu muncul di kolom Start.
User yang masuk secara otomatis terisi sebagai peserta pertama. Attendees tambahan dapat ditambahkan atau dibuat dari sini juga.
Untuk meeting virtual, salin dan tempel URL ke dalam ruang yang disediakan di kolom URL Videocall. Atau, klik Odoo meeting untuk membuat link.
Selanjutnya, buat acara dengan mengklik Save & Close, atau pilih More Options untuk mengonfigurasi acara lebih lanjut.
Tip
Setelah acara dibuat, user dapat mengklik langsung ke pertemuan virtual dari acara kalender untuk mengakses lebih banyak opsi konfigurasi.

Kolom Description memungkinkan user menambahkan informasi dan detail tambahan tentang pertemuan.
Klik More Options untuk membuka formulir pertemuan, yang menyediakan konfigurasi tambahan untuk acara:
Duration: Tentukan durasi pertemuan dalam hours, atau aktifkan tombol All Day.
Recurrent: Centang kotak centang untuk membuat pertemuan berulang. Setelah dipilih, ini membuka kolom baru:
Timezone: Pilih zona waktu untuk waktu pertemuan ini ditentukan.
Repeat: Pilih periode berulang pertemuan ini. Tergantung pada jenis pengulangan yang dipilih, kolom berikutnya muncul, di mana user dapat menunjukkan kapan pertemuan harus berulang. Misalnya, jika Monthly dipilih sebagai opsi Repeat, kolom baru muncul, di mana user memutuskan pada Day of Month berapa pertemuan harus berulang.
Until: Pilih Number of repetitions terbatas pertemuan ini harus berulang, End date kapan pengulangan harus berhenti, atau jika pertemuan harus berulang Forever.
Tags: Tambahkan tag ke acara, seperti
Customer MeetingatauInternal Meeting. Ini dapat dicari dan difilter di aplikasi Kalender saat mengatur beberapa acara.Appointment: Hubungkan appointment yang ada atau buat yang baru. Ini dapat dikonfigurasi melalui tombol Bagikan Ketersediaan dari dashboard Calendar utama.
Privasi: Alihkan antara opsi visibilitas untuk mengontrol siapa yang dapat melihat acara.
Organizer: Ini default ke user Odoo saat ini. Pilih yang baru dari user yang ada, atau buat dan edit user baru.
Deskripsi: Tambahkan informasi atau detail tambahan tentang meeting.
Reminders: Pilih opsi notifikasi untuk dikirim ke peserta. Pilih notifikasi default, atau konfigurasikan pengingat baru.
Koordinasikan dengan ketersediaan tim
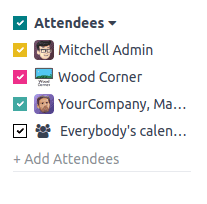
Saat menjadwalkan acara untuk beberapa user, pada Dashboard aplikasi Kalender, centang kotak centang di sebelah Attendees untuk melihat ketersediaan anggota tim. Centang (atau hapus centang) kotak centang di sebelah user yang terdaftar untuk menampilkan (atau menyembunyikan) kalender individual.
Bagikan Ketersediaan Anda
Di dashboard utama aplikasi Calendar, klik tombol Bagikan Ketersediaan di bagian atas halaman. Selanjutnya, klik dan seret untuk memilih waktu dan tanggal yang tersedia di kalender untuk menambahkannya sebagai opsi dalam undangan.
Tip
Untuk menghapus rentang waktu yang dipilih, arahkan kursor ke ketersediaan untuk mengklik ikon (trash).
Catatan
Dalam fitur Bagikan Ketersediaan, memilih waktu hanya dimungkinkan pada tampilan kalender Hari.
Setelah ketersediaan dipilih, klik tombol Buka untuk membuka appointment terkait.

Beberapa opsi konfigurasi tersedia di formulir appointment:
Di kolom Penjadwalan, atur jendela jam minimum untuk memastikan appointment dikonfirmasi dalam jumlah waktu tertentu sebelumnya. Misalnya, atur 01:00 untuk mengharuskan peserta mengonfirmasi setidaknya satu jam sebelum waktu appointment mereka.
Di kolom Izinkan Pembatalan, atur jendela jam maksimum sebelum appointment di mana peserta dapat membatalkan.
Kolom Ketersediaan pada memungkinkan peserta untuk memesan User atau Sumber Daya, seperti ruangan meeting atau meja. Setelah memilih User atau Sumber Daya, ketik user atau sumber daya yang diinginkan di ruang di bawahnya.
Kolom Tampilan Front-End digunakan untuk memilih Tanpa Gambar atau Tampilkan Gambar terkait user atau sumber daya yang dipilih di halaman appointment.
Jika Sumber Daya telah dipilih di kolom Ketersediaan pada, user memiliki opsi untuk Kelola Kapasitas.
Centang kotak untuk membatasi jumlah maksimum orang yang dapat menggunakan sumber daya pada waktu yang sama.
Kolom Metode Penugasan memungkinkan urutan di mana peserta memesan waktu dan user/sumber daya mereka:
Pilih User/Sumber Daya lalu Waktu
Pilih Waktu lalu User/Sumber Daya
Jika Sumber Daya telah dipilih di bidang Ketersediaan Pada, opsi ketiga tersedia, Pilih Waktu lalu tetapkan otomatis.
Secara opsional, konfigurasikan tab berikut:
Klik tombol Preview untuk melihat tampilan tautan appointment bagi peserta.
Setelah konfigurasi selesai, klik tombol Share untuk membuat tautan yang dapat dikirim langsung, atau klik Publish untuk mempublikasikan pilihan appointment di Website Odoo yang terhubung.
Tab Jadwal
Di tab Jadwal pada formulir appointment, slot waktu dapat dikelola. Tanggal dan waktu target diisi sebagai slot waktu pertama.
Untuk menambahkan slot waktu baru, klik Tambah baris. Klik ke dalam ruang kosong baru di bawah bidang Dari, lalu pilih dan masukkan tanggal dan waktu mulai target baru. Ulangi di bawah ruang kosong baru di bawah Ke untuk memilih dan memasukkan tanggal dan waktu akhir target baru.
Tab opsi
Tab Options menyediakan konfigurasi tambahan:
Website: Tentukan website mana undangan meeting ini akan dipublikasikan.
Timezone: Secara default menggunakan timezone perusahaan yang dipilih di aplikasi Settings. Untuk mengubah timezone, pilih opsi yang diinginkan dari menu drop-down.
Lokasi: Pilih atau buat lokasi baru dari menu drop-down. Jika bidang ini dibiarkan kosong, rapat dianggap berlangsung secara online.
Tautan Konferensi Video: Pilih dari Odoo Diskusi atau Google Meet untuk menyertakan tautan konferensi video dalam undangan rapat, atau biarkan kosong untuk mencegah pembuatan URL rapat.
Konfirmasi Manual: Hanya ditampilkan jika Sumber Daya telah dipilih di bidang Ketersediaan Pada. Centang kotak dan masukkan persentase maksimum dari total kapasitas sumber daya yang dipilih untuk membuat persyaratan konfirmasi manual guna menyelesaikan rapat.
Up-front Payment: Centang kotak untuk mewajibkan user membayar sebelum mengonfirmasi booking mereka. Setelah dicentang, sebuah tautan muncul ke Configure Payment Providers, yang memungkinkan pembayaran online.
Batasi ke Jam Kerja: Jika User telah dipilih di bidang Ketersediaan Pada, centang kotak untuk membatasi slot waktu rapat pada jam kerja user.
Buat Peluang: Ketika ini dipilih, setiap appointment yang dijadwalkan membuat peluang CRM baru.
Pengingat: Tambahkan atau hapus pengingat notifikasi di bidang ini. Pilih ruang kosong untuk opsi tambahan.
Email Konfirmasi: Centang kotak untuk secara otomatis mengirim email konfirmasi kepada peserta setelah rapat dikonfirmasi. Pilih dari template email atau klik Cari Lainnya..., lalu Baru untuk membuat template khusus.
Email Pembatalan: Centang kotak untuk secara otomatis mengirim email pembatalan kepada peserta jika rapat dibatalkan. Pilih dari template email atau klik Cari Lainnya..., lalu Baru untuk membuat template khusus.
CC ke: Tambahkan kontak yang akan diberitahu tentang pembaruan rapat di bidang ini, terlepas dari apakah mereka menghadiri rapat.
Izinkan Tamu: Centang kotak untuk mengizinkan peserta mengundang tamu.
Tab Pertanyaan
Di tab Pertanyaan, tambahkan pertanyaan untuk dijawab peserta saat mengonfirmasi rapat mereka. Klik Tambah baris untuk mengonfigurasi Pertanyaan. Kemudian pilih Jenis Pertanyaan, secara opsional tambahkan jawaban Placeholder, dan pilih apakah ini merupakan Jawaban Wajib.
Untuk mempelajari cara membuat kuesioner yang lebih komprehensif, kunjungi dokumentasi aplikasi Survey tentang membuat dan mengonfigurasi pertanyaan pengumpulan data.
Tab Pesan
Di bidang Pesan Pengantar pada tab Pesan, tambahkan informasi rapat tambahan yang muncul pada undangan.
Informasi yang ditambahkan ke bidang Pesan Tambahan saat Konfirmasi muncul setelah rapat dikonfirmasi.