
Pusat Bantua
Odoo Helpdesk integrates with the Forum, eLearning, and Knowledge apps to create the Help Center. The Help Center is a centralized location where teams and customers can search for and share detailed information about products and services.

Konfigurasi
To activate any Help Center features (Forums, eLearning, or Knowledge) on a Helpdesk team, go to and select a team, or create a new one. Verify the Visibility of the team is set to Invited portal users and all internal users (public) in the Visibility & Assignment section.
Additionally, the Website Form option on the Helpdesk team page must be enabled to activate any of the Help Center features. When one or more of the Help Center features is enabled, the Website Form is automatically enabled, as well.
Bahaya
Karena semua fitur Pusat Bantuan memerlukan integrasi dengan aplikasi lain, mengaktifkan salah satunya dapat mengakibatkan instalasi modul atau aplikasi tambahan.
Installing a new application on a One-App-Free database will trigger a 15-day trial. At the end of the trial, if a paid subscription has not been added to the database, it will no longer be active or accessible.
Lihat juga
Pengetahuan
Odoo's Knowledge application is a collaborative library, where users can store, edit, and share information. The Knowledge app is accessible throughout the database by clicking on the Knowledge (bookmark) icon.

Aktifkan Pengetahuan pada tim Pusat Bantuan
To enable the Knowledge feature on a Helpdesk team, go to and select a team, or create a new one.
Ketika tim telah dipilih atau dibuat, Odoo menampilkan formulir detail tim tersebut.
On the team's detail form, scroll down to the Help Center section. Then, click the box next to Knowledge to activate the Knowledge feature. When clicked, a new field labeled, Article appears.
Mengklik bidang Artikel akan menampilkan menu drop-down. Pada awalnya, hanya ada satu opsi dalam menu drop-down berjudul Bantuan, yang disediakan Odoo secara default. Pilih Bantuan dari menu drop-down untuk memilih artikel ini.
Tip
To create a new article, go to the , then hover the cursor next to the Workspace section heading, located in the left sidebar. Moving the cursor there reveals a hidden ➕ (plus sign) icon.
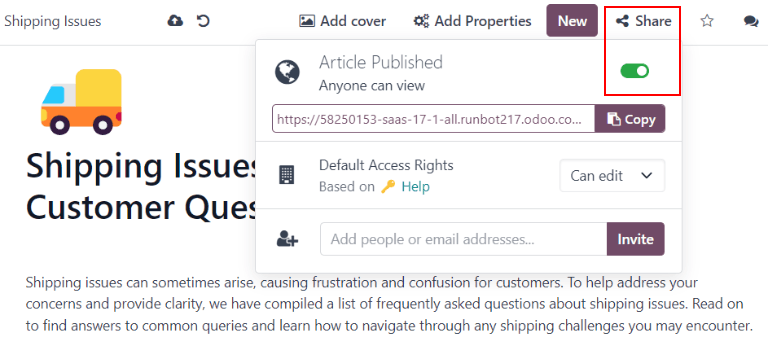
Click the ➕ (plus sign) icon to create a new article in the Workspace. In the upper-right corner of the page, click the Share button, and slide the Share to Web toggle switch until it reads Article Published. It can then be added to a Helpdesk team.
Once an article has been created and assigned to a Helpdesk team, content can be added and organized through the Knowledge app.
Lihat juga
Cari artikel dari tiket Pusat Bantuan
When members of a Helpdesk team are trying to solve a ticket, they can search through the content in the Knowledge app for more information on the issue.
To search Knowledge articles, open a ticket — either from the Helpdesk app dashboard, or by going to , then select a ticket from the list.
Ketika tiket dipilih, Odoo menampilkan formulir detail tiket tersebut.
Klik ikon Pengetahuan (bookmark), yang terletak di kanan atas halaman, untuk membuka jendela pencarian pop-up.

Tip
Knowledge articles can also be searched by pressing Ctrl + K to open the command
palette, then typing ?, followed by the name of the desired article.
Ketika Odoo menampilkan artikel yang diinginkan, klik artikel tersebut, atau sorot judul Artikel, dan tekan Enter. Ini akan membuka artikel di aplikasi Pengetahuan.
Untuk membuka artikel di tab baru, tekan Ctrl + Enter.
Tip
Jika pencarian yang lebih mendalam diperlukan, tekan Alt + B. Ini menampilkan halaman terpisah, di mana pencarian yang lebih detail dapat dilakukan.
Bagikan artikel ke Pusat Bantuan
To make a Knowledge article available to customers and website visitors, it must be published.
Penting
Meskipun artikel Bantuan telah diaktifkan pada tim, Odoo tidak membagikan semua artikel bersarang ke web. Artikel individual yang ditujukan untuk pelanggan harus dipublikasikan agar dapat dilihat di website.
To publish an article, navigate to the desired article, by following the above steps, and click the Share icon in the upper-right corner. This reveals a menu. Slide the toggle button labeled Share to Web to read Article Published.
Selesaikan tiket dengan kotak clipboard
Clipboard boxes can be added to Knowledge articles to allow content to be reused, copied, sent as messages, or added to the description on a ticket. This allows teams to maintain consistency when answering customer tickets, and minimize the amount of time spent on responding to repeat questions.
Tambahkan kotak clipboard ke artikel
To create a clipboard box, go to . Click on an existing nested article or create a new one by clicking the ➕ (plus sign) icon next to Help.
Type / to open the powerbox, and view a drop-down list of commands. Select or type clipboard. A gray block is
then added to the page. Add any necessary content to this block.

Catatan
Clipboard boxes only display the Use as description or Send as Message options if they are accessed directly from the Helpdesk.
Menggunakan kotak clipboard dalam tiket
Clipboard boxes can be used to respond directly to a Helpdesk ticket as a message, or to add information to the ticket's description.
To use clipboard boxes in a Helpdesk ticket, first, open a ticket, either from the Helpdesk dashboard or by going to and selecting a ticket from the list.
Click on the Knowledge (bookmark) icon in the top-right corner. This opens a search window. In this search window, select, or search, for the desired article. Doing so reveals that article page in the Odoo Knowledge application.
Untuk menggunakan kotak clipboard untuk merespons tiket, klik Kirim sebagai pesan di pojok kanan atas kotak clipboard, yang terletak di badan artikel.
Melakukan ini membuka jendela pop-up Tulis Email. Di jendela ini, pilih penerima, buat penambahan atau pengeditan yang diperlukan pada konten clipboard, lalu klik Kirim.
Tip
Untuk menggunakan kotak clipboard untuk menambahkan informasi ke deskripsi tiket, klik Gunakan sebagai deskripsi di pojok kanan atas kotak clipboard, yang terletak di badan artikel. Melakukan ini tidak mengganti teks yang ada di deskripsi tiket. Konten dari kotak clipboard ditambahkan sebagai teks tambahan.
Forum Komunitas
A Community Forum provides a space for customers to answer each other's questions and share information. By integrating a forum with a Helpdesk team, tickets submitted by customers can be converted to posts and shared.
Mengaktifkan forum pada tim Pusat Bantuan
To enable Community Forums on a Helpdesk team, start by navigating to and select a team, or create a new one.
Memilih atau membuat tim akan menampilkan formulir detail tim tersebut. Gulir ke bawah ke bagian fitur Pusat Bantuan, dan aktifkan Forum Komunitas, dengan mencentang kotak di sampingnya.
Saat diaktifkan, bidang baru berlabel Forum muncul di bawahnya.
Klik bidang Forum yang kosong untuk menampilkan menu drop-down. Secara default, hanya ada satu opsi untuk memulai, berlabel Bantuan. Itu adalah opsi yang secara otomatis dibuat Odoo saat fitur Forum Komunitas diaktifkan. Pilih Bantuan dari menu drop-down untuk mengaktifkan forum tersebut.
Untuk membuat forum baru, ketik nama ke dalam bidang Forum yang kosong, lalu klik opsi Buat dan Edit. Beberapa forum dapat dipilih di bidang ini.
Lihat juga
Membuat postingan forum dari tiket Pusat Bantuan
When a Helpdesk team has a Forum enabled, tickets submitted to that team can be converted to forum posts.
Untuk melakukan itu, pilih tiket, baik dari pipeline tim atau dari di aplikasi Pusat Bantuan.
Di bagian atas formulir detail tiket, klik tombol Bagikan di Forum.

Saat diklik, jendela pop-up muncul. Di sini, pos Forum dan Judul dapat diedit untuk memperbaiki kesalahan ketik, atau dimodifikasi untuk menghapus informasi milik perusahaan atau klien.
Tag juga dapat ditambahkan untuk membantu mengatur pos di forum, membuatnya lebih mudah bagi pengguna untuk menemukan saat pencarian. Setelah semua penyesuaian selesai dilakukan, klik Buat dan Lihat Pos.
eLearning
Odoo eLearning courses offer customers additional training and content in the form of videos, presentations, and certifications/quizzes. Providing additional training enables customers to work through issues and find solutions on their own. They can also develop a deeper understanding of the services and products they are using.
Mengaktifkan kursus eLearning pada tim Pusat Bantuan
To enable eLearning courses on a Helpdesk team, go to and select a team, or create a new one.
Pada halaman pengaturan tim, gulir ke bagian Pusat Bantuan, dan centang kotak di samping eLearning. Kolom baru muncul di bawahnya, berlabel Kursus.
Klik kolom kosong di samping Kursus di bawah fitur eLearning untuk menampilkan menu drop-down. Pilih kursus yang tersedia dari menu drop-down, atau ketik judul ke dalam kolom, dan klik Buat dan edit untuk membuat kursus baru dari halaman ini. Beberapa kursus dapat ditugaskan ke satu tim.
Membuat kursus eLearning
A new eLearning course can be created from the Helpdesk team's settings page, as in the step above, or from the eLearning app.
To create a course directly through the eLearning application, navigate to . This reveals a blank course template that can be customized and modified as needed.
Pada halaman templat kursus, tambahkan Judul Kursus, dan di bawahnya, Tag.
Klik pada tab Opsi.
Di bawah Hak Akses, pilih pengguna mana yang dapat melihat dan mendaftar di kursus.
Bidang Show Course To menentukan siapa yang dapat mengakses kursus. Bidang Enroll Policy menentukan bagaimana mereka dapat mendaftar untuk kursus.
Di bawah Display, pilih Type kursus yang diinginkan.
Menambahkan konten ke kursus eLearning
Untuk menambahkan konten ke kursus, klik tab Content dan pilih Add Content. Pilih Content Type dari menu drop-down dan unggah file, atau tempel tautan, sesuai petunjuk. Klik Save setelah selesai. Klik Add Section untuk mengorganisir kursus dalam beberapa bagian.

Catatan
Untuk menambahkan sertifikasi ke kursus, buka , centang kotak berlabel Certifications, dan Save untuk mengaktifkan pengaturan.
Lihat juga
Mempublikasikan kursus eLearning
Agar pelanggan dapat mendaftar dalam kursus, baik kursus maupun kontennya harus dipublikasikan.
Tip
Jika kursus dipublikasikan, tetapi konten kursus tidak dipublikasikan, pelanggan dapat mendaftar dalam kursus di website, tetapi mereka tidak dapat melihat konten kursus apa pun. Mengetahui hal ini, mungkin bermanfaat untuk mempublikasikan kursus terlebih dahulu, jika konten kursus dimaksudkan untuk dirilis secara bertahap, seperti kelas dengan jadwal mingguan.
Untuk menyediakan seluruh kursus sekaligus, setiap bagian konten kursus harus dipublikasikan terlebih dahulu, kemudian kursus dapat dipublikasikan.
To publish a course, choose a course from the eLearning dashboard. On the course template page, click the Go to Website smart button.
Ini akan menampilkan bagian depan halaman web kursus. Di bagian atas halaman web kursus, geser tombol toggle Unpublished ke Published.
Mempublikasikan konten kursus eLearning dari back-end
To publish eLearning course content from the back-end, choose a course from the eLearning dashboard. On the course template page, click the Published Contents smart button.
Tindakan ini akan menampilkan halaman terpisah yang menampilkan semua konten yang dipublikasikan terkait kursus tersebut. Hapus filter default Published dari bilah pencarian di pojok kanan atas, untuk menampilkan semua konten terkait kursus - bahkan konten yang belum dipublikasikan.
Click the ≣ (bars) icon in the upper-right corner, directly beneath the search bar to switch to list view.
Saat dalam tampilan daftar, terdapat kotak centang di sisi paling kiri layar, di atas kursus yang terdaftar, di sebelah kiri judul kolom Title. Ketika kotak centang tersebut diklik, semua konten kursus dipilih sekaligus.
Dengan semua konten kursus dipilih, klik salah satu kotak di kolom Is Published. Ini akan menampilkan jendela pop-up, meminta konfirmasi bahwa semua rekaman yang dipilih dimaksudkan untuk dipublikasikan. Klik Confirm untuk mempublikasikan semua konten kursus secara otomatis.
