支援中心
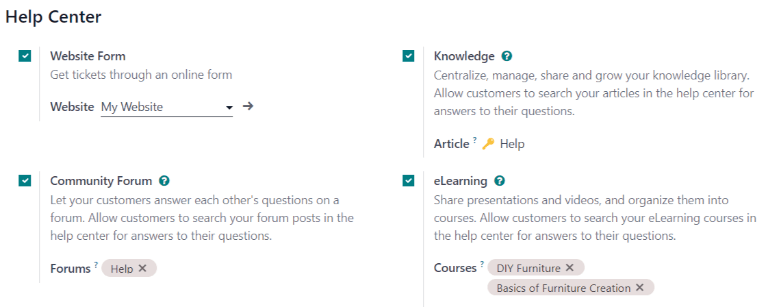
Odoo 服务台 与 论坛、在线学习 和 指示 应用程序整合,创建了 帮助中心。帮助中心 是一个整合的位置,团队和客户可在此搜索和共享有关产品和服务的详细信息。
配置
To activate any Help Center features (Forums, eLearning, or Knowledge) on a Helpdesk team, go to and select a team, or create a new one. Verify the Visibility of the team is set to Invited portal users and all internal users (public) in the Visibility & Assignment section.
Additionally, the Website Form option on the Helpdesk team page must be enabled to activate any of the Help Center features. When one or more of the Help Center features is enabled, the Website Form is automatically enabled, as well.
危險
由于 帮助中心 所有功能都需要与其他应用程序整合,因此启用其中任何一项功能,都可能需要安装额外模块或应用程序。
Installing a new application on a One-App-Free database will trigger a 15-day trial. At the end of the trial, if a paid subscription has not been added to the database, it will no longer be active or accessible.
其他資料
知識庫
Odoo’s Knowledge application is a collaborative library, where users can store, edit, and share information. The Knowledge app is accessible throughout the database by clicking on the Knowledge (bookmark) icon.
在服务台团队启用知识库
To enable the Knowledge feature on a Helpdesk team, go to and select a team, or create a new one.
选择或创建一个团队后,Odoo 会显示该团队的详细表单。
On the team’s detail form, scroll down to the Help Center section. Then, click the box next to Knowledge to activate the Knowledge feature. When clicked, a new field labeled, Article appears.
点击 文章 字段会显示一个下拉菜单。起初,下拉菜单中只有一个名为 帮助 的选项,由 Odoo 默认提供。从下拉菜单中选择 帮助 即可选择该文章。
小訣竅
要创建新文章,请进入 ,然后将光标停留在位于左侧边栏的 工作区 部分标题旁边。将光标移至该处,会显示一个隐藏的 :guilabel:` ➕(加号)` 图标。
Click the ➕ (plus sign) icon to create a new article in the Workspace. In the upper-right corner of the page, click the Share button, and slide the Share to Web toggle switch until it reads Article Published. It can then be added to a Helpdesk team.
一旦创建了一篇文章并将其分配给*服务台*团队,就可以通过*知识库*应用程序添加和组织内容。
其他資料
从服务台工单中搜索文章
*服务台*团队的成员尝试解决工单问题时,可以通过*知识库*应用程序中的内容搜索有关该问题的更多信息。
To search Knowledge articles, open a ticket — either from the Helpdesk app dashboard, or by going to , then select a ticket from the list.
选择工单后,Odoo 会显示该工单的详细信息表单。
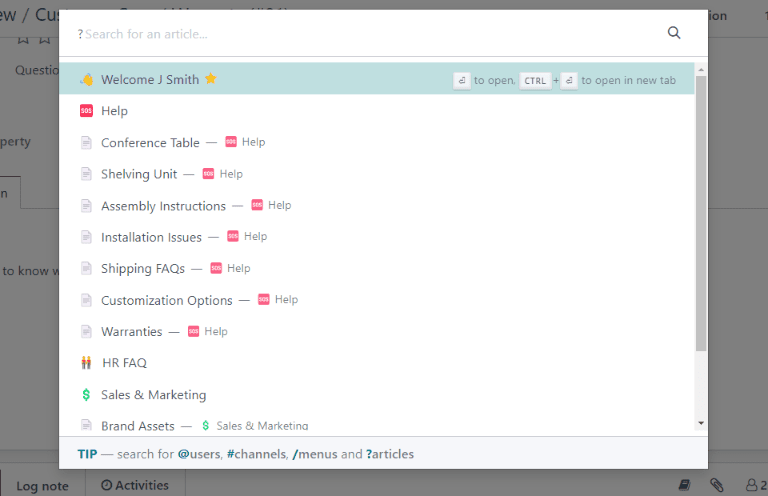
点击页面右上方的 知识库(书签) 图标,弹出搜索窗口。
小訣竅
Knowledge articles can also be searched by pressing Ctrl + K to open the command
palette, then typing ?, followed by the name of the desired article.
当 Odoo 显示所需的文章时,点击它,或高亮显示 文章 标题,然后按 进入。这将在 知识库 应用程序中打开文章。
要在新标签页中打开文章,请按 Ctrl + Enter。
小訣竅
如果需要更深入的搜索,请按 Alt+B。这将显示一个单独的页面,可以进行更详细的搜索。
用剪贴板盒解决工单问题
Clipboard boxes can be added to Knowledge articles to allow content to be reused, copied, sent as messages, or added to the description on a ticket. This allows teams to maintain consistency when answering customer tickets, and minimize the amount of time spent on responding to repeat questions.
将剪贴板框添加到文章中
To create a clipboard box, go to . Click on an existing nested article or create a new one by clicking the ➕ (plus sign) icon next to Help.
Type / to open the powerbox, and view a drop-down list of commands. Select or type clipboard. A gray block is
then added to the page. Add any necessary content to this block.
備註
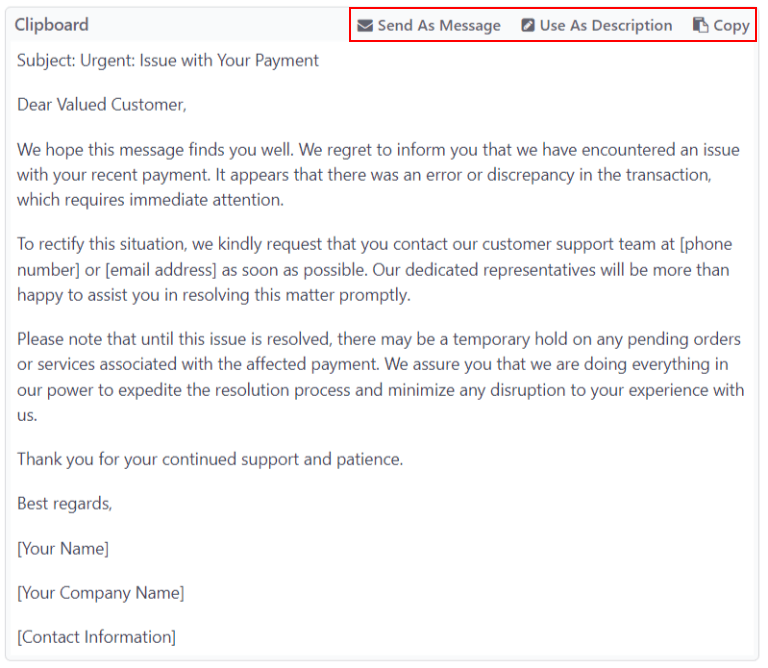
Clipboard boxes only display the Use as description or Send as Message options if they are accessed directly from the Helpdesk.
在工单中使用剪贴板框
Clipboard boxes can be used to respond directly to a Helpdesk ticket as a message, or to add information to the ticket’s description.
To use clipboard boxes in a Helpdesk ticket, first, open a ticket, either from the Helpdesk dashboard or by going to and selecting a ticket from the list.
Click on the Knowledge (bookmark) icon in the top-right corner. This opens a search window. In this search window, select, or search, for the desired article. Doing so reveals that article page in the Odoo Knowledge application.
要使用剪贴板框回复工单,请点击位于文章正文中的剪贴板框右上角的 作为消息发送。
这样做将弹出 撰写电子邮件 窗口。在该窗口中,选择收件人,对剪贴板内容进行必要的添加或编辑,然后点击 发送。
小訣竅
要使用剪贴板框为票单说明添加信息,请点击位于文章正文中的剪贴板框右上角的 用作描述。这样做**不会**取代工单描述中的现有文本。剪贴板框中的内容将作为附加文本添加。
社群討論區
*社区论坛*为客户提供了一个相互解答问题和共享信息的空间。通过将论坛与*服务台*团队整合,可将客户提交的工单转换为帖文并进行共享。
启用服务台团队论坛
To enable Community Forums on a Helpdesk team, start by navigating to and select a team, or create a new one.
选择或创建一个团队会显示该团队的详细表格。向下滚动到 帮助中心 功能部分,选中旁边的复选框,启用 社区论坛。
激活后,下方会出现一个标有 论坛 的新字段。
点击空白的 论坛 字段,显示一个下拉菜单。默认情况下,只有一个选项,标注为 帮助。这是启用 社区论坛 功能时 Odoo 自动创建的选项。从下拉菜单中选择 帮助 以启用该论坛。
要创建新论坛,请在空白的 论坛 字段中输入名称,然后点击 创建和编辑 选项。可在该字段中选择多个论坛。
其他資料
从服务台工单创建论坛帖文
当 服务台 团队启用了 论坛 时,提交给该团队的工单可转换为论坛帖文。
要执行此操作,请从团队管道或 服务台 应用程序中的 选择工单。
在工单详情表单顶部,单击 在论坛上分享 按钮。

点击后会弹出一个窗口。在这里,可以编辑 论坛 帖子和 标题,以纠正任何错别字,或修改以删除任何专有或客户信息。
还可以添加 标签,以帮助整理论坛中的帖子,使用户在搜索时更容易找到。完成所有调整后,点击 创建并查看帖子。
網上學習
Odoo 线上学习 课程以视频、演示和认证/测验的形式为客户提供附加培训和内容。通过提供附加培训,客户可以自己解决问题并找到解决方案。他们还可以更深入地了解自己正在使用的服务和产品。
在服务台团队中启用线上学习课程
To enable eLearning courses on a Helpdesk team, go to and select a team, or create a new one.
在团队设置页面,滚动到 帮助中心 部分,选中 在线学习 旁边的复选框。下面会出现一个新字段,标注为 课程。
点击 线上学习 功能下方 课程 旁边的空白区域,显示一个下拉菜单。从下拉菜单中选择可用的课程,或在字段中键入标题,然后单击 创建并编辑 从本页创建新课程。可为一个团队分配多个课程。
创建线上学习课程
可以通过 服务台 团队的设置页面(与上述步骤相同)或 线上学习 应用程序创建新的 线上学习 课程。
要直接通过 线上学习 应用程序创建课程,请导航至 。将显示一个空白课程模板,可根据需要进行自定义和修改。
在课程模板页面,添加 课程名称,并在其下方添加 标签。
Click on the Options tab.
Under Access Rights, select which users are able to view and enroll in the course.
The Show Course To field defines who can access the courses. The Enroll Policy field specifies how they can register for the course.
Under Display, choose the preferred course Type.
将内容添加到线上学习课程
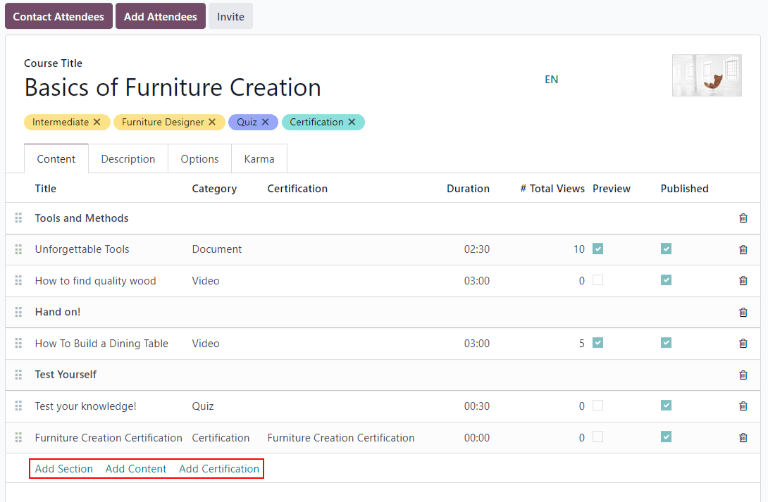
要为课程添加内容,请单击 内容 选项卡并选择 添加内容。从下拉菜单中选择 内容类型,然后上传文件或粘贴链接。完成后单击 保存。 单击 添加章节 按章节组织课程。
備註
要在课程中添加认证,请访问 ,选中标有 认证 的复选框,然后 保存,以激活设置。
其他資料
发布线上学习课程
要让客户能够报名课程,**必须**确保课程本身和课程内容都已发布。
小訣竅
如果课程已发布,但课程内容**尚未**发布,则客户可以在网站上注册课程,但**无法**查看任何课程内容。有鉴于此,如果课程内容打算在一段时间内发布,例如每周都有课程表的课程,那么先发布课程可能会有好处。
要想一次性提供整个课程,必须先发布每个课程内容,然后才能发布课程。
要发布课程,请从 线上学习 面板选择课程。在课程模板页面,单击 前往网站 智能按钮。
这将显示课程网页的前端。在课程网页的顶部,将 未发布 切换开关移至 已发布。
从后台发布线上学习课程内容
要从后台发布 线上学习 课程内容,请从 线上学习 面板选择一个课程。在课程模板页面,单击 已发布内容 智能按钮。
这样就会出现一个单独的页面,显示与该课程相关的所有已发布内容。从右上角的搜索栏中移除默认的 已发布 筛选器,即可显示与课程相关的所有内容,包括未发布的内容。
Click the ≣ (bars) icon in the upper-right corner, directly beneath the search bar to switch to list view.
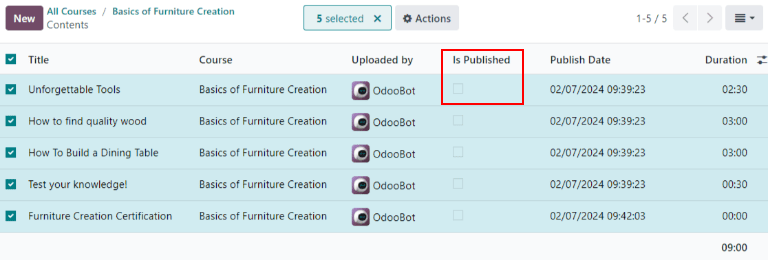
在列表视图中,屏幕最左侧、列出课程上方、:guilabel:`标题`列标题左侧有一个复选框。点击该复选框可一次性全选所有课程内容。
全选课程内容后,点击 :guilabel:`已发布`列中的任意复选框,系统将弹出确认窗口,提示是否确定发布所有选中内容。点击 :guilabel:`确认`即可自动发布全部课程资料。
