Helpdesk
Odoo Helpdesk is a ticketing-based customer support application. Multiple teams can be configured and managed in one dashboard, each with their own pipeline for tickets submitted by customers. Pipelines are organized in customizable stages that enable teams to track, prioritize, and solve customer issues quickly and efficiently.
สร้างทีม Helpdesk
To view or modify Helpdesk teams, go to . To create a new team, click the New button in the top-left of the dashboard.

ในฟอร์มทีม Helpdesk ว่าง ให้ใส่:guilabel:ชื่อ`สำหรับทีมใหม่ จากนั้นใส่คำอธิบายของทีมในฟิลด์ด้านล่างชื่อทีมหากต้องการ หากต้องการเปลี่ยนบริษัทที่ทีมนี้ได้รับมอบหมาย ให้เลือกจากเมนูแบบเลื่อนลง:guilabel:`บริษัท
Important
คำอธิบายทีมจะถูกเผยแพร่บน:doc:`ฟอร์มเว็บไซต์ <helpdesk/overview/receiving_tickets>`สาธารณะ ซึ่งลูกค้าและผู้ใช้พอร์ทัลส่งตั๋ว คำอธิบายที่รวมอยู่ในฟิลด์นี้**ไม่ควร**มีข้อมูลใดๆ ที่ใช้สำหรับภายในเท่านั้น

การมองเห็นและการมอบหมาย
การตั้งค่า*การมองเห็น*เปลี่ยนแปลงว่าผู้ใช้ภายในและผู้ใช้พอร์ทัลคนใดมีสิทธิ์เข้าถึงทีมนี้และตั๋วของทีม การตั้งค่า*การมอบหมาย*เปลี่ยนแปลงวิธีที่ผู้ใช้ได้รับมอบหมายให้จัดการตั๋วแต่ละใบ
กำหนดการมองเห็นทีม
ภายใต้ส่วน:guilabel:การมองเห็น ให้เลือกหนึ่งในตัวเลือกต่อไปนี้เพื่อกำหนดว่าใครสามารถดูทีมนี้และตั๋วของทีมได้:
ผู้ใช้ภายในที่ได้รับเชิญ (ส่วนตัว): ผู้ใช้ภายในสามารถเข้าถึงทีมและทิกเก็ตที่ตนกำลังติดตามได้ สิทธิ์การเข้าถึงนี้สามารถแก้ไขได้ในแต่ละทิกเก็ตโดยการเพิ่มหรือลบผู้ใช้ที่เป็นผู้ติดตาม ผู้ใช้ภายในจะถือว่าได้รับเชิญเมื่อเพิ่มพวกเขาเป็นผู้ติดตามทิกเก็ตรายบุคคลหรือ ทีมนั้นเอง
All internal users (company): all internal users can access the team and all of its tickets.
Invited portal users and all internal users (public): all internal users can access the team and all of its tickets. Portal users can only access the tickets they are following.
Example
ทีม Customer Support ที่มีไว้สำหรับจัดการปัญหาการจัดส่งและสินค้าทั่วไป จะตั้งค่าการมองเห็นเป็น ผู้ใช้พอร์ทัลที่ได้รับเชิญและผู้ใช้ภายในทั้งหมด
ในขณะเดียวกัน ทีม Financial Services ที่จัดการตั๋วที่เกี่ยวข้องกับระบบบัญชีหรือข้อมูลภาษี จะต้องมองเห็นได้เฉพาะ ผู้ใช้ภายในที่ได้รับเชิญ เท่านั้น
Warning
A team's visibility can be altered after the initial configuration. However, if the team changes from public access to either private or company-only access, portal users are removed as followers from both the team, and from individual tickets.
ติดตามตั๋วทั้งหมดของทีม
หากผู้ใช้ควรได้รับการแจ้งเตือนเกี่ยวกับการอัปเดตใดๆ เกี่ยวกับตั๋วสำหรับทีมนี้ ให้เลือกชื่อของพวกเขาจากเมนูแบบเลื่อนลง ผู้ติดตาม ที่อยู่ในฟิลด์ ติดตามตั๋วทั้งหมดของทีม สามารถเลือกผู้ใช้หลายคนเพื่อติดตามทีมเดียวได้
Important
รายชื่อผู้ติดต่อภายนอกสามารถเลือกได้ในฟิลด์ ผู้ติดตาม หากการมองเห็นของทีมตั้งค่าเป็น ผู้ใช้ภายในที่ได้รับเชิญ (ส่วนตัว) ผู้ติดตามจะได้รับการแจ้งเตือนเกี่ยวกับการอัปเดตตั๋วของทีม แต่**ไม่**สามารถดูได้ในพอร์ทัล
มอบหมายตั๋วใหม่โดยอัตโนมัติ
When tickets are received, they need to be assigned to a member of the team. This is done either manually on each ticket individually, or through Automatic Assignment. Check the Automatic Assignment checkbox to enable this feature for the team.
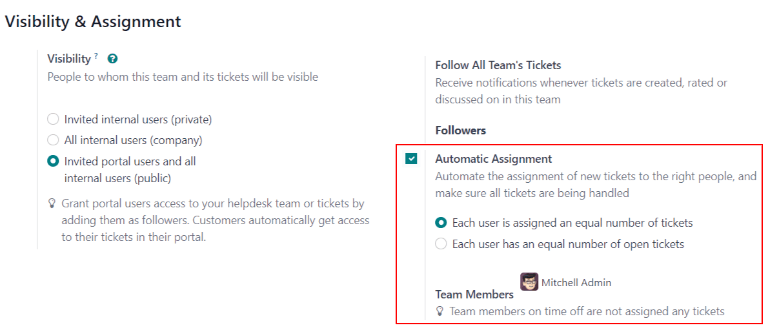
As soon as Automatic Assignment has been enabled, additional fields appear.
เลือกหนึ่งในวิธีการมอบหมายต่อไปนี้ ตามวิธีที่ภาระงานควรกระจายไปยังทีม:
Each user is assigned an equal number of tickets: tickets are assigned to team members based on total ticket count, regardless of the number of open or closed tickets they are currently assigned.
Each user has an equal number of open tickets: tickets are assigned to team members based on how many open tickets they are currently assigned.
Note
เมื่อเลือก แต่ละผู้ใช้ได้รับมอบหมายตั๋วจำนวนเท่ากัน จำนวนตั๋วโดยรวมที่มอบหมายให้สมาชิกของทีมจะเท่ากัน แต่**ไม่**คำนึงถึงภาระงานปัจจุบัน
เมื่อเลือก ผู้ใช้แต่ละรายมีจำนวนทิกเก็ตที่เปิดอยู่เท่ากัน จะช่วยรับประกันปริมาณงานที่สมดุลระหว่างสมาชิกในทีม เนื่องจากจะนำจำนวนทิกเก็ตที่ใช้งานอยู่ในปัจจุบันมาพิจารณาด้วย
Finally, add the Team Members who are to be assigned tickets for this team. Leave the field empty to include all employees who have the proper assignments and access rights configured in their user account settings.
Important
If an employee has time off scheduled in the Time Off application, they are not assigned tickets during that time. If no employees are available, the system looks ahead until there is a match.
ดูเพิ่มเติม
สร้างหรือแก้ไขขั้นตอน
Stages are used to organize the Helpdesk pipeline and track the progress of tickets. Stages are customizable, and can be renamed to fit the needs of each team.
Important
โหมดนักพัฒนา **ต้อง**เปิดใช้งานเพื่อเข้าถึงเมนูขั้นตอน เปิดใช้งานโหมดนักพัฒนาโดยไปที่ และคลิก Activate the developer mode
To view or modify Helpdesk stages, go to .
The default list view on the Stages page displays the stages currently available in Helpdesk. They are listed in the order they appear in the pipeline.
To change the order of the stages, click the (drag) icon, to the left of the stage name, and drag it to the desired place on the list.

Tip
Change the stage order on the Kanban view of a Helpdesk team's pipeline by dragging and dropping individual columns.
เพื่อสร้างขั้นตอนใหม่ คลิกปุ่ม New ที่มุมบนซ้ายของรายการขั้นตอน การทำเช่นนี้จะแสดงแบบฟอร์มขั้นตอนเปล่า
Choose a Name for the new stage, and add a description, if desired. Then, proceed to fill out the remaining fields following the steps below.

เพิ่มเทมเพลตอีเมลและ SMS ไปยังขั้นตอน
When an Email Template is added to a stage, an email is automatically sent to the customer when a ticket reaches that specific stage in the pipeline. Likewise, adding an SMS Template triggers an SMS text message to send to the customer.
Important
SMS Text Messaging is an In-App Purchase (IAP) service that requires prepaid credits to work. Refer to SMS Pricing FAQ for additional information.
To select an existing email template, select it from the Email Template field. Click on the (right arrow) icon to the right of the field to edit the chosen template.
To create a new template, click the field, and enter a title for the new template. Then, select Create and edit from the drop-down menu that appears, and complete the form details.
ทำตามขั้นตอนเดียวกันเพื่อเลือก แก้ไข หรือสร้าง:guilabel:เทมเพลต SMS

ดูเพิ่มเติม
กำหนดสเตจให้กับทีม
Make a selection in the Helpdesk Teams field on the Stages form. More than one team may be selected, since the same stage can be assigned to multiple teams.
พับขั้นตอน
By default, stages are unfolded in the Kanban view of either tickets dashboard: My Tickets () or All Tickets ().
Tickets in an unfolded stage are visible in the pipeline under the stage name, and are considered open.
Stages can be configured to be folded in the Kanban view of a tickets page (My Tickets or All Tickets).
The name of the folded stages are still visible, though the tickets in the stage are no longer immediately visible.
To fold a stage, check the Folded in Kanban box on the Stages form.
Warning
Tickets that reach a folded stage are considered closed. Closing a ticket before the work is completed can result in reporting and communication issues. This setting should only be enabled for stages that are considered closing stages.
Stages can be temporarily folded in the Kanban view of the tickets pipeline, as well.
View a specific team's pipeline by navigating to , and clicking the team's Kanban card.
Select a stage to fold temporarily, then click the (gear) icon, and select Fold from the drop-down menu.

Important
Manually folding a stage from the Kanban view is temporary and does not close the tickets in the stage.
Sloučení tiketů
If duplicate tickets are found in Helpdesk, they can be combined into a single ticket using the merge feature.
Important
Funkce sloučení je přístupná pouze v případě, že je v databázi nainstalována aplikace Čištění dat.
หากต้องการรวมทิกเก็ต 2 ใบขึ้นไป ให้ไปที่ ระบุทิกเก็ตที่จะรวม และทำเครื่องหมายที่ช่องทำเครื่องหมายที่ด้านซ้ายสุดของทิกเก็ตแต่ละใบเพื่อเลือก จากนั้น คลิกไอคอน ดำเนินการ และเลือก รวม จากเมนูแบบเลื่อนลง การดำเนินการดังกล่าวจะเปิดหน้าใหม่ซึ่งทิกเก็ตที่เลือกไว้จะแสดงรายการพร้อมกับการจัดอันดับ ความเหมือน จากที่นี่ ให้คลิก รวม เพื่อรวมทิกเก็ต หรือ ละทิ้ง
ดูเพิ่มเติม