โต๊ะลงทะเบียน
Use the Registration Desk feature in Odoo Events to grant access to registered event attendees as they arrive, and store attendee-related data in the reporting metrics.
Registration Desk page
On a mobile device (on the Odoo app or in a browser), open the , and click the Registration Desk to view the Registration Desk page.

ที่ด้านล่างของกล่อง โต๊ะลงทะเบียน จะมีตัวเลือกให้เลือก สแกนบัตร หรือ เลือกผู้เข้าร่วม
สแกนเหรียญรางวัล
สแกนรหัสที่ปรากฏบนบัตรของผู้เข้าร่วมงาน โดยไปที่ และเลือกตัวเลือก สแกนบัตร
Important
Odoo ต้อง ได้รับสิทธิ์ในการเข้าถึงกล้องที่ใช้เพื่อให้ตัวเลือก สแกนบัตร ทำงานได้
Once Odoo has access to the camera, a Barcode Scanner pop-up window appears, showing the camera's point-of-view. There is also a specified view finder box present, whose size can be manually modified, accordingly, using the (crop) icon.
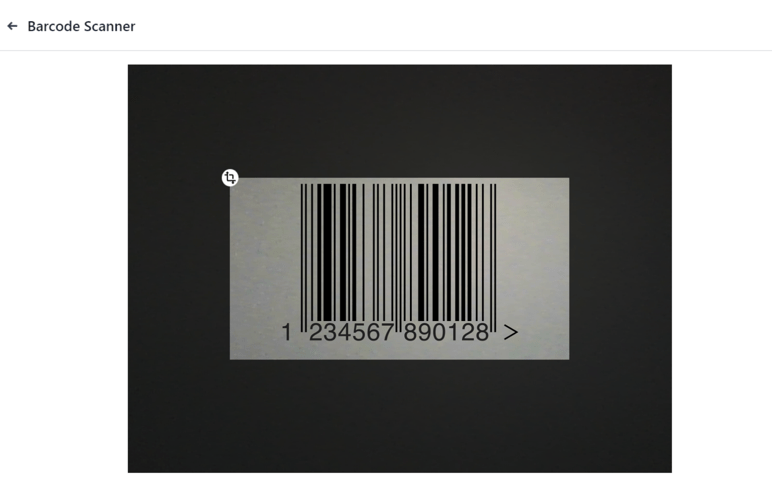
เมื่อรหัสบัตรอยู่ตรงกลางช่องมองภาพ รหัสจะถูกสแกน หน้าต่างป๊อปอัป เครื่องสแกนบาร์โค้ด จะหายไป และผู้เข้าร่วมจะได้รับสิทธิ์เข้าร่วมงาน เมื่อสแกนรหัสแล้ว การเข้าร่วมจะถูกบันทึกลงในแอป Odoo กิจกรรม
If the barcode being scanned is invalid, an error pop-up message appears in the upper-right corner.
Select attendee
Manually grant access to event attendees, by navigating to , and selecting the Select Attendee option.
Odoo reveals an Attendees page, with all the attendees for every event in the database, in a default Kanban view.

On the Attendees page, each attendee card displays that person's name, which event they are registered to attend, their associated company (if applicable), what ticket tier they purchased (if applicable), along with two buttons: a (checkmark) and (counter-clockwise arrow).
To grant access to a person, marking them as attended, click the (checkmark) button on that attendee's card.
Click the (counter-clockwise arrow) button on an attendee's card to undo the previous action.
Tip
It is recommended to use an event-specific filter on the Attendees page, via the search bar drop-down menu.
To do that, click the (down arrow) beside the seach bar to reveal a drop-down menu with Filters, Group By, and Favorites options.
For example, click the Event option, in the Group By column. Then, click away to remove the drop-down menu. Odoo reveals the Attendees page with event-specific columns, allowing users to locate specific event attendees.