ปิดตั๋ว
Once work has been completed on a Helpdesk ticket in Odoo, there are several ways it can be closed.
In addition to manually closing solved tickets, automatically closing inactive tickets keeps the pipeline up-to-date. At the same time, allowing customers to close their own tickets minimizes confusion around whether an issue is considered solved or not. This results in increased operational capacity for support teams, and higher customer satisfaction.
ปิดตั๋วที่แก้ไขแล้วด้วยตนเอง
As work on a ticket progresses, it is moved along to the next stage in the pipeline. Once the issue is solved, the ticket is moved to a folded stage. This marks the ticket as closed.
To fold a stage, navigate to the app dashboard, and click on a team to open the to reveal that team's pipeline on a separate page.
From the pipeline page, hover over a stage's heading, and click the ⚙️ (gear) icon that appears in the top-right corner of that stage's Kanban column.

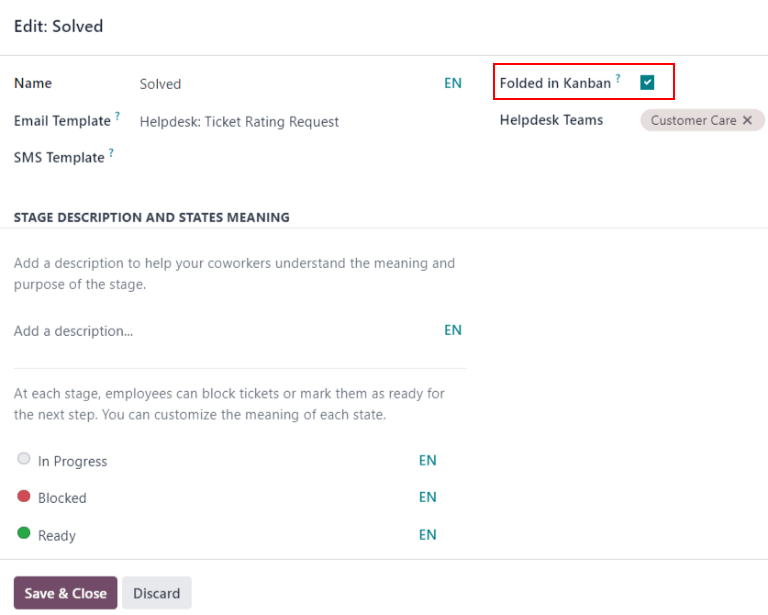
From the menu that appears, select Edit. This opens the stage's settings in a pop-up window.
In the pop-up window, check the box labeled, Folded in Kanban, towards the top of the window. Then, click Save & Close to confirm the changes.
Tickets that reach this stage are now considered: closed.
Warning
การคลิกไอคอน ⚙️ (เกียร์) จะแสดงตัวเลือกในการ พับ พื้นที่งานด้วย การตั้งค่านี้จะพับพื้นที่งาน ชั่วคราว เพื่อทำให้มุมมองคัมบังนั้นอ่านง่ายขึ้น สิ่งนี้ ไม่ ปิดทิกเก็ตในขั้นตอนนี้ นอกจากนี้ยัง ไม่ พับ-ขั้นตอนอย่างถาวรอีกด้วย หากขั้นตอนจำเป็นต้องพับ เพื่อให้สามารถทำเครื่องหมายทิกเก็ตเป็น ปิด ได้ กล่องกาเครื่องหมาย พับในคัมบัง ต้อง ถูกเลือกในการตั้งค่าของขั้นตอน
ปิดตั๋วที่ไม่มีการใช้งานโดยอัตโนมัติ
ตั๋วที่ไม่มีการใช้งานเป็นระยะเวลาหนึ่งสามารถปิดโดยอัตโนมัติได้ ณ จุดนั้น จะถูกย้ายไปยังขั้นตอนที่พับ
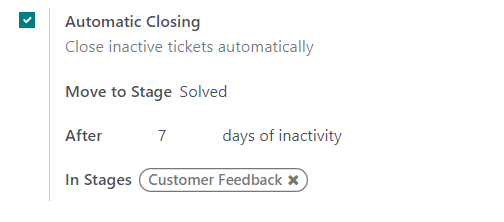
To have Odoo automatically close inactive tickets, go to the desired team's settings page, by navigating to , and selecting the desired team to configure. Under the Self-Service section, enable Automatic Closing.
After ticking the box for Automatic Closing, three new fields appear beneath:
Move to Stage
After (#) days of inactivity
In Stages
หากตั้งค่าให้พับขั้นตอนใดขั้นตอนหนึ่งของทีมในมุมมอง คัมบัง ขั้นตอนที่พับไว้จะเป็นการเลือกเริ่มต้นในฟิลด์ ย้ายไปที่ขั้นตอน หากทีมมีขั้นตอนที่พับไว้มากกว่าหนึ่งขั้นตอน ขั้นตอนที่พับไว้ซึ่งเกิดขึ้นในขั้นตอนแรกในไปป์ไลน์จะเป็นค่าเริ่มต้น หากไม่มีขั้นตอนใดถูกพับไว้ การเลือกเริ่มต้นจะเป็นขั้นตอนสุดท้ายในไปป์ไลน์
The After (#) days of inactivity field defaults to 7, but can be adjusted if
necessary.
Warning
The After (#) days of inactivity field does not take the working calendar into account when tracking the amount of time a ticket has been inactive.
หากมีเฉพาะบางขั้นตอนเท่านั้นที่ควรใช้เพื่อติดตามวันที่ไม่มีการใช้งาน สามารถเพิ่มลงในฟิลด์ ในขั้นตอน ได้
Example
ไปป์ไลน์ของทีมถูกสร้างขึ้นด้วยขั้นตอนต่อไปนี้:
ใหม่กำลังดำเนินการข้อเสนอแนะจากลูกค้าปิดแล้ว
Tickets may linger in the Customer Feedback stage, because once an issue is solved, customers may not respond immediately. At that point, the tickets can be closed automatically.
Tickets in the New and In Progress stages could remain inactive due to assignment or workload issues. The support team may be looking into the issue even if they are not updating the ticket directly. Closing these tickets automatically would result in issues going unsolved.
Therefore, the Automatic Closing settings for this team would be configured as below:
ปิดอัตโนมัติ: เลือก
ย้ายไปยังขั้นตอน:
แก้ไขแล้วหลังจาก
7วันของความไม่เคลื่อนไหวในขั้นตอน:
ข้อเสนอแนะจากลูกค้า
อนุญาตให้ลูกค้าปิดตั๋วของตนเอง
การเปิดใช้งานการตั้งค่า การปิดโดยลูกค้า ช่วยให้ลูกค้าสามารถปิดตั๋วของตนเองได้เมื่อพวกเขาพิจารณาว่าปัญหาของพวกเขาได้รับการแก้ไขแล้ว
To allow customers to close their own tickets, start by navigating to , and click on a team to open the team's settings page. Next, scroll to the Self-Service section, and check the box for Closure by Customers.

Once the ticket closing settings are enabled, a Close Ticket button is available for customers when they view their ticket through the customer portal.

Note
ลูกค้าสามารถดูทิกเก็ตได้โดยคลิกลิงก์ ดูทิกเก็ต ที่ได้รับทางอีเมล ลิงก์ดังกล่าวจะรวมอยู่ในเทมเพลต Helpdesk: ได้รับทิกเก็ตแล้ว ซึ่งจะถูกเพิ่มในขั้นตอนแรกของทีมตามค่าเริ่มต้น ลิงก์นี้ ไม่ต้องการ ให้ลูกค้าเข้าถึงพอร์ทัลเพื่อดูหรือตอบกลับทิกเก็ต
Customers with access to the portal can view their tickets under .